openSUSE Leap 15.6 安裝小記

openSUSE Leap 15.5 Lifetime 到 2024/12
15.6 可以撐到 2025/12
過了一年又到升級的時候 :)
安裝前處理
使用 imagewriter 建立 openSUSE 安裝USB
整理 /home/sakana 目錄
使用 du -h --max-depth=1 /home/sakana 檢查
清掉不要的檔案, 特別是 ~/.cache , ~/.config 內兩大瀏覽器內有佔很大空間的 cache ( 這次只清掉部分 )
因為有很多相關的 config 在個人家目錄內, 所以先把舊的 openSUSE Leap 15.5 的 /home 目錄, 打包到隨身碟的目錄中
使用# tar cvf home.tar /home 進行打包到隨身碟 ( 不要使用 .gz 方式, 會比較快速 )( 在隨身碟的目錄中 )
如果剛剛的光碟 ISO 放在下載目錄, 記得刪除來節省空間
新機器再使用 tar 指令還原回來
這次先在 console F1 以 root 使用者,
使用 tar 指令解壓縮 home.tar 到隨身碟目錄
刪除 /home/sakana 目錄, 將解壓縮的檔案直接移動過去
這次也是使用 USB 來進行安裝
== 安裝過程小記==
這次建立的時候我還是選擇 GNOME 桌面
磁碟區分割的部分, 使用引導的方式安裝
刪除所有分割區
建立獨立分割區 XFS
根目錄取消 Btrfs 快照
===============
Network Manager:
openSUSE Leap 15.6 預設為 Network Manager
Google Chrome:128
https://www.google.com/intl/zh-TW/chrome/browser/
還是會有驗證性問題, 但是功能沒有差異
為了進行google 登入,先使用 Google 驗證App, 後面來處理yubikey
有遇到 舊版 chrome 鎖定問題, 我將 ~/.config/google-chrome 刪除解決
重開機又遇到一次, 因為我改了 hostname, 發先解決方法可以到 ~/.config/google-chrome 目錄下將 SingletonLock 與 SingletonCookie 刪除好像就解掉了
home 資料回復:
因為有很多相關的 config 在個人家目錄內, 所以先把舊的 openSUSE Leap 15.0 的 /home 目錄, 使用# tar cvf home.tar /home 進行打包到隨身碟 ( 不要使用 .gz 方式, 會比較快速 )
新機器再使用 tar 指令還原回來
這次先在 console F1 以 root 使用者,
使用 tar 指令解壓縮 home.tar 到隨身碟目錄
刪除 /home/sakana 目錄, 將解壓縮的檔案直接移動過去
Notes
Ifconfig 預設沒有安裝, 要使用 ip address show
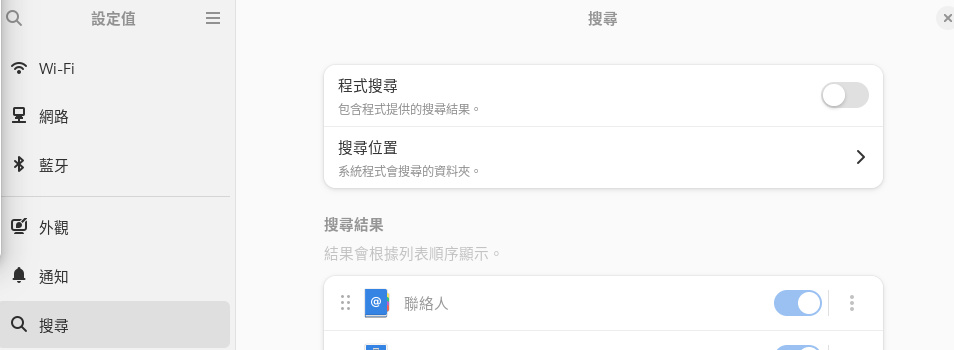
關閉GNOME裡面的搜尋功能預設關閉 (點選右上角的設定按鈕), 因為我覺得用不到
中文輸入法問題:
輸入法的部分, 要手動加入想要的輸入法
預設切換的方式爲 Super Key + 空白鍵
我修改爲 Ctrl + 空白鍵, 在設定的 鍵盤 -- > 檢視與自訂快速鍵 -- > 輸入 修改

螢幕截圖問題:
之前可以用 Ctrl + Print 擷取部分視窗
目前是用 Print 按鍵呼叫相關功能之後擷取, 之後來找快速鍵
取消 USB 為安裝來源:
# yast2 repositories
Snapd:2.63
因有些軟體可能會透過 snap 來安裝
安裝方式紀錄
# zypper addrepo --refresh https://download.opensuse.org/repositories/system:/snappy/openSUSE_Leap_15.6 snappy
# zypper --gpg-auto-import-keys refresh
# zypper dup --from snappy
# zypper install snapd
Additional rpm output:
Please reboot, logout/login or source /etc/profile to have /snap/bin added to PATH.
On a Tumbleweed and Leap 15.3+ systems you need to run: systemctl enable snapd.apparmor.service
可以重開機, 登出登入, 讓 路徑變數內有 /snap/bin 這個路徑
在 X 11 下就是開一個新的終端機切換為 root, 檢查 $PATH
建議使用重開機的方式
# systemctl enable snapd
# systemctl start snapd
# systemctl enable snapd.apparmor
# systemctl start snapd.apparmor
如果安裝應用程式, 要重開機才會找的到
freeplane: 1.10.5
因為 Freemind 已經不再維護, 找了好久找到他的替代
使用 snap 來進行安裝
# snap install freeplane-mindmapping
因為使用社群維護的 .ymp 有問題然後太多 SLES 的 repo, 我也不喜歡
將.mm 的檔案指定用 freeplane 開啟
xmind in snap - 無法開啟 .mm 檔案所以放棄
然後可以參考黑暗執行緒的文章 https://blog.darkthread.net/blog/freeplane/
Firefox Sync:
登入 Firefox Sync, 會處理之前有下載的 Plugin
Telegram desktop:
使用 Web 的方式來使用 Telegram
hostname更改 :
之前是用# yast2 lan 的方式更改 hostname, 但是現在 NetworkManager 控制網路就比較麻煩
觀察
# hostnamectl
設定 hostname
# hostnamectl set-hostname opensuse156
觀察
# hostnamectl
Skype:
使用網頁版的 Skype 不另外安裝
GNOME Extension:
最後我使用 flatpak 搞定 GNOME Extension
openSUSE Leap 15.6 預設有裝 flatpak
安裝完成之後, 應用程式就有擴充套件可以執行與設定
不須要裝 chrome extension
之前的調校小記
然後到 https://extensions.gnome.org/
選想裝的 Extension, 調爲 on 就好
裝了
NetSpeed
RunCat
IP Finder
Tray Icons: Reloaded (這個我暫時停用 - 因為登入會產生問題)
.7z 支援:
預設 openSUSE Leap 15.6 就有裝 7zip 套件
imagewriter:
# zypper install imagewriter
用來製作開機 USB
rdesktop 安裝與測試:
#zypper install freerdp
執行方式
#xfreerdp -g 1280x1024 -u administrator HOST_IP
修改 LS_OPTIONS 變數
# vi /etc/profile.d/ls.bash
把 root 的 LS_OPTIONS 的 -A 移除
修改 HISTSIZE 變數
# vi /etc/profile
修改 HISTSIZE 的筆數
ansible 安裝: 2.16.5
#zypper install ansible
因為相依性的關係會裝 python 3.11
python3.11 安裝:
系統預設是裝 python3.6
但是 python 3.6 已經 EOL
Python 3.11 於 2024/4/1 End Active Support, 但是 Security Support 到 2027/10/31
目前是 python 3.12 Active Support
但是 ansible 目前是裝 3.11 , 然後還在 Security Suport 內, 就先不換 3.12
剛剛安裝 ansible 會順道安裝 python3.11
觀察目前的設定
# ls -l /usr/bin/python3
lrwxrwxrwx 1 root root 9 Apr 9 17:42 /usr/bin/python3 -> python3.6
參考網路上的文章
https://linuxconfig.org/how-to-change-from-default-to-alternative-python-version-on-debian-linux
使用 update-alternatives 指令來調整系統設定
目前沒有相關設定
# update-alternatives --list python
update-alternatives: error: no alternatives for python
將 python 3.6 加入
# update-alternatives --install /usr/bin/python3 python /usr/bin/python3.6 1
update-alternatives: using /usr/bin/python3.6 to provide /usr/bin/python3 (python) in auto mode
將 python 3.11 加入, 優先性設定爲 2 比上一個高
# update-alternatives --install /usr/bin/python3 python /usr/bin/python3.11 2
update-alternatives: using /usr/bin/python3.11 to provide /usr/bin/python3 (python) in auto mode
觀察相關設定
# update-alternatives --list python
/usr/bin/python3.11
/usr/bin/python3.6
檢視目前 python 的版本設定
# python3 --version
Python 3.11.9
這個時候可以發現已經從 python3.6 換成 python3.11
再次觀察
# ls -l /usr/bin/python3
lrwxrwxrwx 1 root root 24 Sep 4 18:31 /usr/bin/python3 -> /etc/alternatives/python
這邊可以發現由剛剛指定 python3.6 換成會去參考 alternatives
Dropbox 206.4.6506 版 :
openSUSE Leap 15.6 預設不支援 dropbox
參考官方網站上面斷頭的安裝方式來安裝
> cd ~ && wget -O - "https://www.dropbox.com/download?plat=lnx.x86_64" | tar xzf -
接下來,請從新建立的 .dropbox-dist 資料夾執行 Dropbox 精靈。
> ~/.dropbox-dist/dropboxd
順便安裝 Nautilus 相關套件
# zypper install nautilus-extension-dropbox
AWS Cli 安裝: 2.17.42
安裝參考
# curl "https://awscli.amazonaws.com/awscli-exe-linux-x86_64.zip" -o "awscliv2.zip"
# unzip awscliv2.zip
# ./aws/install
# aws --version
aws-cli/2.17.42 Python/3.11.9 Linux/6.4.0-150600.21-default exe/x86_64.opensuse.15
將補齊的指令 寫到或是修改到個人家目錄的 .bashrc 內
echo "complete -C '/usr/local/bin/aws_completer' aws" >> /root/.bashrc
Google Cloud SDK ( gcloud )安裝: 490
參考 https://cloud.google.com/sdk/docs/install-sdk 安裝 gcloud
看看目前最新的版本號
也可以使用容器的方式來執行
使用一般使用者安裝
> wget https://dl.google.com/dl/cloudsdk/channels/rapid/downloads/google-cloud-sdk-490.0.0-linux-x86_64.tar.gz
> tar zxvf google-cloud-sdk-490.0.0-linux-x86_64.tar.gz
可以考慮解壓縮前, 如果家目錄有 google-cloud-sdk 目錄先移除
> ./google-cloud-sdk/install.sh
透過 gcloud 安裝 kubectl
> gcloud components install kubectl
確認版本
> kubectl version --client
新增 Packman 套件庫:
使用 #yast2 repositories 加入社群版本的Packman
#yast2 repositories
Packman 這次無法從社群套件庫內直接加入, 所以我用 URL 手動加入
nVidia 套件庫 - 之後再來加
播放器:
Codecs 的部分參考網路上找到的
# zypper install opi
# opi codecs
這邊會裝 ffmpeg-4 以及一堆套件
之後就可以使用播放器看 .mp4
Visual Studio Core 相關 :
安裝 git
# zypper install git
參考
http://sakananote2.blogspot.com/2019/01/visual-studio-code-with-opensuse-leap-15.html
https://code.visualstudio.com/docs/setup/linux#_opensuse-and-slebased-distributions
安裝 vscode
Leap 15.6 現在可以直接透過 zypper ar 方式新增 repo
因為是 openSUSE 包的, 目前看到是 account 那邊只有看到 Github account, 沒有看到 Microsoft Account, 這個可以列為考量 (openSUSE provides free-as-in-freedom binaries of Code in a development repository. It does not include Microsoft branding and ships a configuration enabling the Open VSX extension store by default.)
我後來還是用 Microsoft 那個版本
# rpm --import https://packages.microsoft.com/keys/microsoft.asc
# sh -c ' echo -e "[code]\nname=Visual Studio Code\nbaseurl=https://packages.microsoft.com/yumrepos/vscode\nenabled=1\ntype=rpm-md\ngpgcheck=1\ngpgkey=https://packages.microsoft.com/keys/microsoft.asc" > /etc/zypp/repos.d/vscode.repo '
# zypper refresh
# zypper install code
# yast2 repositories
將 vscode 的 autorefresh 啟動
安裝 vscode extension
這次沒有作, 因為將舊的 /home 還原回來, 另外目前 vscode 也有同步機制
AWS Toolkit for Visual Studio Code
Bracket Pair Colorizer
Git Graph
GitHub Pull Requests
GitLens
Kubernetes
Python
REST Client
GitHub Pull Requests and Issues
Docker 安裝: 25.0.6
#zypper install docker
將使用者 sakana 加入 docker 群組
# usermod -a -G docker sakana
#systemctl start docker
#systemctl enable docker
helm 安裝: 3.13.3
#zypper install helm
# helm version
PPPoE 設定:
目前光世代有配一個固定 IP
之前參考 http://sakananote2.blogspot.com/2021/05/nmcli-network-manager-pppoe-ip.html
設定 PPPoE 以及固定 IP
現在使用 IP 分享器 + 有線網路連接光世代取得固定 IP, 然後使用無線 SSID 分享使用
這個版本沒有安裝的, 以後要安裝就看之前的筆記
http://sakananote2.blogspot.com/2019/08/opensuse-leap-151.html
Sqlitebrowser
VMware workstation Pro 15
Nextcloud client 安裝, crontab 設定
PDF Viewer - Foxit:
hexchat
youtube-dl
Yubico Key ( 現在 google 已經可以直接手機驗證 )
smartgit 安裝 ( 現在使用 vscode )
PPSSPP ( 沒時間 …. )
flash-player (應該沒有人用了吧)
podman (之前都還沒用到)
Filezilla
Azure-cli 安裝 (MS 已經不維護)
這樣又可以再戰一年 :p
~ enjoy it
參考
https://sakananote2.blogspot.com/2023/09/opensuse-leap-155.html
http://sakananote2.blogspot.com/2022/10/opensuse-leap-154.html
https://sakananote2.blogspot.com/2021/11/opensuse-leap-153.html
http://sakananote2.blogspot.com/2020/08/opensuse-leap-152.html
http://sakananote2.blogspot.com/2019/08/opensuse-leap-151.html
http://sakananote2.blogspot.com/2019/01/opensuse-leap-15-2.html
http://sakananote2.blogspot.com/2017/11/opensuse-leap-423.html
http://sakananote2.blogspot.tw/2017/07/opensuse-leap-423-beta.html
http://sakananote2.blogspot.tw/2016/11/opensuse-leap-422.html
http://sakananote2.blogspot.tw/2016/12/opensuse-leap422-gnomeextension.html
http://sakananote2.blogspot.com/2018/07/kubernetes-in-azure-with-opensuse-leap.html
http://sakananote2.blogspot.com/2019/01/visual-studio-code-with-opensuse-leap-15.html
http://sakananote2.blogspot.com/2019/03/aws-cli-with-opensuse-leap-15.html
沒有留言:
張貼留言