Pulse Secure Linux client with openSUSE Leap 15.5 安裝小記

OS: openSUSE Leap 15.5
Pulse Secure: 9.1
公司的 SSLVPN 用的是 Pulse Secure, 但是 openSUSE Leap 的參考文章相對少
今天就寫相關的安裝方式
參考台大的文章還有廠商的文章
取得套件 RPM
# wget https://ccnet.ntu.edu.tw/vpn/Download/ps-pulse-linux-9.1r15.0-b15819-64bit-installer.rpm
先嘗試安裝
# rpm -ivh ps-pulse-linux-9.1r15.0-b15819-64bit-installer.rpm
error: Failed dependencies:
gtkmm30 >= 3.22.2 is needed by pulsesecure-2:9.1-R15.x86_64
libbsd is needed by pulsesecure-2:9.1-R15.x86_64
libcurl >= 7.29.0 is needed by pulsesecure-2:9.1-R15.x86_64
nss-tools is needed by pulsesecure-2:9.1-R15.x86_64
webkit2gtk3 >= 2.24.4 is needed by pulsesecure-2:9.1-R15.x86_64
直接安裝會遇到相依性的問題
安裝 mozilla-nss-tools
# zypper install mozilla-nss-tools
The following NEW package is going to be installed:
mozilla-nss-tools
1 new package to install.
Overall download size: 557.8 KiB. Already cached: 0 B. After the operation, additional 2.1 MiB will be
used.
Continue? [y/n/v/...? shows all options] (y):y
新增一個 repo
# zypper addrepo https://download.opensuse.org/repositories/server:mail/openSUSE_Tumbleweed/server:mail.repo
更新 repo, 並信任相關 Key
# zypper refresh
安裝 glibc 套件
# zypper install glibc
Loading repository data...
Reading installed packages...
Resolving package dependencies...
The following package is going to be upgraded:
glibc
1 package to upgrade.
Overall download size: 1.7 MiB. Already cached: 0 B. No additional space will be used or freed after the
operation.
Continue? [y/n/v/...? shows all options] (y): y
Leap 15.5 可以直接安裝
安裝 pulse secure 套件
# zypper install ps-pulse-linux-9.1r15.0-b15819-64bit-installer.rpm
Loading repository data...
Reading installed packages...
Resolving package dependencies...
Problem: nothing provides 'libbsd' needed by the to be installed pulsesecure-2:9.1-R15.x86_64
Solution 1: do not install pulsesecure-2:9.1-R15.x86_64
Solution 2: break pulsesecure-2:9.1-R15.x86_64 by ignoring some of its dependencies
Choose from above solutions by number or cancel [1/2/c/d/?] (c): 2
Resolving dependencies...
Resolving package dependencies...
The following 2 NEW packages are going to be installed:
libXss1 pulsesecure
1 new package to install.
Overall download size: 10.3 MiB. Already cached: 0 B. After the operation, additional 29.6 MiB will be
used.
Continue? [y/n/v/...? shows all options] (y): y
Retrieving: pulsesecure-2:9.1-R15.x86_64 (Plain RPM files cache) (1/1), 10.3 MiB
ps-pulse-linux-9.1r15.0-b15819-64bit-installer.rpm:
Package header is not signed!
pulsesecure-2:9.1-R15.x86_64 (Plain RPM files cache): Signature verification failed [6-File is unsigned]
Abort, retry, ignore? [a/r/i] (a): i
這邊使用方案 2 , 忽略相依性的方式來進行安裝, 並忽略簽章問題
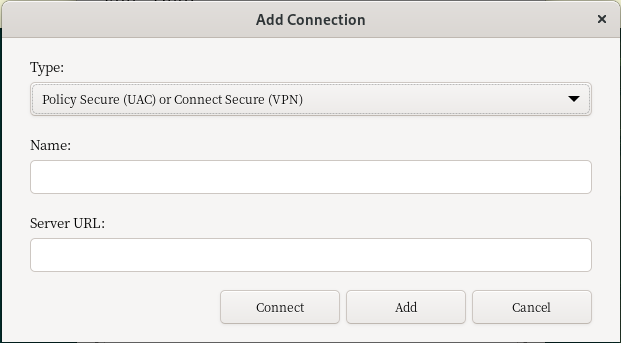
安裝完畢就可以找到圖形介面的程式

點選 新增的 + 按鈕
輸入 名稱與 Server URL
點選 Connect 就可以進行連線
同場加映, 文字介面連線方式
建立憑證存放資料夾
# mkdir -p /etc/pki/ca-trust/extracted/openssl
建立檔案
# touch /etc/pki/ca-trust/extracted/openssl/ca-bundle.trust.crt
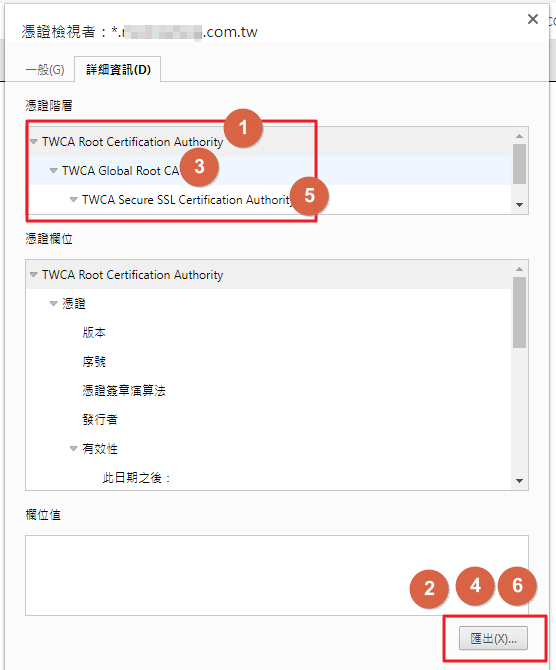
使用 Brave 瀏覽器開啟之後要存取的網址, 例如 https://YOUR_SERVER_URL
點選 鎖頭 -- > 點選 憑證有效的另開視窗

點選 詳細資訊

將 3 個憑證全部匯出
將憑證放入
# cat /home/sakanamax/Builtin\ Object\ Token_TWCA\ Global\ Root\ CA > /etc/pki/ca-trust/extracted/openssl/ca-bundle.trust.crt
# cat /home/sakanamax/TWCA\ Secure\ SSL\ Certification\ Authority >> /etc/pki/ca-trust/extracted/openssl/ca-bundle.trust.crt
# cat /home/sakanamax/_.YOURS.com.tw >> /etc/pki/ca-trust/extracted/openssl/ca-bundle.trust.crt
公司憑證名稱記得換成自己的
進行連線
# /opt/pulsesecure/bin/pulselauncher -U https://YOUR_SERVER_URL -u YOUR_USER
實務上測試用一般使用者可以連線
輸入User Realm:
輸入密碼
這樣之後就可以用 Pulse Secure 進行 SSLVPN 連線了
~ enjoy it
Reference