星期日, 8月 18, 2019

openSUSE Leap 15.1 安裝小記

openSUSE Leap 15.1 安裝小記

openSUSE Leap 15.0 Lifetime 到 2019/11 

所以在處理完 COSCUP 議程之後, 就可以動手來安裝 openSUSE Leap 15.1 到我的桌機了

這次也是使用 USB 來進行安裝,  

== 安裝過程小記==

這次建立的時候我還是選擇 GNOME 桌面

磁碟區分割的部分, 使用 進階磁碟分割程式
  • / 大小為 60GB, 一樣使用 btrfs, 但是取消勾選”啟用快照”
  • swap 大小為 16GB
  • /boot/efi, 大小為 1GB, 使用 fat
  • /home 大小為剩下的所有空間(126 GB ), 使用 xfs ( 如果有勾選 )

安裝的內容, 我這次是全新安裝, 
  • 有鑒於之前 flatpak 的 bug 還有 snapper 佔用空間, 這次把 / 大小調整為 60GB, 然後取消啟用快照

===============

Network Manager:

#yast2  lan
更該預設為 Network Manager


Google Chrome:

還是會有驗證性問題, 但是功能沒有差異
為了進行google 登入,先使用 Google 驗證App,  後面來處理yubikey

home 資料回覆:

因為有很多相關的 config 在個人家目錄內, 所以先把舊的 openSUSE Leap 15.0 的 /home 目錄, 使用# tar    cvf home.tar /home 進行打包到隨身碟 ( 不要使用 .gz 方式, 會比較快速 )
新機器再使用 tar 指令還原回來

Notes
  • Ifconfig 預設沒有安裝, 要使用 ip  address show

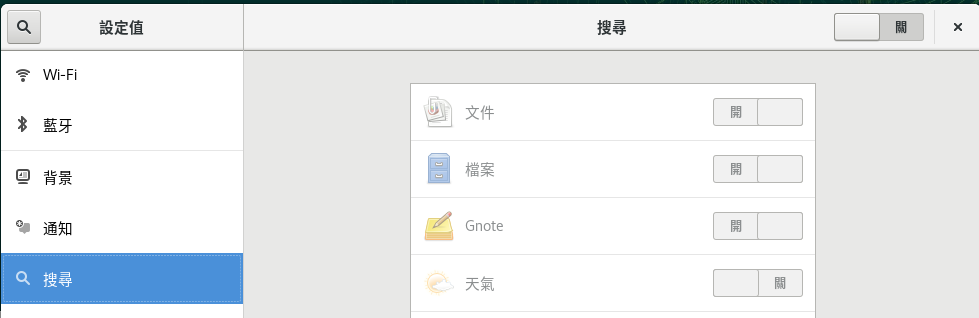
關閉GNOME裡面的搜尋功能(點選右上角的設定按鈕), 因為我覺得用不到

中文輸入法問題:

在系統內新增中文輸入法, 目前使用 ibus
  • system_key( windows ) + 空白鍵 切換輸入法


取消 USB 為安裝來源
# yast2  repositories 


Freemind:
使用one click install 安裝 http://software.opensuse.org/package/freemind 
我是使用 editors 那個來源的 ymp 檔案安裝

.mm 的檔案指定用 freemind  開啟


新增 Packman 套件庫:

使用 #yast2  repositories 加入社群版本的Packman 

#yast2  repositories

Firefox Sync:
登入 Firefox Sync, 會處理之前有下載的 Plugin

flash-player:
# zypper   install flash-player


播放器:

# zypper  install   vlc vlc-codecs

  • Mp4 codec 應該是要安裝 vlc-codecs,  需要 Packman 套件庫

並將 .rmvb 以及 .mp4 預設播放器設定為  VLC

安裝  ffmpeg ( 會把提供者從 openSUSE 換成 Packman )
# zypper  install ffmpeg

這樣的好處是使用 youtube-dl  可以轉換 mp3 格式


透過 youtube-dl  -F 來觀察可以下載的格式

# zypper  install youtube-dl

> youtube-dl  -F  http://www.youtube.com/watch?v=13eLHrDcb1k
[youtube] Setting language
[youtube] 13eLHrDcb1k: Downloading video webpage
[youtube] 13eLHrDcb1k: Downloading video info webpage
[youtube] 13eLHrDcb1k: Extracting video information
Available formats:
22 : mp4 [720x1280]
18 : mp4 [360x640]
43 : webm [360x640]
5 : flv [240x400]
17 : mp4 [144x176]

指定要下載的格式進行下載 (請注意 -f 是小寫)

> youtube-dl  -f  22  http://www.youtube.com/watch?v=13eLHrDcb1k

下載為 mp3
首先要安裝 ffmpeg 套件

>youtube-dl    http://www.youtube.com/watch?v=13eLHrDcb1k --extract-audio --audio-format mp3

PDF Viewer 安裝:
Foxit
  • 下載軟體的 .tar.gz 然後以  root 安裝

Skype:
目前的版本是 8.51.0.72 的版本


下載 RPM 版本用軟體安裝就裝好了 :)

使用 #yast2 sound 調整音效


GNOME Extension:

參考調校小記

> gnome-tweak-tool
裝了
  • TopIcons
  • NetSpeed


Dropbox:

目前版本 2.10.0
使用 # zypper install dropbox 來安裝

安裝完之後在終端機下 dropbox  start -i 來安裝

裝好之後才發現, 現在 linux 又支援 XFS …..

修改 LS_OPTIONS 變數
# vi   /etc/profile.d/ls.bash
把 root 的 LS_OPTIONS 的 -A 移除

.7z 支援:
# zypper  install p7zip

imagewriter:
# zypper  install imagewriter
用來製作開機 USB

hexchat:
# zypper  install hexchat

rdesktop 安裝與測試:
#zypper  install freerdp

執行方式
#xfreerdp  -g 1280x1024  -u administrator  HOST_IP

Yubico Key:
如果 linux 沒有抓到 Yubico 的 U2F Key可以使用以下步驟
讓 linux 支援 Yubico , 我是參考 https://www.yubico.com/faq/enable-u2f-linux/  
作法
存到 /etc/udev/rules.d/70-u2f.rules
將 linux 重開機, 接下來就可以使用了 :-)

ansible 安裝:

目前版本 2.8.1
#zypper  install ansible

Docker 安裝:

目前版本 18.09.6-ce
#zypper  install  docker

將使用者 sakana  加入 docker 群組 

#systemctl  start  docker
#systemctl  enable   docker


VMware workstation Pro 15:

安裝 kernel-default-devel  
# zypper   install   kernel-default-devel kernel-source
# ./VMware-Workstation-Full-15.1.0-13591040.x86_64.bundle

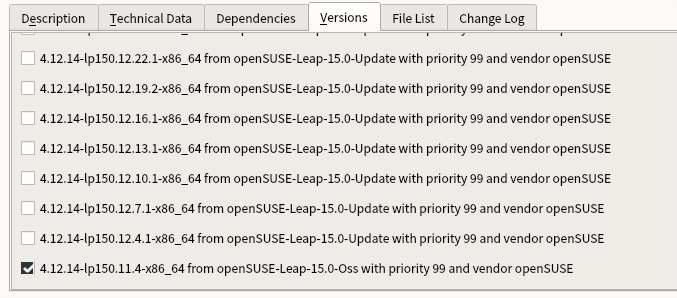
如果啟動的時候出現找不到 Kernel Header
# yast2  sw_single
點選 kernel-default-devel 套件, 點選 Versions 分頁, 勾選適當的 kernel 版本

取消 “Enable virtual machine sharing and remote access

2017-11-13 20-45-20 的螢幕擷圖.png


smartgit 安裝:

下載 smartgit-linux-19_1_1.tar.gz

解壓縮到 /opt
# tar  zxvf   smartgit-linux-19_*.tar.gz  -C   /opt/

建立 link 讓一般使用者也能使用
# ln  -s   /opt/smartgit/bin/smartgit.sh   /usr/local/bin/smartgit

安裝 git
# zypper  install  git

建立 個人的 ssh key ( 這次沒有作, 因為將舊的 /home 還原回來 )
> ssh-keygen  -t dsa

將 ssh 的公鑰 id_dsa.pub 新增到 Github 的 Settings -- >  SSH and GPG Keys ( 這次沒有作, 因為將舊的 /home 還原回來 )

接下來就是以一般使用者的身份執行 smartgit 指令
> smartgit

這次沒有發生 一般使用者發生找不到 jre 路徑

解法, 目前是在 ~/.smartgit/smartgit.vmoptions 檔案內
將 jre 指向 /opt/smartgit/jre

> cat   ~/.smartgit/smartgit.vmoptions 
jre=/opt/smartgit/jre

按照上面的參考設定

# zypper  install alacarte
設定 smart git icon 使用 alacarte

> alacarte
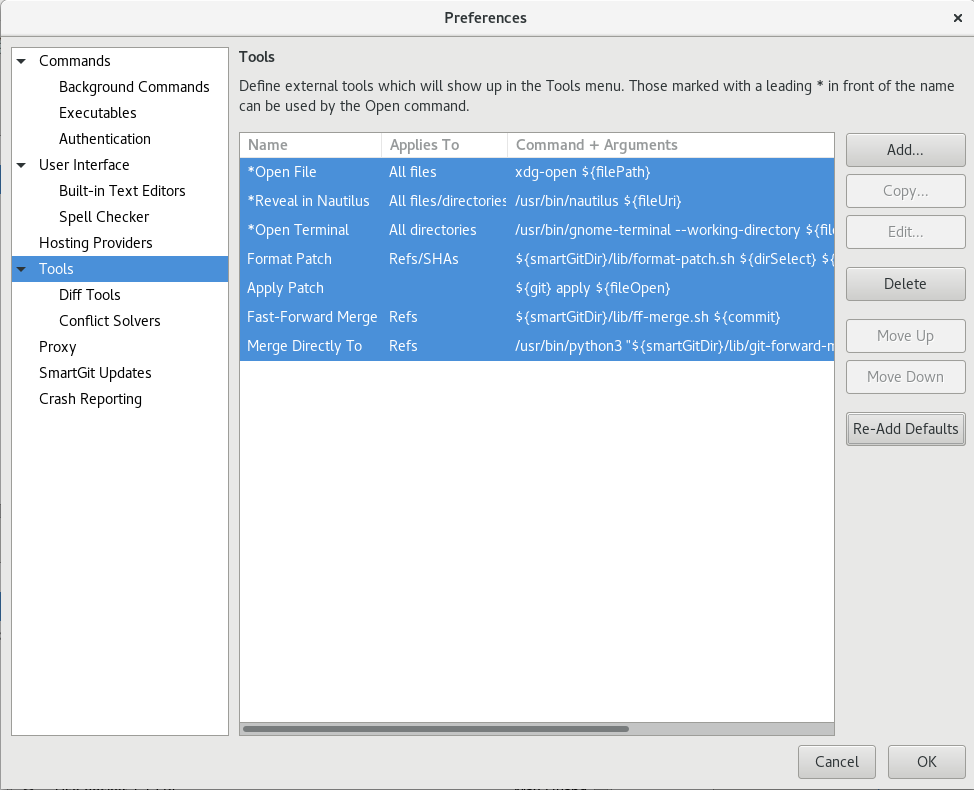
在設定好之後如果發現無法直接開啟資料夾 ( 資料夾上面按右鍵 -- > Open )
Edit -- > Preferences --> 點選  Tools -- > 點選 Re-Add Defaults 得到解決
2016-11-24 15-48-28 的螢幕擷圖.png


Azure-cli 安裝:

版本: 2.0.71

匯入 rpm key

新增 Azure CLI 的 repo
# zypper  addrepo --name 'Azure CLI' --check https://packages.microsoft.com/yumrepos/azure-cli azure-cli

安裝 azure-cli 套件
# zypper  install --from azure-cli  -y  azure-cli

使用互動的方式登入 azure ( 現在已經不需要輸入機器碼, 直接驗證帳號就可以  )
> az  login

AWS Cli 安裝:

版本: 1.16.220

有鑑於 python 2 即將終止 support , 這次是用 pip3 來安裝 awscli

# pip3 install awscli

# pip3  install --upgrade pip

# aws --version

aws-cli/1.16.220 Python/3.6.5 Linux/4.12.14-lp151.27-default botocore/1.12.210


Google Cloud SDK ( gcloud )安裝:

安裝 gcloud
  • 但是目前實務上是使用容器的方式來執行


Visual Studio Core 相關 :


安裝 vscode

安裝 vscode extension ( 這次沒有作, 因為將舊的 /home 還原回來 )
  • AWS Toolkit for Visual Studio Code
  • Bracket Pair Colorizer
  • Code Time
  • Git Graph
  • GitHub Pull Requests
  • GitLens
  • Kubernetes
  • Python

Nextcloud client 安裝,  crontab 設定:

參考之前的文章

# zypper  install  nautilus-extension-nextcloud  nextcloud-client

使用一般使用者 啟動 nextcloud client
設定相關連線與同步   ( 這次沒有作, 因為將舊的 /home 還原回來 )

設定同步 Dropbox 與 Nextcloud 目錄
> crontab  -e

0 22 * * * rsync -a --delete /home/sakana/Dropbox/*  /home/sakana/Nextcloud/Dropbox/


PPSSPP 安裝:


使用 Emulators 來源安裝


Filezilla 安裝:

#zypper  install  filezilla


Sqlitebrowser 安裝:


=====================================

這次安裝的時間真的相對久 :p

~ enjoy it

參考


星期五, 8月 09, 2019

Azure Storage Explorer with openSUSE Leap 15 小記

Azure Storage Explorer with openSUSE Leap 15 小記


OS: openSUSE Leap 15
Azure Storage Explorer: 1.9.0
Dotnet-sdk: 2.1.801-1


Azure Storage Explorer 官方網站


使用一般使用者
下載 Linux 版本的 Azure Storage Explorer ( StorageExplorer-linux-x64.tar.gz )


解壓縮檔案
> tar  zxvf  StorageExplorer-linux-x64.tar.gz


觀察相關資訊
> ls
blink_image_resources_200_percent.pak  icudtl.dat locales resources          StorageExplorer-linux-x64.tar.gz
content_resources_200_percent.pak      libffmpeg.so natives_blob.bin snapshot_blob.bin  ui_resources_200_percent.pak
content_shell.pak                      libnode.so pdf_viewer_resources.pak StorageExplorer    views_resources_200_percent.pak


嘗試執行 StorageExplorer
> ./StorageExplorer


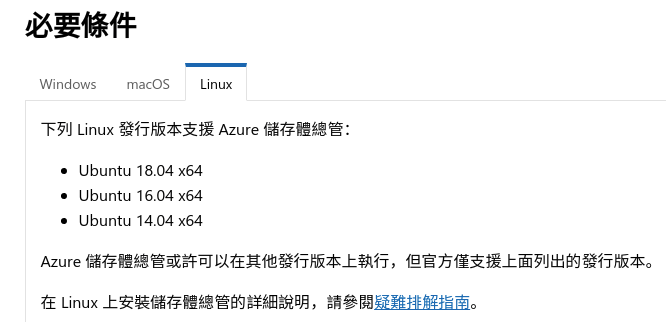
被告知要有 .NET Core 2.0 才能執行 :)


  • 上面只列出 Ubuntu 14.04 ~ Ubuntu 18.04


相關的相依項目有
  • .NET core 2.0 執行階段
  • libgconf-2-4
  • libgnome-keyring0 或 libgnome-keyring-dev
  • libgnome-keyring-common


先來處理 .NET core 2.0 , 參考官方文件


按照比較新的日期, 我安裝的是 .NET Core SDK 2.1.202
Linux 相關網頁


上面雖然是 openSUSE Leap, 可是內容是 openSUSE Leap 42.2 , 而我目前用的是 Leap 15


根據上面的方式改為 openSUSE Leap 15 


使用管理者 root


匯入 Microsoft 的 Key
# rpm  --import  https://packages.microsoft.com/keys/microsoft.asc


下載 .repo 檔案
# wget  -q  https://packages.microsoft.com/config/opensuse/15/prod.repo


將 .repo 檔案移動到 /etc/zypp/repos.d 目錄下, 並更改名稱
# mv  prod.repo   /etc/zypp/repos.d/microsoft-prod.repo

透過 zypper update 指令去更新儲存庫,  我覺得用 zypper refresh 應該也可以
# zypper   update


Building repository 'packages-microsoft-com-prod' cache ...............................................................[done]
Loading repository data...


# zypper install libunwind libicu


Loading repository data...
Warning: Repository 'openSUSE-Leap-15.0-Update-Non-Oss' appears to be outdated. Consider using a different mirror or server.
Reading installed packages...
'libicu' not found in package names. Trying capabilities.
'libicu60_2' providing 'libicu' is already installed.
'libunwind' is already installed.
No update candidate for 'libunwind-1.2.1-lp150.2.1.x86_64'. The highest available version is already installed.
Resolving package dependencies...


Nothing to do.


  • 這邊看到 libicu 在 openSUSE Leap 15 應該是由 libicu60_2 提供


安裝前先搜尋一下
# zypper search -s dotnet-sdk


Loading repository data...
Warning: Repository 'openSUSE-Leap-15.0-Update-Non-Oss' appears to be outdated. Consider using a different mirror or server.
Reading installed packages...


S | Name           | Type | Version   | Arch | Repository                 
--+----------------+---------+-----------+--------+----------------------------
  | dotnet-sdk-2.1 | package | 2.1.801-1 | x86_64 | packages-microsoft-com-prod
  | dotnet-sdk-2.1 | package | 2.1.701-1 | x86_64 | packages-microsoft-com-prod
  | dotnet-sdk-2.1 | package | 2.1.605-1 | x86_64 | packages-microsoft-com-prod
  | dotnet-sdk-2.1 | package | 2.1.603-1 | x86_64 | packages-microsoft-com-prod
  | dotnet-sdk-2.1 | package | 2.1.508-1 | x86_64 | packages-microsoft-com-prod
  | dotnet-sdk-2.2 | package | 2.2.401-1 | x86_64 | packages-microsoft-com-prod
  | dotnet-sdk-2.2 | package | 2.2.301-1 | x86_64 | packages-microsoft-com-prod
  | dotnet-sdk-2.2 | package | 2.2.205-1 | x86_64 | packages-microsoft-com-prod
  | dotnet-sdk-2.2 | package | 2.2.203-1 | x86_64 | packages-microsoft-com-prod
  | dotnet-sdk-2.2 | package | 2.2.108-1 | x86_64 | packages-microsoft-com-prod
  | dotnet-sdk-2.2 | package | 2.2.107-1 | x86_64 | packages-microsoft-com-prod


這邊其實會看到 有 2.1 與 2.2 版本
我決定先裝 2.1 版本


# zypper  install  dotnet-sdk-2.1
Loading repository data...
Warning: Repository 'openSUSE-Leap-15.0-Update-Non-Oss' appears to be outdated. Consider using a different mirror or server.
Reading installed packages...
Resolving package dependencies...


The following 7 NEW packages are going to be installed:
  aspnetcore-runtime-2.1 dotnet-host dotnet-hostfxr-2.1 dotnet-runtime-2.1 dotnet-runtime-deps-2.1 dotnet-sdk-2.1
  libopenssl1_0_0


7 new packages to install.
Overall download size: 171.8 MiB. Already cached: 0 B. After the operation, additional 173.7 MiB will be used.
Continue? [y/n/...? shows all options] (y): y


安裝完 .NET core 接下來試試看是否可以執行 Storage Explorer


使用一般使用者
嘗試執行 StorageExplorer
> ./StorageExplorer


Cool, 可以執行了
點選 I Accept 接受授權


接下來點選連接 Azure Storage 的方式
我先用 Add an Azure Account  -- > 點選 Next


接下來會要求登入 Microsoft Azure


接下來就可以看到 Microsoft Azure Storage Explorer 的操作畫面


接下來進行相關實驗


登入 Azure portal


Lab 1: 利用  Microsoft Azure Storage Explorer 管理儲存體


所有服務 -- > 儲存體帳戶
點選 新增儲存體帳戶
選取 訂用帳戶 / 資源群組
輸入名稱 / 選取 地區
點選 下一步


看看是否需要設定進階選項
我這邊按照預設值 -- > 下一步

看看是否需要加入標籤
-- > 下一步


確認相關資訊 -- > 點選 建立
完成 儲存體帳戶建立


接下來實驗相關功能
從 Microsoft Azure Storage Explorer 界面中
點選 Refresh All 重新整理物件
在訂閱帳號 -- > 展開 Storage Accounts 找到剛剛建立的 儲存體帳戶
展開帳戶, 在 Blob Containers 上面按滑鼠右鍵
Create Blob Contaier


輸入 Blob 名稱


這個時候可以在界面內或是 Azure Portal 確認是否有建立成功


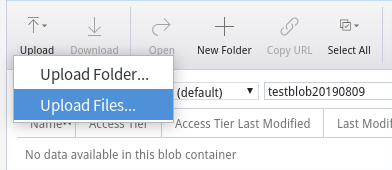
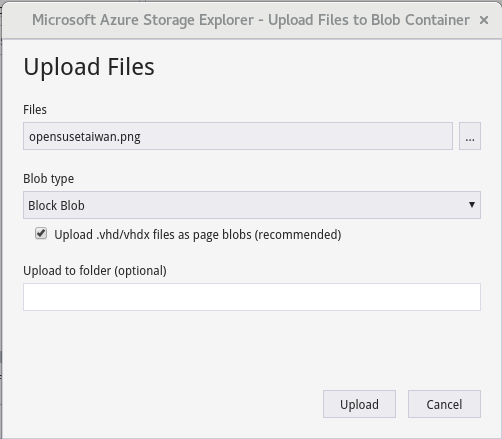
嘗試使用界面上傳物件


選取檔案 -- > Upload


可以在界面或是 Azure Portal 確認上傳狀況


這樣就可以方便的在 Linux 使用  Microsoft Azure Storage Explorer 管理儲存體


接下來換個情境, 有的時候因為專案的關係, 不會給帳戶金鑰或是開帳戶給相關同仁, 取而代之的, 會使用 SAS 共用存取簽章 的方式存取


Lab 2: 利用  SAS 共用存取簽章 存取儲存體


在剛剛建立的儲存體 點選 共用存取簽章


按照需求調整到期日或是允許的資源類型
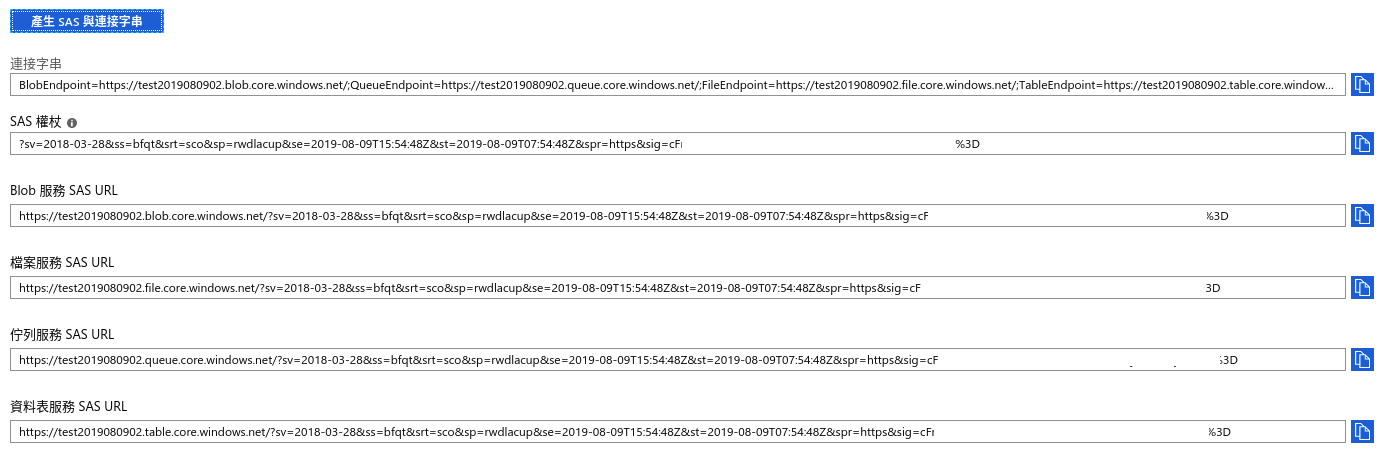
-- > 點選 產生 SAS 與 連接字串


產生相關 Token 以及 URL


在 Microsoft Azure Storage Explorer 內使用 SAS 方式連接


還沒連接之前觀察界面相關資訊


點選左方的 Add Account

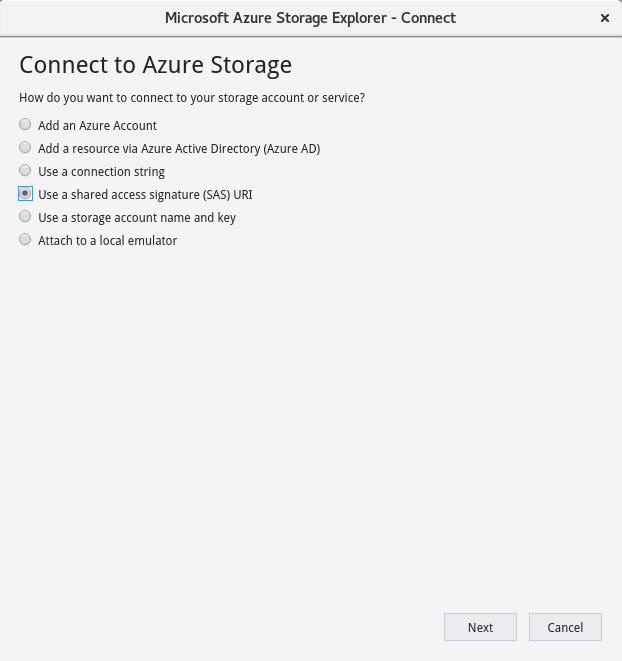
點選 Use a shared access signature ( SAS ) URL
點選 Next


輸入相關資訊
其實就是把剛剛的 URL 複製貼上 -- >  Next 


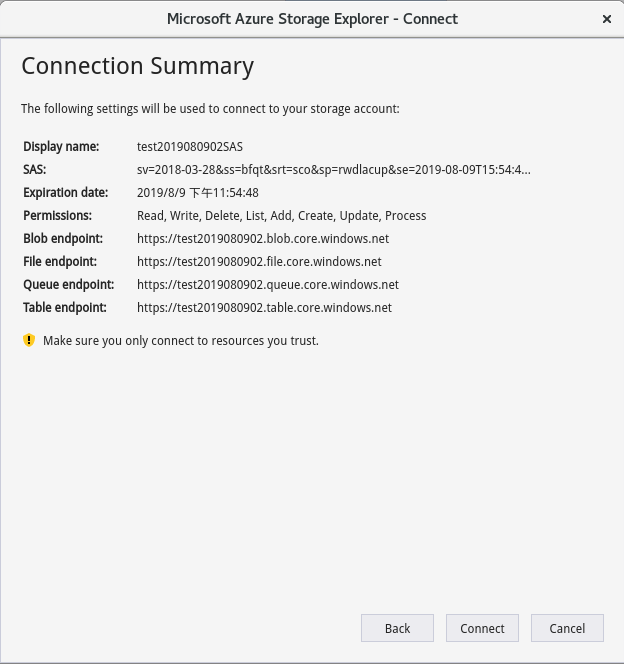
從 Summary 確認相關資訊
點選 Connect 


再次觀察界面


之後一樣可以透過 Microsoft Azure Storage Explorer 來進行管理


Notes

  • 相關設定檔, Linux 在 ~/.config/StorageExplorer

這樣又在 Azure 前進一步


~ enjoy it


Reference: