星期六, 4月 06, 2019

AWS Elastic Load Balancing with openSUSE instance in AWS 測試小記

AWS Elastic Load Balancing with openSUSE instance in AWS 測試小記

OS: openSUSE Leap 15
AWS CLI: 1.16.135

準備工作:

參考昨天自己的筆記建立兩個 openSUSE instances in AWS

因為要測試 Load Balancing
建立的 EC2 instance 分別隸屬於不同的 subnet ( 不同的 Availability Zone )


兩台 openSUSE Leap 15 instance ( 兩台 instances 都要做 )

==== 在 openSUSE instances 內 ====

切換成 root
>  sudo  su -

安裝 apache2 套件
# zypper  install  apache2

Building repository 'openSUSE-Leap-15.0-Non-Oss' cache ..................................................................................................[done]
Building repository 'openSUSE-Leap-15.0-Oss' cache ......................................................................................................[done]
Loading repository data...
Reading installed packages...
Resolving package dependencies...

The following 11 NEW packages are going to be installed:
 apache2 apache2-prefork apache2-utils git-web libapr-util1 libapr1 libbrotlicommon1 libbrotlienc1 libgc1 system-user-wwwrun w3m

The following recommended package was automatically selected:
 w3m

11 new packages to install.
Overall download size: 3.3 MiB. Already cached: 0 B. After the operation, additional 8.8 MiB will be used.
Continue? [y/n/...? shows all options] (y):  Y

啟動 apache 服務 ( Web )
# systemctl  start  apache2

觀察服務狀態
# systemctl  status  apache2

● apache2.service - The Apache Webserver
  Loaded: loaded (/usr/lib/systemd/system/apache2.service; disabled; vendor preset: disabled)
  Active: active (running) since Sat 2019-04-06 11:29:18 UTC; 3s ago
Main PID: 2000 (httpd-prefork)

設定開機啟動服務
# systemctl  enable  apache2

Created symlink /etc/systemd/system/httpd.service → /usr/lib/systemd/system/apache2.service.
Created symlink /etc/systemd/system/apache.service → /usr/lib/systemd/system/apache2.service.
Created symlink /etc/systemd/system/multi-user.target.wants/apache2.service → /usr/lib/systemd/system/apache2.service.

建立測試網頁 ( 不同 site 帶不同的數字 )
# vi   /srv/www/htdocs/index.html

<html> This is site 1 </html>

=============================

接下來在建立一個 security group 可以允許 port 80 連入

> aws ec2 create-security-group --group-name  testweb-sg  --description  "Test Web"

> aws ec2 authorize-security-group-ingress  --group-name  testweb-sg --protocol  tcp  --port  80 --cidr  0.0.0.0/0

接下來使用 aws 指令來將剛剛的 instance 掛上 test-sg ( port 22 ) 以及 testweb-sg ( port 80 )兩個 security group

針對兩個 instance 來修改
> aws ec2 modify-instance-attribute --instance-id  i-0563bb05f74c6d4d3 --groups "sg-09422cde3af0f76cb" "sg-0e725fc07ae70c8a8"

> aws ec2 modify-instance-attribute --instance-id i-06bfb784bea733d7b --groups "sg-09422cde3af0f76cb" "sg-0e725fc07ae70c8a8"

  • Instance-id 請換成自己的 id
  • --groups 後面請填上 security-group-id


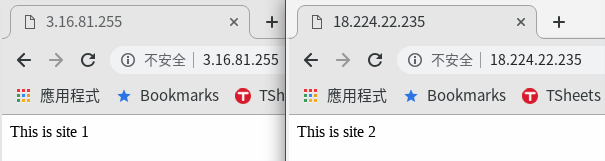
測試網站存取
針對兩個 instance 的 Public IP 來存取


參考官方文件:

驗證是否有支援 ELB
> aws elbv2  help

如果有出現指令說明就是有支援

使用 aws 指令 建立 load balancer
> aws  elbv2  create-load-balancer  --name  test-elb --subnets  subnet-92dfe4fb subnet-e4e8989e  --security-groups  sg-0e725fc07ae70c8a8

  • 建立一個 test-elb, 與 2 個 subnet 和 1 個 security group

到 Manage console 觀察
目前的狀態是 provisioning ( 配置 )
Listeners 是空的


使用 aws 指令建立 target group
> aws  elbv2  create-target-group  --name  test-target  --protocol  HTTP --port  80  --vpc-id vpc-c42635ac

  • 這邊要指定 vpc-id 不能使用預設的方式

可以到 Manage console 觀察

順便觀察 Registered targets , 目前為空
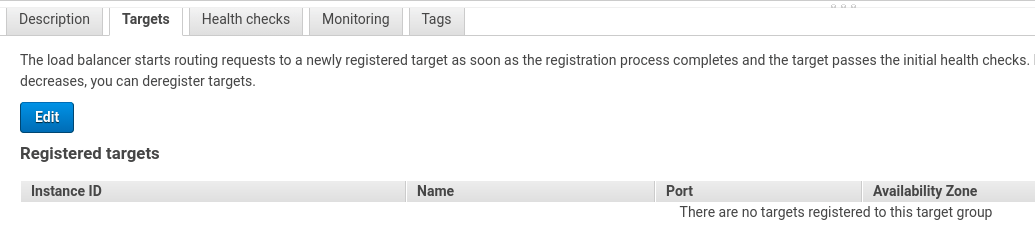
接下來用 aws 指令將 instance 註冊到 target
> aws  elbv2  register-targets --target-group-arn arn:aws:elasticloadbalancing:us-east-2:772127831904:targetgroup/test-target/732b4ddaff306e56  --targets  Id=i-0563bb05f74c6d4d3  Id=i-06bfb784bea733d7b

  • Target-group-arn 用剛剛建立起來的 arn
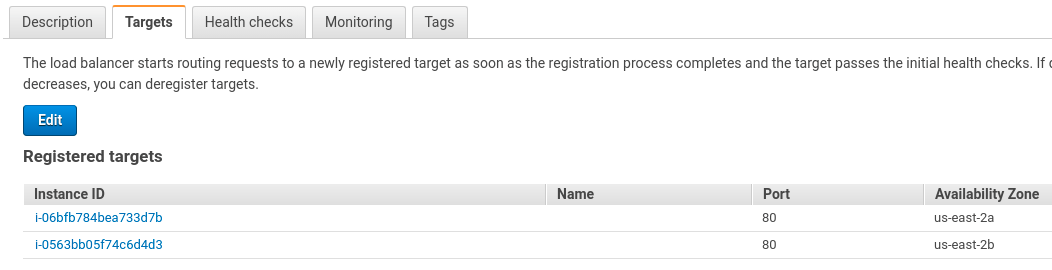
  • --targets 後面接 2 個 openSUSE instance id

再次觀察 Registered targets

最後使用 aws 指令建立 listener

> aws  elbv2  create-listener --load-balancer-arn arn:aws:elasticloadbalancing:us-east-2:772127831904:loadbalancer/app/test-elb/00d35f538d194bd1  --protocol  HTTP  --port 80  --default-actions Type=forward,TargetGroupArn=arn:aws:elasticloadbalancing:us-east-2:772127831904:targetgroup/test-target/742b4ddaff306e56


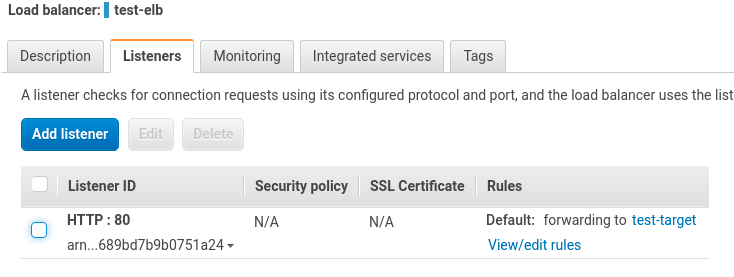
到 Manage Console 觀察 test-elb 的 Listeners

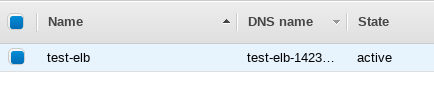
觀察  test-elb 的狀態為 active

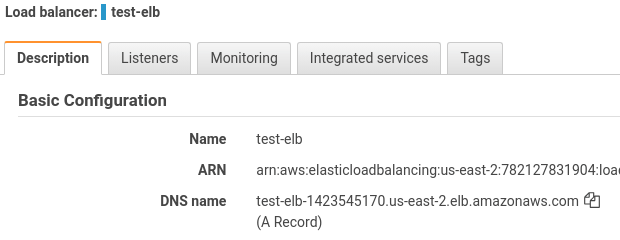
點選 Description 觀察 DNS name 並複製 FQDN
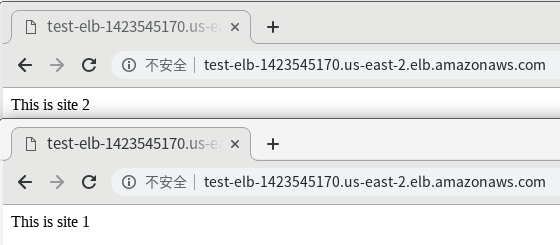
開啟瀏覽器
使用 Load balancer 的 FQDN 進行存取測試, 應該會看到向不同 instance 進行存取

今天完成 AWS Load balaner 測試
也是再往前一小步

~ enjoy it


Reference:

使用 AWS CLI 建立 openSUSE Leap 15 in AWS EC2 小記

使用 AWS CLI 建立 openSUSE Leap 15 in AWS EC2 小記


OS: openSUSE Leap 15
AWS CLI: 1.16.135

測試 aws ec2 指令
> aws  ec2  describe-regions  --output  table


----------------------------------------------------------
|                     DescribeRegions             |
+--------------------------------------------------------+
||                        Regions    ||
|+-----------------------------------+------------------+|
||             Endpoint       | RegionName ||
|+-----------------------------------+------------------+|
||  ec2.eu-north-1.amazonaws.com     | eu-north-1 ||
||  ec2.ap-south-1.amazonaws.com     | ap-south-1 ||
||  ec2.eu-west-3.amazonaws.com      | eu-west-3 ||
||  ec2.eu-west-2.amazonaws.com      | eu-west-2 ||
||  ec2.eu-west-1.amazonaws.com      | eu-west-1 ||
||  ec2.ap-northeast-2.amazonaws.com |  ap-northeast-2 ||
||  ec2.ap-northeast-1.amazonaws.com |  ap-northeast-1 ||
||  ec2.sa-east-1.amazonaws.com      | sa-east-1 ||
||  ec2.ca-central-1.amazonaws.com   | ca-central-1 ||
||  ec2.ap-southeast-1.amazonaws.com |  ap-southeast-1 ||
||  ec2.ap-southeast-2.amazonaws.com |  ap-southeast-2 ||
||  ec2.eu-central-1.amazonaws.com   | eu-central-1 ||
||  ec2.us-east-1.amazonaws.com      | us-east-1 ||
||  ec2.us-east-2.amazonaws.com      | us-east-2 ||
||  ec2.us-west-1.amazonaws.com      | us-west-1 ||
||  ec2.us-west-2.amazonaws.com      | us-west-2 ||
|+-----------------------------------+------------------+|

嘗試使用 aws  ec2 指令建立 security group
這邊先嘗試不指定 vpc-id 的方式來建立, 觀察預設值
> aws  ec2  create-security-group  --group-name  test-sg  --description "Test security group"
{
   "GroupId": "sg-0408e6036599eee01"
}


建立起來的 Security Group 是建立在 US East (N. Virginia)


觀察之前 AWS 的設定
> cat  ~/.aws/config


[default]
region = us-east-1
output = json


因為之前有設定 default region 為 us-east-1 所以 security group 會建立到 N. Virginia


目前測試環境在 Ohio ( us-east-2 )
所以大概有兩種方式
  • 將 ~/.aws/config 的 default region 設定為 us-east-2
  • 使用 aws ec2 指令的時候加上 --vpc-id 選項


嘗試使用指令 刪除剛剛的 security group , 這邊我使用 --group-name 的方式
> aws  ec2  delete-security-group  --group-name  test-sg


那要如何知道 --vpc-id 呢, 可以使用 aws ec2 指令進行查詢


> aws  ec2  describe-vpcs
{
   "Vpcs": [
       {
           "CidrBlock": "172.31.0.0/16",
           "DhcpOptionsId": "dopt-eab73381",
           "State": "available",
           "VpcId": "vpc-c42535ac",
           "OwnerId": "781126831804",
           "InstanceTenancy": "default",
           "CidrBlockAssociationSet": [
               {
                   "AssociationId": "vpc-cidr-assoc-3efaf757",
                   "CidrBlock": "172.31.0.0/16",
                   "CidrBlockState": {
                       "State": "associated"
                   }
               }
           ],
           "IsDefault": true
       }
   ]
}


有了 vpc-id 接下來使用 aws ec2 指令建立 security group 測試
> aws  ec2  create-security-group  --group-name  test-sg  --vpc-id  vpc-c42535ac --description "Test cli"


{
   "GroupId": "sg-090a6648734644155"
}


接下來建立 規則, 開放 所有 IP 連線 port 22
> aws  ec2  authorize-security-group-ingress  --group-name  test-sg --protocol  tcp  --port 22 --cidr  0.0.0.0/0

接下來建立 Key Pair
使用 aws ec2 指令建立金鑰
> aws  ec2  create-key-pair  --key-name  test-key  --query  "KeyMaterial"  --output  text  > test-key.pem


  • --query "KeyMaterial" 參數只擷取您需要的輸出部分到 .pem 檔案


調整 key 的權限
> chmod  400  test-key.pem


接下來準備要建立 instance
但是開始之前還有一些資訊要知道的
  • image-id
  • subnet-id
  • security-group-ids


image-id  的查詢方式 這邊我以 openSUSE 為例
> aws  ec2  describe-images  --filters  'Name=name,Values=openSUSE*'


subnet-id 查詢方式
> aws  ec2  describe-subnets


security-group-ids 查詢方式
> aws  ec2  describe-security-groups


再來就是啟動 instances 了


> aws  ec2  run-instances --image-id  ami-026fef571e7830801 --subnet-id  subnet-92dfe4fb --security-group-ids sg-090a6648734644255  --instance-type  t2.micro --key-name  test-key --count  1


建立的時候會回應相關資訊, 其中會有 InstanceId


透過 aws ec2 指令查詢 Public IP address
> aws ec2  describe-instances --instance-ids  i-YOUR_InstanceID --query "Reservations[0].Instances[0].PublicIpAddress"


"18.223.195.175"


根據得到的 IP 進行連線


> ssh  -i  test-key.pem  ec2-user@18.223.195.175


The authenticity of host '18.223.195.175 (18.223.195.175)' can't be established.
ECDSA key fingerprint is SHA256:HbjDjHC5oNzXGWwKsmExV1VzUWWfCjvmYgTHlRWbcJk.
Are you sure you want to continue connecting (yes/no)? yes
Warning: Permanently added '18.223.195.175' (ECDSA) to the list of known hosts.
openSUSE Leap 15.0 x86-64


As "root" use the:
- zypper command for package management
- yast command for configuration management


Have a lot of fun...
ec2-user@ip-172-31-0-246:~>

這樣也算是多邁入 AWS 一小步
~ enjoy it


Reference: