星期六, 5月 18, 2019

建立 gcloud 設定與切換設定小記

建立 gcloud 設定與切換設定小記

OS: openSUSE Leap 15
Google Cloud SDK : 246.0.0

今天來進行 Google Cloud SDK ( gcloud ) 專案相關設定

之前的文章, 安裝 Google Cloud SDK

在安裝的過程當中有進行初始化動作
>gcloud  init

當時選擇了自己的第一個專案

建立完成之後, 查詢的方式為
> gcloud  config  configurations list
NAME     IS_ACTIVE  ACCOUNT          PROJECT  DEFAULT_ZONE DEFAULT_REGION
default  True  xxxxx@gmail.com  steadfast-task-228409  asia-east1-a asia-east1

但是在 GCP 上面, 專案又只會何止一個??
所以接下來就是要設定其他的專案然後實做如何切換

新增第二個專案, 再次執行
>gcloud  init

Welcome! This command will take you through the configuration of gcloud.

Settings from your current configuration [default] are:
compute:
 region: asia-east1
 zone: asia-east1-a
core:
 account: xxxxxx@gmail.com
 disable_usage_reporting: 'True'
 project: steadfast-task-238409

Pick configuration to use:
[1] Re-initialize this configuration [default] with new settings
[2] Create a new configuration
Please enter your numeric choice:   2

這邊點選 2 建立新專案

Enter configuration name. Names start with a lower case letter and
contain only lower case letters a-z, digits 0-9, and hyphens '-':  sakanatest
Your current configuration has been set to: [sakanatest]

You can skip diagnostics next time by using the following flag:
 gcloud init --skip-diagnostics

Network diagnostic detects and fixes local network connection issues.
Checking network connection...done.                                                                                               
Reachability Check passed.
Network diagnostic passed (1/1 checks passed).

Choose the account you would like to use to perform operations for
this configuration:
[1] xxxxxx@gmail.com
[2] Log in with a new account
Please enter your numeric choice:  1

輸入設定檔名稱以及選擇登入帳號

Pick cloud project to use:
[1] employee-mgr-sakana
[2] sakanatest
[3] Create a new project
Please enter numeric choice or text value (must exactly match list
item):  2

選取專案名稱

到此, 設定完成, 再次觀察設定

> gcloud  config  configurations  list

NAME        IS_ACTIVE ACCOUNT              PROJECT DEFAULT_ZONE  DEFAULT_REGION
default        False xxxxxx@gmail.com  steadfast-task-228409 asia-east1-a  asia-east1
sakanatest  True       xxxxxx@gmail.com  sakanatest

目前作用中的是 sakanatest 這個設定檔, 對應的專案是 sakanatest
切換設定檔的方式

> gcloud  config  configurations activate default

Activated [default].
  • activate 後面接設定檔的名稱

再次觀察
> gcloud  config  configurations  list

NAME        IS_ACTIVE ACCOUNT              PROJECT DEFAULT_ZONE  DEFAULT_REGION
default        True      xxxxxx@gmail.com  steadfast-task-228409  asia-east1-a asia-east1
sakanatest False       xxxxxx@gmail.com sakanatest


建立 openSUSE Leap 15 instances 測試一下
> gcloud  compute  instances create  test20190518  --image-project  opensuse-cloud --image opensuse-leap-15-v20181106 --zone  asia-east1-a

列出 compute engine list
> gcloud  compute  instances list

使用 gcloud 連線 ssh 到 GCE
> gcloud  compute  ssh  test20190518

  • 會在 ~/.ssh 目錄建立SSH 金鑰 google_compute_engine  / google_compute_engine.pub 以及 google_compute_known_hosts
  • 可以在專案的中繼資料  -- > SSH 金鑰中觀察到


好處就是不需要用瀏覽器的方式連線

後記:
今天在查詢 google could sdk 版本的時候被通知可以升級版本
指令如下
> gcloud  components  update

下完指令就可以輕鬆升級 google cloud sdk 了

今天就先進行專案設定切換, ssh 連線 VM
再往前進一步

~ enjoy it

Reference:

星期四, 5月 16, 2019

MFA (Multi-Factor Authentication) with AWS 小記

MFA (Multi-Factor Authentication) with AWS 小記

今天來實驗 MFA 多因素驗證 with AWS

首先在 IAM 建立使用者, 然後給相關權限


回到 IAM Users -- > 選取使用者
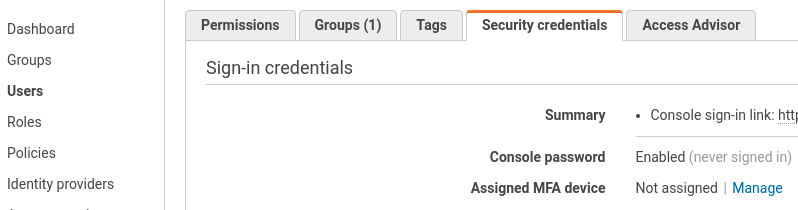
點選 Security credentials
點選 Assigned MFA device 的 Manage


這邊要選取 MFA 裝置, 這邊我選 Virtual MFA device
點選 Continue

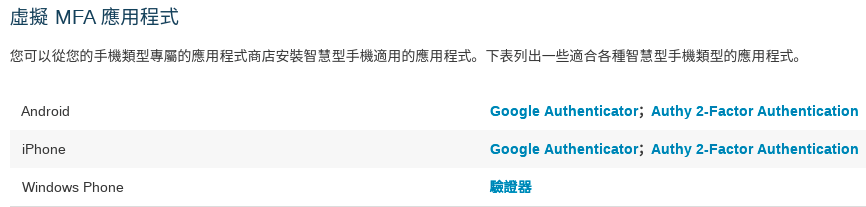
這邊按照 Android 或是 iphone 可以安裝不同的應用程式
我是用 Google Authenticator


安裝完 App ( Google Authenticator ) 之後
點選畫面中的 Show QR code
使用 Google Authenticator 掃描 QR code
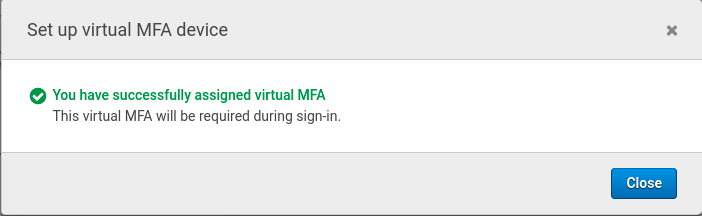
輸入兩次的 OTP 密碼 -- > Assign MFA

完成 MFA 的設定


接下來使用剛剛建立的使用者登入 console
輸入完帳號密碼後, 會被要求輸入 OTP 密碼( MFA Code )

這樣就又多一分保障 :)

~ enjoy it

Reference:

星期日, 5月 12, 2019

使用 Ansible 建立 容器化 GitLab with openSUSE in Azure 小記

使用 Ansible 建立 容器化 GitLab with openSUSE in Azure 小記

OS: openSUSE Leap 15 in Azure

今天來測試使用 ansible 在 Azure 上面透過容器化的方式建立 GitLab

GitLab 官方建議規格

先來試試看網路上搜尋到的方式
首先試試看沒有掛在 volume 的方式

$docker  run  -d  --hostname  gitlab.example.com  -p  443:443  -p  80:80  --name  gitlab --restart always  gitlab/gitlab-ce:latest

這樣的方式可以將 GitLab 啟動起來, 沒有問題
接下來就要考慮如何將這一系列的動作用 Ansible 串起來了 :)

考量點有
  • 安裝容器服務以及啟動
  • 要有一個獨立磁碟將 container 的設定與資料存起來
    • 掛載起來的時候, 要進行切割分割區以及建立 file system
    • 掛載到指定目錄
  • 下載 gitlab-ce 的 container image 並執行他, 開通 port 80 and port 443
  • 以上的方式要以非互動的方式來進行

寫了一個 playbook 來進行 gitlab 的安裝
  • 使用 gitlab 群組來進行安裝
    • 因為想配合 Azure Dynamic Inventory 方式

檔案 gitlab_install.yml 內容如下

---
# edit by sakana 2019/5/12
#########################################################  
#
#
#########################################################  

- name: Install docker and run service
# use group
 hosts: gitlab
#  sudo: True
 become: True
 vars_prompt:
   - name: "hostname"
     prompt: "Enter gitlab hostname, ex: gitlab.example.com"
     private: no
     default: gitlab.example.com

   - name: "container_name"
     prompt: "Enter container name when we create, ex: gitlab"
     private: no
     default: gitlab

 tasks:
#    - name: test setup moudule
#      setup: filter=ansible_distribution

   - name: Install docker with openSUSE Leap
     zypper:
       name:
         - docker
         - curl
     when: ansible_distribution == "openSUSE Leap"

# 舊的方式 with_item 即將被棄用
#    - name: Install docker with openSUSE Leap
#      zypper: name={{ item }}
#      with_items:
#        - docker
#        - curl
#      when: ansible_distribution == "openSUSE Leap"

#######################################################
# 等到 openSUSE 測試完成再來測試 CentOS and Ubuntu
#
#    - name: Install docker with CentOS
#      yum: name={{ item }}
#      with_items:
#        - docker
#        - curl
#      when: ansible_distribution == "CentOS"

#    - name: Install docker with Ubuntu
#      apt: name={{ item }} update_cache=yes
#      with_items:
#        - docker.io
#        - curl
#      when: ansible_distribution == "Ubuntu"

  
#    - name: Create docker link with Ubuntu
#      shell: ln -sf /usr/bin/docker.io /usr/local/bin/docker
#      when: ansible_distribution == "Ubuntu"
#
######################################################


#-------------------------------------------------------  

   - name: Set docker enable and run
     service: name=docker state=started enabled=yes

#-------------------------------------------------------  

# 使用 parted 建立label
   - name: use parted to make label
     shell: parted /dev/sdc mklabel msdos
# 使用 parted 建立分割區, 要使用百分比的方式才能非互動
   - name: use parted create partition
     shell: parted /dev/sdc mkpart primary 0% 100%
# 建立 file system
   - name: use mkfs.xfs create file system
     shell: mkfs.xfs -f /dev/sdc1
# 使用 mount module 掛載, 寫入 /etc/fstab
   - name: mount /dev/sdc1 to /gitlab
     mount:
       path: /gitlab
       src: /dev/sdc1
       fstype: xfs
       state: mounted

#-------------------------------------------------------  

   - name: use docker command to run
     shell: docker run -d --hostname {{ hostname }} -p 443:443 -p 80:80 --name {{ container_name }} --restart always gitlab/gitlab-ce:latest

#-------------------------------------------------------  


建立方式
如果有使用 azure_rm.py 記得 chmod a+x azure_rm.py

我是使用 Azure Dynamic Inventory 方式

> ansible-playbook -i  azure_rm.py  --ask-pass  --ask-become-pass  -u  使用者名稱   gitlab_install.yml

  • 這個 playbook 目前沒有處理 security group, 暫時先用手動開, 後面視需求看要不要加進去

VM 所加掛的資料磁碟, 非互動方式的處理我是使用 parted 指令

==== parted 一些指令小記 ====

列出 /dev/sdc 上面的分割區
> parted  /dev/sdc  print

建立 label
超過 2TB 以上的
> parted  /dev/sdc mklabel  gpt

一般用
> parted  /dev/sdc mklabel msdos

建立分割區, 使用整顆硬碟
> parted  /dev/sdc  mkpart  primary 0%  100%

刪除第一個分割區
> parted  /dev/sdc rm  1

=======================

建立完機器, 最後的步驟就是
  • 在 Azure portal 上面開啟機器 security group 的 port 80


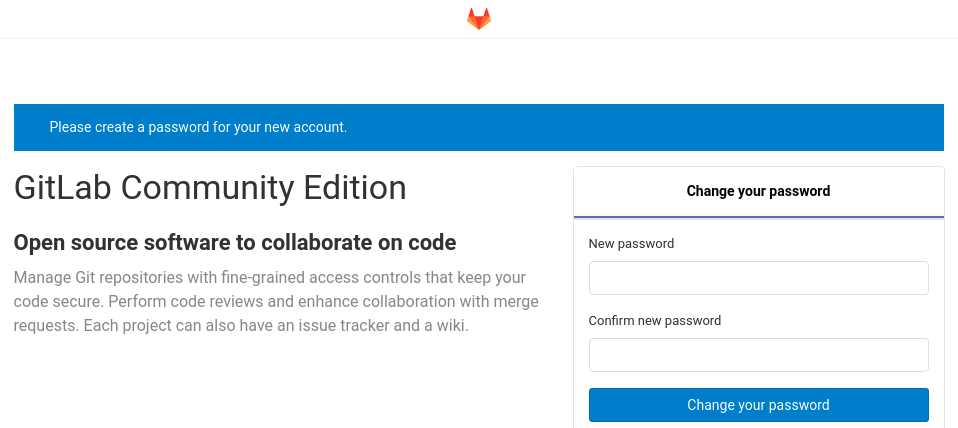
設定 GitLab root 密碼  -- > Change your password

就有一個 GitLab 實驗環境可以使用啦 :)

~ enjoy it

Reference: