星期日, 3月 07, 2021

使用 ssh 連線到 Azure AKS 叢集節點小記

使用 ssh 連線到 Azure AKS 叢集節點小記


今年因為 Kubernetes Up and Running 第2版, 讀書會再開

今天來小記一下, 如果要使用 ssh 連線到 AKS 叢集的 node 該如何作


參考官方文件 https://docs.microsoft.com/zh-tw/azure/aks/ssh


另外知道 AKS node 的所屬 Resource Group 之後, 也許會想要直接用 Cloud Shell 來進行連線

  • 這個可能是有困難的, 因為所屬的網段不同, 有可能有 VNet 對 VNet 的連線或是防火牆的問題


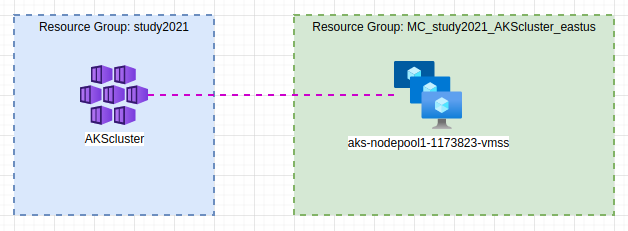
再來就是 Resource Group 的概念

我這邊劃個簡圖, 如果使用 az aks 指令建立 K8S Cluster

  • AKS 是在 study2021 的 Resource Group 建立

  • 但是在建立 AKS 的時候, 其實會同時建立另外一個 Resource Group MC_study2021_AKScluster_eastus

    • 紀錄這個是讓自己記得 cluster node 的 Resource Group 未必是 AKS 的 Resource Group

    • AKS 的叢集節點就是建立在這個 Resource Group, 以 VMSS 方式控制

    • 當然這個 Resource Group 裡面還有 LB, VNet, 等等就不贅述


接下來取得 SSH 要連線的相關資訊

  • 因為如同剛剛描述的官方文件 vm list 指令, 無法列出 node (vmss instance) 相關資訊


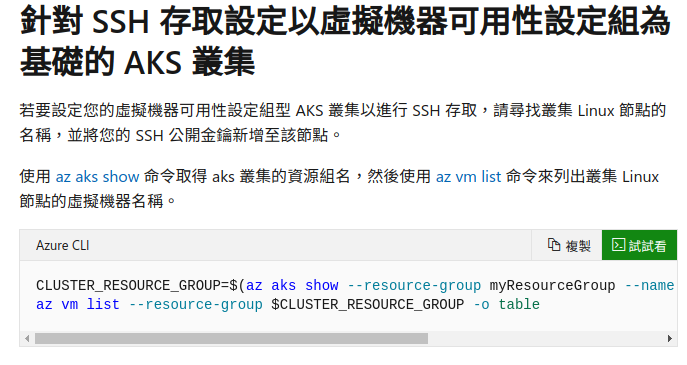
所以我採取使用 kubectl 方式來取得


要觀察該 node 的內部 IP 方式


確認 node

> kubectl  get  nodes


NAME                                STATUS   ROLES   AGE   VERSION

aks-nodepool1-11173823-vmss000000   Ready    agent   61d   v1.18.10


使用 kubectl describe nodes 指令確認相關資訊

> kubectl  describe  nodes  aks-nodepool1-11173823-vmss000000


Name:               aks-nodepool1-11173823-vmss000000

Roles:              agent

Labels:             agentpool=nodepool1

                    beta.kubernetes.io/arch=amd64

                    beta.kubernetes.io/instance-type=standard_b2s

                    beta.kubernetes.io/os=linux

                    failure-domain.beta.kubernetes.io/region=eastus

                    failure-domain.beta.kubernetes.io/zone=0

                    kubernetes.azure.com/cluster=MC_study2021_AKScluster_eastus

                    kubernetes.azure.com/mode=system

                    kubernetes.azure.com/node-image-version=AKSUbuntu-1804-2020.12.15

                    kubernetes.azure.com/role=agent

                    kubernetes.io/arch=amd64

                    kubernetes.io/hostname=aks-nodepool1-11173823-vmss000000

                    kubernetes.io/os=linux

                    kubernetes.io/role=agent

                    node-role.kubernetes.io/agent=

                    node.kubernetes.io/instance-type=standard_b2s

                    storageprofile=managed

                    storagetier=Premium_LRS

                    topology.kubernetes.io/region=eastus

                    topology.kubernetes.io/zone=0

略....

Addresses:

  Hostname:    aks-nodepool1-11173823-vmss000000

  InternalIP:  10.240.0.4


略....


  • 這邊可以觀察到 內部 IP


接下來確認 AKS 的 adminUsername ( 預設是 azureuser )


> az  aks  show  --resource-group  study2021  --name AKScluster | grep  adminUsername


    "adminUsername": "azureuser",


接下來建立一個臨時的 POD 來連接 SSH 到 node


> kubectl run -it --rm aks-ssh --image=debian


  • 這邊有下 --rm 選項, 所以離開的時候就會刪除該 POD

  • aks-ssh 是名稱


==== 在 aks-ssh 容器內 ====


安裝 openssh client 

# apt-get  update  &&  apt-get  install  openssh-client  -y


======================================================


==== 在自己機器上 ====


在自己機器上(可以連線AKS  SSH )

用新視窗 使用 kubectl cp 指令複製  SSH Key 到 POD 內

> kubectl  cp  ~/.ssh/id_rsa   aks-ssh:/id_rsa


  • ask-ssh 是 pod 名稱

  • 複製過去的時候權限是 600


======================================================


==== 在 aks-ssh 容器內 ====


修改剛剛從主機複製過來的 id_rsa key 權限爲 400

# chmod  400   /id_rsa


進行 SSH 連線測試

# ssh  -i   /id_rsa  azureuser@10.240.0.4


  • 10.240.0.4 換成 node IP


就可以連入該 node 進行觀察


Authorized uses only. All activity may be monitored and reported.

Welcome to Ubuntu 18.04.5 LTS (GNU/Linux 5.4.0-1034-azure x86_64)


 * Documentation:  https://help.ubuntu.com

 * Management:     https://landscape.canonical.com

 * Support:        https://ubuntu.com/advantage


 * Introducing self-healing high availability clusters in MicroK8s.

   Simple, hardened, Kubernetes for production, from RaspberryPi to DC.


     https://microk8s.io/high-availability


 * Canonical Livepatch is available for installation.

   - Reduce system reboots and improve kernel security. Activate at:

     https://ubuntu.com/livepatch


59 packages can be updated.

0 updates are security updates.


New release '20.04.2 LTS' available.

Run 'do-release-upgrade' to upgrade to it.


*** System restart required ***

Last login: Sun Mar  7 03:39:19 2021 from 10.244.0.22

To run a command as administrator (user "root"), use "sudo <command>".

See "man sudo_root" for details.


azureuser@aks-nodepool1-11173823-vmss000000:~$


完成時,exit SSH 工作階段,然後 exit 互動式容器工作階段。 這個容器工作階段關閉時,會刪除用來從 AKS 叢集存取 SSH 的 Pod


  • 因為剛剛在 kubectl run 有加上 --rm


這樣又前進 AKS 一小步

~ enjoy it


Reference:


星期日, 2月 21, 2021

openSUSE Leap 15.2 以非互動方式註冊 GitLab runner with docker executor in Azure 小記

openSUSE Leap 15.2 以非互動方式註冊 GitLab runner with docker executor in Azure 小記


OS: openSUSE Leap 15.2 in Azure

GitLab: 使用 gitlab.com


上次的文章使用互動的方式註冊 gitlab-runner 然後是用 shell executor


今天要來實作以非互動的方式註冊 gitlab-runner 然後採取 docker 來當 executor


實作前提

  • 在 gitlab.com 有帳號 ( 免費的就可以, 有付錢的功能更多  )


確認自己的 GitLab project / Group CI / CD Runner 設定與 Token 

  • 在 GitLab.com 登入自己帳號

  • 在 Project / Group 內 的 Settings -- > CI / CD

  • 展開 Runners 就會看到 Token


接下來開始建立實驗


建立 openSUSE Leap 15.2 in Azure

  • 我是用  Cloud Shell in VS code 然後透過 ansible 建立


使用 zypper 新增 gitlab 的 repo

  • 語法  zypper ar -f <URL> <alias>


# zypper  ar  -f  https://download.opensuse.org/repositories/openSUSE:/infrastructure:/gitlab/openSUSE_Leap_15.2  gitlab


觀察相關資訊

# zypper  lr


Repository priorities are without effect. All enabled repositories share the same priority.


# | Alias               | Name                        | Enabled | GPG Check | Refresh

--+---------------------+-----------------------------+---------+-----------+--------

1 | gitlab              | gitlab                      | Yes     | ( p) Yes  | Yes

2 | repo-debug          | Debug Repository            | Yes     | ( p) Yes  | Yes

3 | repo-debug-update   | Update Repository (Debug)   | Yes     | ( p) Yes  | Yes

4 | repo-non-oss        | Non-OSS Repository          | Yes     | ( p) Yes  | Yes

5 | repo-oss            | Main Repository             | Yes     | ( p) Yes  | Yes

6 | repo-source         | Source Repository           | Yes     | ( p) Yes  | Yes

7 | repo-update         | Main Update Repository      | Yes     | ( p) Yes  | Yes

8 | repo-update-non-oss | Update Repository (Non-Oss) | Yes     | ( p) Yes  | Yes


匯入  GPG Key 與 refresh repo

# zypper  --gpg-auto-import-keys  refresh


安裝 gitlab-runner

# zypper   install  -y  gitlab-runner


啟動 docker 服務

# systemctl  start  docker


設定 docker 開機時啟動

# systemctl  enable  docker


使用 gitlab-runner register 搭配 --non-interactive 方式非互動註冊

# gitlab-runner  register --non-interactive  --url  https://gitlab.com  --registration-token YOUR_TOKEN    --executor  docker --docker-image  opensuse/leap:latest  --name  test-gitlab-runner-docker   --tag-list  "opensuse-docker"


  • --url 與 --registration-token 請換成自己要註冊的 Server 與 token

  • --executor 指定 docker 方式 並指定預設的 docker image 爲 opensuse/leap:latest

  • --name 指定名稱

  • --tag-list 指定 tag


觀察相關資訊

# cat   /etc/gitlab-runner/config.toml


concurrent = 1

check_interval = 0


[session_server]

  session_timeout = 1800


[[runners]]

  name = "test-gitlab-runner-docker"

  url = "https://gitlab.com"

  token = "5kYxjqvGPPy63Vus_W66K"

  executor = "docker"

  [runners.custom_build_dir]

  [runners.cache]

    [runners.cache.s3]

    [runners.cache.gcs]

  [runners.docker]

    tls_verify = false

    image = "opensuse/leap:latest"

    privileged = false

    disable_entrypoint_overwrite = false

    oom_kill_disable = false

    disable_cache = false

    volumes = ["/cache"]

    pull_policy = "always"

    shm_size = 0


  • 這邊的 token 是 runner 的 token


啟動 gitlab-runner

# gitlab-runner  start


觀察相關資訊

# gitlab-runner  status


也可以到 Gitlab 上面觀察


又前進一步

下次預計來弄 ansible playbook :)


~ enjoy it


Reference:


星期一, 2月 08, 2021

openSUSE Leap 15.2 as GitLab runner in Azure 小記

openSUSE Leap 15.2 as GitLab runner in Azure 小記


OS: openSUSE Leap 15.2 in Azure

GitLab: 使用 gitlab.com


最近開始學 GitLab

先感謝 陳正瑋 的鐵人賽文章以及 和艦長一起30天玩轉 GitLab 書籍

入門多了很多的資訊


今天要來寫的是把 openSUSE Leap 15.2 當成 gitlab runner 來執行

爲何要寫這篇呢? 當然是因為官方的文件上沒有列出 openSUSE 安裝方式 :)


那就只好自己嘗試, 然後記錄下來了 (攤手)


實作前提

  • 在 gitlab.com 有帳號 ( 免費的就可以, 有付錢的功能更多  )


確認自己的 GitLab project / Group CI / CD Runner 設定與 Token 

  • 在 GitLab.com 登入自己帳號

  • 在 Project / Group 內 的 Settings -- > CI / CD

  • 展開 Runners 就會看到 Token


接下來開始建立實驗


建立 openSUSE Leap 15.2 in Azure

  • 我是用  Cloud Shell in VS code 然後透過 ansible 建立的 ~ 開心


回到 gitlab 身上來

如果在 software.opensuse.org 上面搜尋 gitlab-runner


  • 這邊其實就有看到實驗性套件了


使用 ssh 連入剛剛的 openSUSE Leap 15.2 in Azure


使用 yast  repositories 新增套件庫


#yast  repositories


新增套件庫 (Alt + A)

方式選取 指定 URL


點選下一步 (Alt + N)

套件庫的名稱可以自行取

URL 的部分指定 


點選下一步 (Alt + N)

有遇到 GnuPG Key 可以 Trust 一下


確認 GitLab 套件庫有被加入

點選 OK (Alt + O)


接下來新增相關套件


# zypper   install  gitlab-runner


Loading repository data...

Reading installed packages...

Resolving package dependencies...


The following 5 NEW packages are going to be installed:

  dash gitlab-common gitlab-runner libruby2_6-2_6 ruby2.6


5 new packages to install.

Overall download size: 12.6 MiB. Already cached: 0 B. After the operation, additional 52.3

MiB will be used.

Continue? [y/n/v/...? shows all options] (y): y


註冊 gitlab-runner


# gitlab-runner  register


輸入 https://gitlab.com

輸入 Gitlab-runner token

輸入 這個 runner 的敘述

輸入 這個 runner 的 tag ( 這個很重要 )

輸入 這個 runner 的 executor ( 一般都是 docker or shell, 請見官方文件 )


啟動 gitlab-runner

# gitlab-runner  start


Runtime platform                                    arch=amd64 os=linux pid=3192 revision=1b659122 version=12.8.0


觀察相關資訊

# gitlab-runner  status


Runtime platform                                    arch=amd64 os=linux pid=3210 revision=1b659122 version=12.8.0

gitlab-runner: Service is running!


Notes:

  • Runner 的 config 會存放在 /etc/gitlab-runner/config.toml

  • 要成為 gitlab-runner 也要安裝 git 不然執行會出現錯誤

  • 執行的時候相關工作目錄會在 /srv/gitlab-runner/builds/GITLAB-RUNNER-TOKEN/ 下


在 GitLab.com 上面確認 runner 有設定成功


找時間要看的文件

Disable SKEL 說明

https://docs.gitlab.com/runner/install/linux-repository.html#disable-skel


Gitlab runner 安裝說明

https://docs.gitlab.com/runner/install/linux-repository.html


這樣算是又向 GitLab 前進一步了

~ enjoy it


Reference: