openSUSE Leap 15.2 以非互動方式註冊 GitLab runner with docker executor in Azure 小記
OS: openSUSE Leap 15.2 in Azure
GitLab: 使用 gitlab.com
上次的文章使用互動的方式註冊 gitlab-runner 然後是用 shell executor
今天要來實作以非互動的方式註冊 gitlab-runner 然後採取 docker 來當 executor
實作前提
在 gitlab.com 有帳號 ( 免費的就可以, 有付錢的功能更多 )
確認自己的 GitLab project / Group CI / CD Runner 設定與 Token
在 GitLab.com 登入自己帳號
在 Project / Group 內 的 Settings -- > CI / CD
展開 Runners 就會看到 Token

接下來開始建立實驗
建立 openSUSE Leap 15.2 in Azure
我是用 Cloud Shell in VS code 然後透過 ansible 建立
使用 zypper 新增 gitlab 的 repo
語法 zypper ar -f <URL> <alias>
# zypper ar -f https://download.opensuse.org/repositories/openSUSE:/infrastructure:/gitlab/openSUSE_Leap_15.2 gitlab
觀察相關資訊
# zypper lr
Repository priorities are without effect. All enabled repositories share the same priority.
# | Alias | Name | Enabled | GPG Check | Refresh
--+---------------------+-----------------------------+---------+-----------+--------
1 | gitlab | gitlab | Yes | ( p) Yes | Yes
2 | repo-debug | Debug Repository | Yes | ( p) Yes | Yes
3 | repo-debug-update | Update Repository (Debug) | Yes | ( p) Yes | Yes
4 | repo-non-oss | Non-OSS Repository | Yes | ( p) Yes | Yes
5 | repo-oss | Main Repository | Yes | ( p) Yes | Yes
6 | repo-source | Source Repository | Yes | ( p) Yes | Yes
7 | repo-update | Main Update Repository | Yes | ( p) Yes | Yes
8 | repo-update-non-oss | Update Repository (Non-Oss) | Yes | ( p) Yes | Yes
匯入 GPG Key 與 refresh repo
# zypper --gpg-auto-import-keys refresh
安裝 gitlab-runner
# zypper install -y gitlab-runner
啟動 docker 服務
# systemctl start docker
設定 docker 開機時啟動
# systemctl enable docker
使用 gitlab-runner register 搭配 --non-interactive 方式非互動註冊
# gitlab-runner register --non-interactive --url https://gitlab.com --registration-token YOUR_TOKEN --executor docker --docker-image opensuse/leap:latest --name test-gitlab-runner-docker --tag-list "opensuse-docker"
--url 與 --registration-token 請換成自己要註冊的 Server 與 token
--executor 指定 docker 方式 並指定預設的 docker image 爲 opensuse/leap:latest
--name 指定名稱
--tag-list 指定 tag
觀察相關資訊
# cat /etc/gitlab-runner/config.toml
concurrent = 1
check_interval = 0
[session_server]
session_timeout = 1800
[[runners]]
name = "test-gitlab-runner-docker"
url = "https://gitlab.com"
token = "5kYxjqvGPPy63Vus_W66K"
executor = "docker"
[runners.custom_build_dir]
[runners.cache]
[runners.cache.s3]
[runners.cache.gcs]
[runners.docker]
tls_verify = false
image = "opensuse/leap:latest"
privileged = false
disable_entrypoint_overwrite = false
oom_kill_disable = false
disable_cache = false
volumes = ["/cache"]
pull_policy = "always"
shm_size = 0
這邊的 token 是 runner 的 token
啟動 gitlab-runner
# gitlab-runner start
觀察相關資訊
# gitlab-runner status
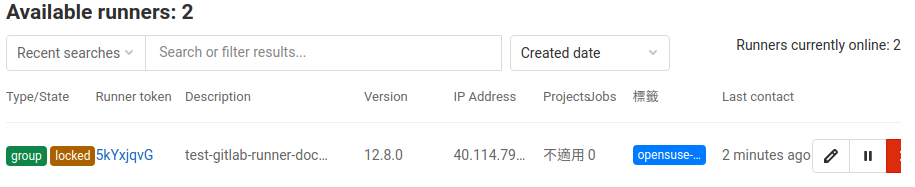
也可以到 Gitlab 上面觀察
又前進一步
下次預計來弄 ansible playbook :)
~ enjoy it
Reference:
https://gitlab.com/gitlab-org/gitlab-runner/-/issues/2811#note_49993634
http://sakananote2.blogspot.com/2021/02/opensuse-leap-152-as-gitlab-runner-in.html
沒有留言:
張貼留言