Nagios 網路監控主機架設
Nagios 是一個 opensource 的電腦系統與網路服務的監控軟體.
Nagios 可以監控主機與服務,當異常狀況發生時, 可以通知指定的聯絡人. 或是以指定的通知方式來聯繫, 另外也有眾多的 Plugin 可以使用.
官方網站
http://www.nagios.org/
openSUSE Linux 為開放社群的 openSUSE Poroject 所開發.
openSUSE 10.3 之後可以藉由 one-click Install 的方式來進行套件安裝
使用者可以在 http://software.opensuse.org/search
搜尋 想要安裝的套件, 藉由單鍵安裝, 快速安裝套件以及增加套件庫.
另外, http://software.opensuse.org/search 也提供其他 Linux 發行版本的套件下載( Fedora, Debian, Ubuntu, CentOS, RHEL, SLES)
架設環境介紹
Server
OS: openSUSE 12.1
IP: 192.168.3.128 (請依照實際的IP 調整)
Linux Client: 192.168.3.130 (請依照實際的IP 調整)
Windows Client: 192.168.3.129 (請依照實際的IP 調整)
Part I: Nagios伺服器的建置
Server:
1. 安裝Nagios 套件
於server 上面使用 one-click install 安裝 Nagios 套件
Nagios
http://software.opensuse.org/ymp/openSUSE:12.1/standard/nagios.ymp
Nagios Plugins
http://software.opensuse.org/ymp/openSUSE:12.1/standard/nagios-plugins.ymp
Nagios Addons Extras
http://software.opensuse.org/ymp/openSUSE:12.1/standard/nagios-plugins-extras.ymp
(如果要使用 putty 連線SSH 到主機, 請確認SSH 服務有開 #rcsshd status )
( 啟動SSH 服務 #rcsshd start )
(可以使用 #hostname server 來變更主機名稱, 並請重新連線 SSH 還有 #rcxdm restart 重新啟動 X -- 如果使用 Ezilla Lab)
當然也可以使用指令的方式
# zypper install nagios nagios-plugins nagios-plugins-extras
2.建立nagiosadmin 密碼
第一次建立密碼的時候 請加上 -c 選項,
新增第二個使用者, 則不需要加上 -c ( 會清空現有的密碼)
請於server 上面
#htpasswd2 -c /etc/nagios/htpasswd.users nagiosadmin
輸入密碼
再次輸入
3.建立nagiosuser 密碼
請於server 上面
#htpasswd2 /etc/nagios/htpasswd.users nagiosuser
輸入密碼
再次輸入
筆記補充: 預設的nagiosadmin 為管理者, 其相關設定, 設定於/etc/nagios/cgi.cfg 所以如果不想使用 nagiosadmin 為預設管理者帳號, 請修改該檔案內的設定.
4.檢視並設定開機啟動nagios
#chkconfig nagios --list
#chkconfig nagios on
#chkconfig nagios --list
5.重新啟動.apache2 並設定開機啟動
#rcapache2 restart
#chkconfig apache2 --list
#chkconfig apache2 on
#chkconfig apache2 --list
6.啟動Nagios
#rcnagios start
7.測試Nagios 主機運作
開啟瀏覽器 於 URL上面輸入 http://127.0.0.1/nagios/
以上的URL 請視連線的IP調整
會出現需要授權的視窗
請輸入
使用者名稱 nagiosadmin
密碼 之前設定的密碼
這個時候應該會出現 Nagios 的相關畫面
如下圖所示

可以觀察相關服務狀況
此時會發現 HTTP 呈現警告狀態
原因為 Apache2 有啟動但是沒有預設的網頁
要解除這個情形可以 建立一個預設網頁
#vi /srv/www/htdocs/index.html
加入
<html> It works ! </html>
受監控的相關主機都會被紀錄在 /etc/nagios/nagios.cfg
Linux 的本機的監控設定也是設定於 /etc/nagios/nagios.cfg 內的
# Definitions for monitoring the local (Linux) host
cfg_file=/etc/nagios/objects/localhost.cfg
也可以使用資料夾的方式匯入設定檔(設定於 /etc/nagios/nagios.cfg)
# You can also tell Nagios to process all config files (with a .cfg
# extension) in a particular directory by using the cfg_dir
# directive as shown below:
#cfg_dir=/etc/nagios/servers
故可以得知之後要監控的主機,
相關的設定檔都要放在 /etc/nagios/objects 資料夾內,
且於/etc/nagios/nagios.cfg 要有cfg_file=xxxx.cfg的設定
另外如果要檢視 Nagios 設定有沒有問題
可以使用
#nagios -v /etc/nagios/nagios.cfg
來觀察匯入那些設定檔, 以及有沒有問題
更多的文件也可以參考這邊
http://wiki.nagios.org/index.php/Main_Page
**修改通知 e-mail **
# vi /etc/nagios/objects/contacts.cfg
修改預設的 e-mail
define contact{
contact_name nagiosadmi ; Short name of user
use generic-contact ; Inherit default values from generic-contact template (defined above)
alias Nagios Admin ; Full name of user
email sakana@study-area.org ; <<***** CHANGE THIS TO YOUR EMAIL ADDRESS ******
}
當然這邊要確認 mail service 有沒有啟動
可以下 #rcpostfix status 確認 ( 啟動請用 #rcpostfix start )
檢視 Nagios 設定有沒有問題
#nagios -v /etc/nagios/nagios.cfg
重新啟動 Nagios
#rcnagios restart
**以上 Nagios 伺服器建置完成**
Part II: Nagios 用戶端-- Linux 伺服器用戶端建置
1.安裝 nagios-nrpe套件
請於Client端啟動 YaST 軟體管理
#yast2 sw_single
並搜尋 nrpe 應該就會看到
nagios-nrpe 套件
nagios-plugins-nrpe 套件
→ 安裝 → 套用
( 或是考慮使用 #yast -i nagios-nrpe nagios-plugins-nrpe)
(根據官方的說法是 相較於 check_by_ssh 的方式比較省資源)
2.設定nagios-nrpe 套件
(另外最好去確認 /etc/services 有沒有 nrpe 5666/tcp # nagios nrpe 的設定)
#grep 5666 /etc/services
修改設定檔 允許 Nagios 伺服器連線
# vi /etc/nagios/nrpe.cfg
allowed_hosts=127.0.0.1,192.168.3.128
這邊要注意 127.0.0.1後面要加上 逗點 , 然後主機 IP 不能有空格
不然會出現沒有辦法建立 SSL HandShake
(這個部份可以解釋, 如果nrpe是使用 SystemV 的形式啟動後面都會出現不能建立SSL Handshake ,但是以Xinetd 就不會)
#rcnrpe start
4.測試nagios-nrpe
設定完成之後 可以於本機及遠端測試
請於Client 端
執行 check_nrpe 測試, 成功應該會出現 NRPE的版本
# /usr/lib/nagios/plugins/check_nrpe -H localhost
NRPE v2.12
*************************************************************
請於 Server 端
安裝 nagios-nrpe 套件
#yast -i nagios-nrpe nagios-plugins-nrpe
針對 nagios client 測試 nagios-nrpe 成功應該會出現 NRPE的版本
#/usr/lib/nagios/plugins/check_nrpe -H 192.168.3.130
NRPE v2.12
(這邊請確認 firewall 是否關閉, 或是准許 nrpe 通過, 可以使用 #yast2 firewall 關閉防火牆測試)
有關於 /etc/nagios/nrpe.conf
(為了防止之後 /etc/hosts 名稱對應有問題建議可以將 localhost 改為 127.0.0.1)
#vi /etc/nagios/nrpe.conf
command[check_ssh]=/usr/lib/nagios/plugins/check_ssh 127.0.0.1
command[check_smtp]=/usr/lib/nagios/plugins/check_smtp 127.0.0.1
*************************************************************
接下來來測試本機相關資訊
請於 Client 端
執行相關測試
線上使用者人數
#/usr/lib/nagios/plugins/check_nrpe -H localhost -c check_users
平均負載
#/usr/lib/nagios/plugins/check_nrpe -H localhost -c check_load
目前使用的process
#/usr/lib/nagios/plugins/check_nrpe -H localhost -c check_total_procs
Zombie Process
#/usr/lib/nagios/plugins/check_nrpe -H localhost -c check_zombie_procs
磁碟狀況
#/usr/lib/nagios/plugins/check_nrpe -H localhost -c check_hda1
(這個部份command[check_hda1]=/usr/lib/nagios/plugins/check_disk -w 20% -c 10% -p /dev/hda1
因為現在 IDE的硬碟以及使用 Kernel 2.6.20 以前的主機越來越少, 所以應該是對應到 /dev/sda1)
故可以修改 /etc/nagios/nrpe.cfg 內的 command 對應
(複製原來的 hda1 改為要監控的 Partition)
#vi /etc/nagios/nrpe.cfg
#command[check_hda1]=/usr/lib/nagios/plugins/check_disk -w 20% -c 10% -p /dev/hda1
command[check_sda1]=/usr/lib/nagios/plugins/check_disk -w 20% -c 10% -p /dev/sda1
command[check_sda2]=/usr/lib/nagios/plugins/check_disk -w 20% -c 10% -p /dev/sda2
command[check_ssh]=/usr/lib/nagios/plugins/check_ssh localhost
command[check_smtp]=/usr/lib/nagios/plugins/check_smtp localhost
(針對想要加入的指令 可以參考 /usr/lib/nagios/plugins 目錄)
(為了防止之後 /etc/hosts 名稱對應有問題建議可以將 localhost 改為 127.0.0.1)
command[check_ssh]=/usr/lib/nagios/plugins/check_ssh 127.0.0.1
command[check_smtp]=/usr/lib/nagios/plugins/check_smtp 127.0.0.1
(這邊如果為了迅速 | 懶的改, 在ip 沒有改變的狀況底下可以下載已改好檔案 #wget http://dl.dropbox.com/u/12787647/client-nrpe.cfg
(如果IP有改就改 allowed_hosts= 後面接的IP吧 !! )
(Ezilla Lab 請將代號改成 vda1)
覆蓋且移動原來的設定檔
#mv client-nrpe.cfg /etc/nagios/nrpe.cfg
這個部份就自行考量 ^^)
重新啟動 nrpe 服務( 修改完 /etc/nagios/nrpe.cfg 請記得重新啟動服務)
#rcnrpe restart
再次測試
# /usr/lib/nagios/plugins/check_nrpe -H localhost -c check_sda1
# /usr/lib/nagios/plugins/check_nrpe -H localhost -c check_sda2
另外於 Server端測試 相關的指令
#/usr/lib/nagios/plugins/check_nrpe -H 192.168.3.130 -c check_sda1
#/usr/lib/nagios/plugins/check_nrpe -H 192.168.3.130 -c check_sda2
Part III: 將linux 伺服器(Nagios Client)加入到 Nagios監控範圍
*************************************************************
Lab: 建立範本 for host
新的主機範本 windows-pc
新的群組範本 windows-pcgroup
新的群組範本 linux-servergroup
新的服務範本 generic-pc-service
請於Server上面
nagios 設定檔內可以經由套用範本 use 的方式來加速管理
用來自訂 監控的時間 或是 設定預設的群組
舉例來說 一般的 workstation 不會 24 小時開機, 只會在上班時間開機
所以先建立, windows-pc 的範本,針對一般的 PC, 指定 上班時間監控.
Nagios 範本設定檔 /etc/nagios/objects/templates.cfg
Nagios 時間範本設定檔 /etc/nagios/objects/timeperiods.cfg
修改 Nagios 的範本檔, 將 windows-servers 複製一份改為 windows-pc
並修改 檢查時間為 workhours
#vi /etc/nagios/objects/templates.cfg
建立新的主機範本 windows-pc
# Windows host definition template - This is NOT a real host, just a template!
define host{
name windows-pc ; The name of this host template 範本的名稱
use generic-host ; Inherit default values from the generic-host template
check_period workhours ; 檢查的時間範圍
check_interval 5 ; Actively check the server every 5 minutes
retry_interval 1 ; Schedule host check retries at 1 minute intervals
max_check_attempts 10 ; Check each server 10 times (max)
check_command check-host-alive; Default command to check if servers are "alive"
notification_period workhours ; Send notification out at any time - day or night
notification_interval 30 ; Resend notifications every 30 minutes
notification_options d,r ; Only send notifications for specific host states
contact_groups admins ; Notifications get sent to the admins by default
hostgroups windows-pcgroup ; window-pc 主機預設會歸屬的群組
register 0 ; DONT REGISTER THIS - ITS JUST A TEMPLATE
}
另外定義一個群組 為 windows-pcgroup
讓剛剛建立的主機 範本可以直接加入
# Define host group for Windows PC
define hostgroup{
hostgroup_name windows-pcgroup ; The name of the hostgroup
alias Windows PC Group ; Long name of the group
}
定義一個群組 為 linux-servergroup
讓 linux-server 範本 可以直接加入
# Define host group for Linux Servers
define hostgroup{
hostgroup_name linux-servergroup ; The name of the hostgroup
alias Linux Server Group ; Long name of the group
}
定義一個群組 為 windows-server (原本定義在 windows.cfg)
讓 windows-server 範本 可以直接加入
# Define a hostgroup for Windows machines
# All hosts that use the windows-server template will automatically be a member of this group
define hostgroup{
hostgroup_name windows-servers ; The name of the hostgroup
alias Windows Servers ; Long name of the group
}
修改 linux-server 的範本 讓他自動加入 linux-servergroup
# Linux host definition template - This is NOT a real host, just a template!
define host{
name linux-server ; The name of this host template
use generic-host ; This template inherits other values from the generic-host template
check_period 24x7 ; By default, Linux hosts are checked round the clock
check_interval 5 ; Actively check the host every 5 minutes
retry_interval 1 ; Schedule host check retries at 1 minute intervals
max_check_attempts 10 ; Check each Linux host 10 times (max)
check_command check-host-alive ; Default command to check Linux hosts
notification_period workhours ; Linux admins hate to be woken up, so we only notify during the day
; Note that the notification_period variable is being overridden from
; the value that is inherited from the generic-host template!
notification_interval 120 ; Resend notifications every 2 hours
notification_options d,u,r ; Only send notifications for specific host states
contact_groups admins ; Notifications get sent to the admins by default
hostgroups linux-servergroup ; Host groups that Linux servers should be a member of
register 0 ; DONT REGISTER THIS DEFINITION - ITS NOT A REAL HOST, JUST A TEMPLATE!
}
建立新的服務範本 generic-pc-service 給一般PC使用
因為一般PC 只會在工作時間開機, 可以複製 generic-service 的範本來修改
# Generic PC service definition template - This is NOT a real service, just a template!
define service{
name generic-pc-service ; The 'name' of this service template
active_checks_enabled 1 ; Active service checks are enabled
passive_checks_enabled 1 ; Passive service checks are enabled/accepted
parallelize_check 1 ; Active service checks should be parallelized (disabling this can lead to major performance problems)
obsess_over_service 1 ; We should obsess over this service (if necessary)
check_freshness 0 ; Default is to NOT check service 'freshness'
notifications_enabled 1 ; Service notifications are enabled
event_handler_enabled 1 ; Service event handler is enabled
flap_detection_enabled 1 ; Flap detection is enabled
failure_prediction_enabled 1 ; Failure prediction is enabled
process_perf_data 1 ; Process performance data
retain_status_information 1 ; Retain status information across program restarts
retain_nonstatus_information 1 ; Retain non-status information across program restarts
is_volatile 0 ; The service is not volatile
check_period workhours ; The service can be checked at any time of the day
max_check_attempts 3 ; Re-check the service up to 3 times in order to determine its final (hard) state
normal_check_interval 10 ; Check the service every 10 minutes under normal conditions
retry_check_interval 2 ; Re-check the service every two minutes until a hard state can be determined
contact_groups admins ; Notifications get sent out to everyone in the 'admins' group
notification_options w,u,c,r ; Send notifications about warning, unknown, critical, and recovery events
notification_interval 60 ; Re-notify about service problems every hour
notification_period workhours ; Notifications can be sent out at any time
register 0 ; DONT REGISTER THIS DEFINITION - ITS NOT A REAL SERVICE, JUST A TEMPLATE!
}
workhours 的檢查時間為 早上 9:00 到 下午 5:00
可以 參考 /etc/nagios/objects/timeperiods.cfg
設定內容如下
# 'workhours' timeperiod definition
define timeperiod{
timeperiod_name workhours
alias Normal Work Hours
monday 09:00-17:00
tuesday 09:00-17:00
wednesday 09:00-17:00
thursday 09:00-17:00
friday 09:00-17:00
}
(這邊如果為了迅速 | 懶的改, 在ip 沒有改變的狀況底下可以下載已改好檔案 #wget http://dl.dropbox.com/u/12787647/server-templates.cfg
覆蓋且移動原來的設定檔
# mv server-templates.cfg /etc/nagios/objects/templates.cfg
這個部份就自行考量 ^^)
請於Server上面
複製 windows 的設定檔 來當成 linux server的設定檔
# cp /etc/nagios/objects/windows.cfg /etc/nagios/objects/linux.cfg
修改 /etc/nagios/objects/linux.cfg 內的設定 加上主機名稱 及 修改為Client 的IP
#vi /etc/nagios/objects/linux.cfg
將原來的
define host{
use windows-server ; Inherit default values from a template
host_name winserver ; The name we're giving to this host
alias My Windows Server ; A longer name associated with the host
address 192.168.1.2 ; IP address of the host
}
改為 (定義遠端Linux主機的名稱及IP)
define host{
use linux-server ; 這邊的名稱要參照 template 內的名稱,故不能亂取
host_name suseserver130 ; The name we're giving to this host 主機名稱(簡稱)
alias openSUSE Server2 ; A longer name associated with the host 主機名稱(長)
address 192.168.3.130 ; IP address of the host
}
接下來處理服務的部份, 因為所有要監控的服務都會認主機名稱
使用 :%s/winserver/suseserver130/gc 將 define service{ } 內的
host_name winserver
改為
host_name suseserver130
接下來將群組註解
將原來
define hostgroup{
hostgroup_name windows-servers ; The name of the hostgroup
alias Windows Servers ; Long name of the group
}
改為
#define hostgroup{
#hostgroup_name windows-servers ; The name of the hostgroup
#alias Windows Servers ; Long name of the group
#}
設定要監控的服務
將define service{ } 內的 service_description 及 check_command
修改(由check_nt 改為check_nrpe)
define service{
use generic-service
host_name suseserver130
service_description NSClient++ Version
check_command check_nt!CLIENTVERSION
}
改為(以線上使用者為例)
define service{
use generic-service
host_name suseserver130
service_description Online Users
check_command check_nrpe!check_users
}
define service{
use generic-service
host_name suseserver130
service_description Check sda1
check_command check_nrpe!check_sda1
}
define service{
use generic-service
host_name suseserver130
service_description Check sda2
check_command check_nrpe!check_sda2
}
define service{
use generic-service
host_name suseserver130
service_description Check Load
check_command check_nrpe!check_load
}
define service{
use generic-service
host_name suseserver130
service_description Total_Procs
check_command check_nrpe!check_total_procs
}
define service{
use generic-service
host_name suseserver130
service_description Check SSH
check_command check_nrpe!check_ssh
}
define service{
use generic-service
host_name suseserver130
service_description Check SMTP
check_command check_nrpe!check_smtp
}
請注意主機名稱需對應 define host { } 區段內的 host_name
(這邊如果為了迅速 | 懶的改, 在ip 沒有改變的狀況底下可以下載已改好檔案 #wget http://dl.dropbox.com/u/12787647/server-linux.cfg
(IP 有變就更改 Client 的IP吧)
覆蓋且移動原來的設定檔
# mv server-linux.cfg /etc/nagios/objects/linux.cfg
這個部份就自行考量 ^^)
整理一下對應關係
Server: 建立要監控對象的範本
Client: 設定允許監控伺服器 IP, NRPE 相對應的指令
**設定 NRPE 指令對應**
請於Server上面
修改 /etc/nagios/objects/commands.cfg 加入 check_nrpe 的指令對應
# vi /etc/nagios/objects/commands.cfg
加入
# 'check_nrpe' command definition
define command{
command_name check_nrpe
command_line $USER1$/check_nrpe -H $HOSTADDRESS$ -c $ARG1$
}
(這邊如果為了迅速 | 懶的改, 可以下載已改好檔案
#wget http://dl.dropbox.com/u/12787647/server-commands.cfg
覆蓋且移動原來的設定檔
# mv server-commands.cfg /etc/nagios/objects/commands.cfg
這個部份就自行考量 ^^)
**設定 Nagios 載入 linux.cfg **
請於Server上面
將剛剛的 linux.cfg 複製一份給 linux server 使用
# cp /etc/nagios/objects/linux.cfg /etc/nagios/objects/linux130.cfg
最後修改 /etc/nagios/nagios.cfg 內的設定 讓 linux.cfg 設定載入, 可以監控nagios Clinet
#vi /etc/nagios/nagios.cfg
加入
#Definitions for monitoring the Linux server
cfg_file=/etc/nagios/objects/linux130.cfg
確認設定檔是否無誤
# nagios -v /etc/nagios/nagios.cfg
重新啟動 nagios 使其生效
#rcnagios restart
(註: 重新啟動之後不會馬上偵測, 會過幾分鐘才偵測)
Part IV: Nagios 用戶端-- Windows 伺服器/ Windows PC用戶端建置
1.安裝 NSClient++ 軟體
請於 Window 伺服器 或是用戶端
開啟瀏覽器 連線至 NSClient++ 的專案網頁下載軟體
http://sourceforge.net/projects/nscplus/
依造機器的平台 x86 or x86_64 下載軟體 這邊以0.3.8-Win32 為例
http://downloads.sourceforge.net/project/nscplus/nscplus/NSClient%2B%2B%200.3.8/NSClient%2B%2B-0.3.8-Win32.msi?use_mirror=ncu&ts=1280992189&r=http://sourceforge.net/projects/nscplus/files/
出現安裝精靈
請按 Next
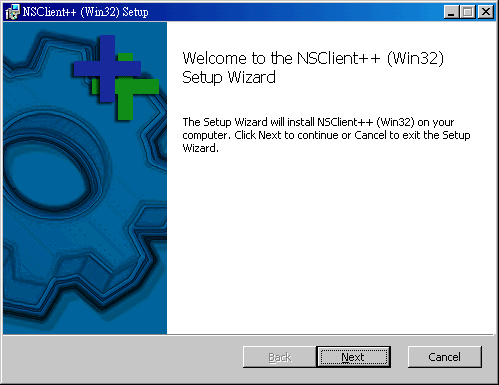
接下來 End-User License Agreement
請勾選 ' I accept the terms in the License Agreement' → Next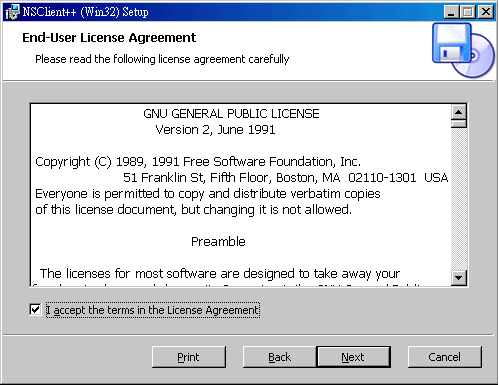
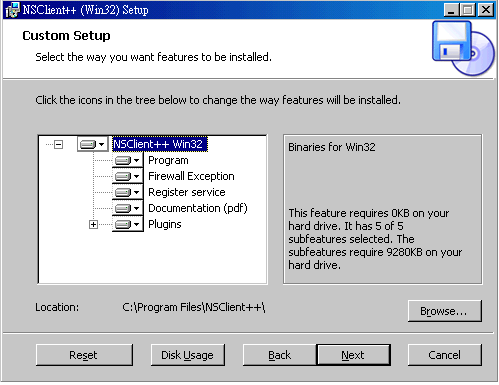
接下來Custom Setup
請按 Next
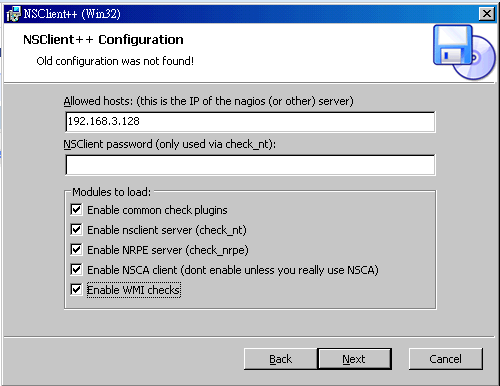
NSClient 會偵測是否有舊的設定檔
由於是新的安裝 請按 Next

這個部份是最重要的部份
Allow hosts: 請輸入 Nagios Server的IP (只允許這台機器連線)
再針對要載入的模組 勾選 → Next
開始安裝
點選 Install
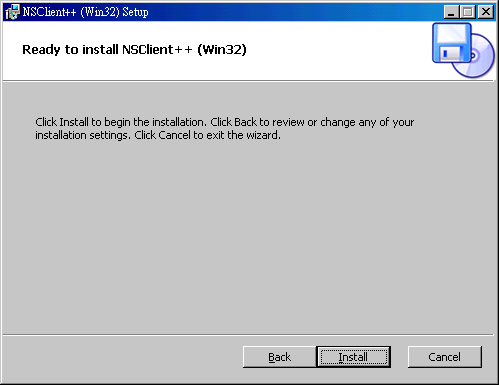
安裝完成後
請勾選 Start service → Finish

Part V: 將Windows 伺服器/PC (Nagios Client)加入到 Nagios監控範圍
請於Server上面
複製 windows.cfg 給 Windows 伺服器或是PC 使用
這邊設定檔的名稱 假定為 windows129.cfg
(這邊個人處理方式目前以 IP命名)
# cp /etc/nagios/objects/windows.cfg /etc/nagios/objects/windows129.cfg
修改相關設定
# vi /etc/nagios/objects/windows129.cfg
Step1:
請將文件內 主機名稱(host_name) winserver 改為Windows 主機名稱
例如 winpc129
Step 2:
請將預設 IP 修改為 正確的 IP 位址
將
define host{
use windows-server ; 需參考template不可以自己亂取名稱
host_name winserver ; The name we're giving to this host 主機名稱
alias My Windows Server ; A longer name associated with the host 主機名稱(長)
address 192.168.1.2 ; IP address of the host 用戶端IP位址
}
改為
define host{
use windows-pc ; Inherit default values from a template
host_name winpc129 ; The name we're giving to this host
alias Windows PC 192.168.3.129 ; A longer name associated with the host
address 192.168.3.129 ; IP address of the host
}
另外確認所有的 define service 內的設定 host_name都是新的主機名稱(winpc129)
將服務 套用 generic-pc-service 符合一般PC 只於上班時間運作
define service{
use generic-pc-service
host_name winpc129
service_description NSClient++ Version
check_command check_nt!CLIENTVERSION
}
另外一般的 PC 不會開 網頁伺服器 故註解 W3SVC
#define service{
# use generic-pc-service
# host_name winpc129
# service_description W3SVC
# check_command check_nt!SERVICESTATE!-d SHOWALL -l W3SVC
# }
要注意的是 主機群組只能定義一次,
windowsxxx.cfg 內的主機群組定義
都要註解起來, 才不會發生錯誤!!
故請將設定檔內的
define hostgroup{
hostgroup_name windows-servers ; The name of the hostgroup
alias Windows Servers ; Long name of the group
}
註解起來
#define hostgroup{
# hostgroup_name windows-servers ; The name of the hostgroup
# alias Windows Servers ; Long name of the group
# }
(這邊如果為了迅速 | 懶的改, 在ip 沒有改變的狀況底下可以下載已改好檔案 #wget http://dl.dropbox.com/u/12787647/server-windows.cfg
#wget http://dl.dropbox.com/u/12787647/server-windows129.cfg
(如果有改IP 就請修正 Client 的IP)
覆蓋且移動原來的設定檔
# mv server-windows.cfg /etc/nagios/objects/windows.cfg
# mv server-windows129.cfg /etc/nagios/objects/windows129.cfg
這個部份就自行考量 ^^)
最後修改 /etc/nagios/nagios.cfg 內的設定
讓 windows129.cfg 設定載入, 可以監控nagios Clinet
#vi /etc/nagios/nagios.cfg
加入
cfg_file=/etc/nagios/objects/windows129.cfg
確認設定檔是否無誤
# nagios -v /etc/nagios/nagios.cfg
重新啟動 nagios 使其生效
#rcnagios restart
(註: 重新啟動之後不會馬上偵測, 會過幾分鐘才偵測)
這樣第一份 Windows 機器的設定檔就設定完成
( 確認你的 Windows firewall 可以被server ping 或是 port 12489 沒有擋 )
( for win2008 在管理工具內防火牆管理File And Print Sharing (Echo Request - ICMPv4-IN) )
可以在 Server 上確認
# /usr/lib/nagios/plugins/check_nt -H 192.168.3.129 -p 12489 -v CLIENTVERSION
# /usr/lib/nagios/plugins/check_nt -H 192.168.3.129 -p 12489 -v USEDDISKSPACE -l c
Window Client 也可以重新啟動 nsclient++
如果要加入第二台 Windows 機器設定
可以複製 原來的Windows 設定, 例如
# cp /etc/nagios/objects/windows129.cfg /etc/nagios/objects/windows131.cfg
修改 主機名稱 及 IP 即可
以上 ^__^ 大功告成
相關畫面如下

Optional Lab: 透過 即時通訊 軟體來通知
以上預設的通知方式是透過 e-mail 來傳送通知
如果希望使用更即時的通知方式, 也可以透過 即時通訊軟體來通知管理者
這邊建議使用 Jabber 的方式來通知管理者 ( 也就是透過 Google Talk )
(之前 perl 的方式目前來通知 jabber 有點問題, 我們使用 python-xmpppy)
(參考 http://blogs.gnome.org/woody/2012/02/18/nagios-xmpp-notifications-for-gtalk/ )
但是要使用 Jabber ( Google talk's XMPP ) 的服務要安裝相關套件
這邊我們使用 OneClickInstall 的方式來安裝套件
安裝 python-xmpppy 套件
以下這行指令在同一行
#OneClickInstallCLI http://software.opensuse.org/ymp/devel:languages:python/openSUSE_12.1/python-xmpppy.ymp
驗證是否有安裝
將網頁上的 程式儲存為 notify_via_jabber 並修改自己的 google 帳號以及google密碼 ( 以下的google 帳號必須與等等被通知的google 帳號互為 google talk 聯絡人 )
# vi /usr/local/bin/notify-via-jabber
#!/usr/bin/python -tt
import warnings
warnings.simplefilter("ignore")
import xmpp
from xmpp.protocol import Message
from optparse import OptionParser
import ConfigParser
import sys
import os
parser = OptionParser()
opts, args = parser.parse_args()
if len(args) < 1:
print "xmppsend message [to whom, multiple args]"
sys.exit(1)
msg = args[0]
msg = msg.replace('\\n', '\n')
# Connect to the server
c = xmpp.Client('gmail.com')
c.connect( ( 'talk.google.com', 5223 ) )
# Authenticate to the server
jid = xmpp.protocol.JID( 'example@gmail.com' )
c.auth( jid.getNode( ), 'yourgmailpassword' )
if len(args) < 2:
r = c.getRoster()
for user in r.keys():
if user == username:
continue
c.send(Message(user, '%s' % msg))
else:
for user in args[1:]:
c.send(Message(user, '%s' % msg))
懶的 vi 是吧 ^_^
#wget http://dl.dropbox.com/u/12787647/2012-3-31-nagios/notify-via-jabber
但是再如何懶也要進去填個帳號吧
#chmod a+x notify-via-jabber
# mv notify-via-jabber /usr/local/bin/
測試 一下傳送訊息
#/usr/local/bin/notify-via-jabber "testmesg" 被通知的google帳號
接下來修改相關設定
將 notify-by-jabber 以及 host-notify-by-jabber 加入到/etc/nagios/objects/commands.cfg
# vi /etc/nagios/objects/commands.cfg
加入 請複製參考網頁上面的設定
define command{
command_name host-notify-by-jabber
command_line /usr/local/bin/notify-via-jabber "Host '$HOSTALIAS$' is $HOSTSTATE$ - Info : $HOSTOUTPUT$" $CONTACTPAGER$
}
define command{
command_name notify-by-jabber
command_line /usr/local/bin/notify-via-jabber "$NOTIFICATIONTYPE$ $HOSTNAME$ $SERVICEDESC$ $SERVICESTATE$ $SERVICEOUTPUT$ $LONGDATETIME$" $CONTACTPAGER$
}
由上面的指令可以看出 notify_via_jabber 後面傳送的 Google 帳號是由 $CONTACTPAGER$ 來指定
所以我們要新增 聯絡人的 PAGER, 也就是 google 帳號
# vi /etc/nagios/objects/contacts.cfg
請加入 pager 的設定, 就是要傳送的 google 帳號
define contact{
contact_name nagiosadmin ; Short name of user
use generic-contact ; Inherit default values from generic-contact template (defined above)
alias Nagios Admin ; Full name of user
email sakana@study-area.org
pager 要傳送的google帳號
}
故我們接下來修改範本設定檔 /etc/nagios/objects/templetes.cfg
# vi /etc/nagios/objects/templates.cfg
修改 generic-contact 內容, 加入 jabber 的設定
define contact{
name generic-contact ; The name of this contact template
service_notification_period 24x7 ; service notifications can be sent anytime
host_notification_period 24x7 ; host notifications can be sent anytime
service_notification_options w,u,c,r,f,s ; send notifications for all service statesents
host_notification_options d,u,r,f,s ; send notifications for all host states
service_notification_commands notify-service-by-email,notify-by-jabber ; 加入設定
host_notification_commands notify-host-by-email,host-notify-by-jabber ; 加入設定
register 0 ; DONT REGISTER THIS DEFINITION - ITS NOT A REAL CONTACT, JUST A TEMPLATE!
}
確認設定檔是否無誤
# nagios -v /etc/nagios/nagios.cfg
重新啟動 nagios 使其生效
#rcnagios restart
Optional Lab: Nagios Map icon
有關於在status的頁面要使用圖案
可以上 Nagios 的官網去抓 icon
http://exchange.nagios.org/directory/Images-and-Logos
我是去抓 Base Images
頁面如下
http://exchange.nagios.org/directory/Graphics-and-Logos/Images-and-Logos/Base-Images/details
下載下來檔案名稱為 base.zip (假設下載到 /root)
解壓縮在 /usr/share/nagios/images/logos/base
#unzip /root/base.zip
#mv /root/base /usr/share/nagios/images/logos
可以在該主機的設定檔內加入以下區段
define hostextinfo{
host_name da-1
icon_image base/linux40.gif ;icon的圖案
icon_image_alt linux
statusmap_image base/linux40.gd2 ;這個才是statusmap上面的圖案,最好用gd2省資源
}
icon要放在安裝目錄的 images/logos目錄下
openSUSE安裝的目錄路徑就是 /usr/share/nagios/images/logos
所以路徑寫法就會是 base/linux40.gd2
但是上面的寫法
要一個一個主機設定這樣比較麻煩
所以可以使用範本的方式來解決
# vi /etc/nagios/objects/templates.cfg
將 剛剛的範本檔案
# Linux host definition template - This is NOT a real host, just a template!
define host{
name linux-server ; The name of this host template
use generic-host ; This template inherits other values from the generic-host template
check_period 24x7 ; By default, Linux hosts are checked round the clock
check_interval 5 ; Actively check the host every 5 minutes
retry_interval 1 ; Schedule host check retries at 1 minute intervals
max_check_attempts 10 ; Check each Linux host 10 times (max)
check_command check-host-alive ; Default command to check Linux hosts
notification_period workhours ; Linux admins hate to be woken up, so we only notify during the day
; Note that the notification_period variable is being overridden from
; the value that is inherited from the generic-host template!
notification_interval 120 ; Resend notifications every 2 hours
notification_options d,u,r ; Only send notifications for specific host states
contact_groups admins ; Notifications get sent to the admins by default
hostgroups linux-servergroup ; Host groups that Linux servers should be a member of
register 0 ; DONT REGISTER THIS DEFINITION - ITS NOT A REAL HOST, JUST A TEMPLATE!
}
加上相關設定
# Linux host definition template - This is NOT a real host, just a template!
define host{
name linux-server ; The name of this host template
use generic-host ; This template inherits other values from the generic-host template
check_period 24x7 ; By default, Linux hosts are checked round the clock
check_interval 5 ; Actively check the host every 5 minutes
retry_interval 1 ; Schedule host check retries at 1 minute intervals
max_check_attempts 10 ; Check each Linux host 10 times (max)
check_command check-host-alive ; Default command to check Linux hosts
notification_period workhours ; Linux admins hate to be woken up, so we only notify during the day
; Note that the notification_period variable is being overridden from
; the value that is inherited from the generic-host template!
notification_interval 120 ; Resend notifications every 2 hours
notification_options d,u,r ; Only send notifications for specific host states
contact_groups admins ; Notifications get sent to the admins by default
hostgroups linux-servergroup ; Host groups that Linux servers should be a member of
icon_image base/linux40.gif
icon_image_alt linux
statusmap_image base/linux40.gd2 ;這個才是statusmap 上面的圖案, 最好用gd2 省資源
register 0 ; DONT REGISTER THIS DEFINITION - ITS NOT A REAL HOST, JUST A TEMPLATE!
}
這樣就可以讓所有機器都套用
windows 還有其他的機器也可以比照辦理
加完要重新啟動 nagios
#rcnagios restart
~enjoy it
Nagios 是一個 opensource 的電腦系統與網路服務的監控軟體.
Nagios 可以監控主機與服務,當異常狀況發生時, 可以通知指定的聯絡人. 或是以指定的通知方式來聯繫, 另外也有眾多的 Plugin 可以使用.
官方網站
http://www.nagios.org/
openSUSE Linux 為開放社群的 openSUSE Poroject 所開發.
openSUSE 10.3 之後可以藉由 one-click Install 的方式來進行套件安裝
使用者可以在 http://software.opensuse.org/search
搜尋 想要安裝的套件, 藉由單鍵安裝, 快速安裝套件以及增加套件庫.
另外, http://software.opensuse.org/search 也提供其他 Linux 發行版本的套件下載( Fedora, Debian, Ubuntu, CentOS, RHEL, SLES)
架設環境介紹
Server
OS: openSUSE 12.1
IP: 192.168.3.128 (請依照實際的IP 調整)
Linux Client: 192.168.3.130 (請依照實際的IP 調整)
Windows Client: 192.168.3.129 (請依照實際的IP 調整)
Part I: Nagios伺服器的建置
Server:
1. 安裝Nagios 套件
於server 上面使用 one-click install 安裝 Nagios 套件
Nagios
http://software.opensuse.org/ymp/openSUSE:12.1/standard/nagios.ymp
Nagios Plugins
http://software.opensuse.org/ymp/openSUSE:12.1/standard/nagios-plugins.ymp
Nagios Addons Extras
http://software.opensuse.org/ymp/openSUSE:12.1/standard/nagios-plugins-extras.ymp
(如果要使用 putty 連線SSH 到主機, 請確認SSH 服務有開 #rcsshd status )
( 啟動SSH 服務 #rcsshd start )
(可以使用 #hostname server 來變更主機名稱, 並請重新連線 SSH 還有 #rcxdm restart 重新啟動 X -- 如果使用 Ezilla Lab)
當然也可以使用指令的方式
# zypper install nagios nagios-plugins nagios-plugins-extras
2.建立nagiosadmin 密碼
第一次建立密碼的時候 請加上 -c 選項,
新增第二個使用者, 則不需要加上 -c ( 會清空現有的密碼)
請於server 上面
#htpasswd2 -c /etc/nagios/htpasswd.users nagiosadmin
輸入密碼
再次輸入
3.建立nagiosuser 密碼
請於server 上面
#htpasswd2 /etc/nagios/htpasswd.users nagiosuser
輸入密碼
再次輸入
筆記補充: 預設的nagiosadmin 為管理者, 其相關設定, 設定於/etc/nagios/cgi.cfg 所以如果不想使用 nagiosadmin 為預設管理者帳號, 請修改該檔案內的設定.
4.檢視並設定開機啟動nagios
#chkconfig nagios --list
#chkconfig nagios on
#chkconfig nagios --list
5.重新啟動.apache2 並設定開機啟動
#rcapache2 restart
#chkconfig apache2 --list
#chkconfig apache2 on
#chkconfig apache2 --list
6.啟動Nagios
#rcnagios start
7.測試Nagios 主機運作
開啟瀏覽器 於 URL上面輸入 http://127.0.0.1/nagios/
以上的URL 請視連線的IP調整
會出現需要授權的視窗
請輸入
使用者名稱 nagiosadmin
密碼 之前設定的密碼
這個時候應該會出現 Nagios 的相關畫面
如下圖所示
可以觀察相關服務狀況
此時會發現 HTTP 呈現警告狀態
原因為 Apache2 有啟動但是沒有預設的網頁
要解除這個情形可以 建立一個預設網頁
#vi /srv/www/htdocs/index.html
加入
<html> It works ! </html>
受監控的相關主機都會被紀錄在 /etc/nagios/nagios.cfg
Linux 的本機的監控設定也是設定於 /etc/nagios/nagios.cfg 內的
# Definitions for monitoring the local (Linux) host
cfg_file=/etc/nagios/objects/localhost.cfg
也可以使用資料夾的方式匯入設定檔(設定於 /etc/nagios/nagios.cfg)
# You can also tell Nagios to process all config files (with a .cfg
# extension) in a particular directory by using the cfg_dir
# directive as shown below:
#cfg_dir=/etc/nagios/servers
故可以得知之後要監控的主機,
相關的設定檔都要放在 /etc/nagios/objects 資料夾內,
且於/etc/nagios/nagios.cfg 要有cfg_file=xxxx.cfg的設定
另外如果要檢視 Nagios 設定有沒有問題
可以使用
#nagios -v /etc/nagios/nagios.cfg
來觀察匯入那些設定檔, 以及有沒有問題
更多的文件也可以參考這邊
http://wiki.nagios.org/index.php/Main_Page
**修改通知 e-mail **
# vi /etc/nagios/objects/contacts.cfg
修改預設的 e-mail
define contact{
contact_name nagiosadmi ; Short name of user
use generic-contact ; Inherit default values from generic-contact template (defined above)
alias Nagios Admin ; Full name of user
email sakana@study-area.org ; <<***** CHANGE THIS TO YOUR EMAIL ADDRESS ******
}
當然這邊要確認 mail service 有沒有啟動
可以下 #rcpostfix status 確認 ( 啟動請用 #rcpostfix start )
檢視 Nagios 設定有沒有問題
#nagios -v /etc/nagios/nagios.cfg
重新啟動 Nagios
#rcnagios restart
**以上 Nagios 伺服器建置完成**
Part II: Nagios 用戶端-- Linux 伺服器用戶端建置
1.安裝 nagios-nrpe套件
請於Client端啟動 YaST 軟體管理
#yast2 sw_single
並搜尋 nrpe 應該就會看到
nagios-nrpe 套件
nagios-plugins-nrpe 套件
→ 安裝 → 套用
( 或是考慮使用 #yast -i nagios-nrpe nagios-plugins-nrpe)
(根據官方的說法是 相較於 check_by_ssh 的方式比較省資源)
2.設定nagios-nrpe 套件
(另外最好去確認 /etc/services 有沒有 nrpe 5666/tcp # nagios nrpe 的設定)
#grep 5666 /etc/services
修改設定檔 允許 Nagios 伺服器連線
# vi /etc/nagios/nrpe.cfg
allowed_hosts=127.0.0.1,192.168.3.128
這邊要注意 127.0.0.1後面要加上 逗點 , 然後主機 IP 不能有空格
不然會出現沒有辦法建立 SSL HandShake
(這個部份可以解釋, 如果nrpe是使用 SystemV 的形式啟動後面都會出現不能建立SSL Handshake ,但是以Xinetd 就不會)
#rcnrpe start
4.測試nagios-nrpe
設定完成之後 可以於本機及遠端測試
請於Client 端
執行 check_nrpe 測試, 成功應該會出現 NRPE的版本
# /usr/lib/nagios/plugins/check_nrpe -H localhost
NRPE v2.12
*************************************************************
請於 Server 端
安裝 nagios-nrpe 套件
#yast -i nagios-nrpe nagios-plugins-nrpe
針對 nagios client 測試 nagios-nrpe 成功應該會出現 NRPE的版本
#/usr/lib/nagios/plugins/check_nrpe -H 192.168.3.130
NRPE v2.12
(這邊請確認 firewall 是否關閉, 或是准許 nrpe 通過, 可以使用 #yast2 firewall 關閉防火牆測試)
有關於 /etc/nagios/nrpe.conf
(為了防止之後 /etc/hosts 名稱對應有問題建議可以將 localhost 改為 127.0.0.1)
#vi /etc/nagios/nrpe.conf
command[check_ssh]=/usr/lib/nagios/plugins/check_ssh 127.0.0.1
command[check_smtp]=/usr/lib/nagios/plugins/check_smtp 127.0.0.1
*************************************************************
接下來來測試本機相關資訊
請於 Client 端
執行相關測試
線上使用者人數
#/usr/lib/nagios/plugins/check_nrpe -H localhost -c check_users
平均負載
#/usr/lib/nagios/plugins/check_nrpe -H localhost -c check_load
目前使用的process
#/usr/lib/nagios/plugins/check_nrpe -H localhost -c check_total_procs
Zombie Process
#/usr/lib/nagios/plugins/check_nrpe -H localhost -c check_zombie_procs
磁碟狀況
#/usr/lib/nagios/plugins/check_nrpe -H localhost -c check_hda1
(這個部份command[check_hda1]=/usr/lib/nagios/plugins/check_disk -w 20% -c 10% -p /dev/hda1
因為現在 IDE的硬碟以及使用 Kernel 2.6.20 以前的主機越來越少, 所以應該是對應到 /dev/sda1)
故可以修改 /etc/nagios/nrpe.cfg 內的 command 對應
(複製原來的 hda1 改為要監控的 Partition)
#vi /etc/nagios/nrpe.cfg
#command[check_hda1]=/usr/lib/nagios/plugins/check_disk -w 20% -c 10% -p /dev/hda1
command[check_sda1]=/usr/lib/nagios/plugins/check_disk -w 20% -c 10% -p /dev/sda1
command[check_sda2]=/usr/lib/nagios/plugins/check_disk -w 20% -c 10% -p /dev/sda2
command[check_ssh]=/usr/lib/nagios/plugins/check_ssh localhost
command[check_smtp]=/usr/lib/nagios/plugins/check_smtp localhost
(針對想要加入的指令 可以參考 /usr/lib/nagios/plugins 目錄)
(為了防止之後 /etc/hosts 名稱對應有問題建議可以將 localhost 改為 127.0.0.1)
command[check_ssh]=/usr/lib/nagios/plugins/check_ssh 127.0.0.1
command[check_smtp]=/usr/lib/nagios/plugins/check_smtp 127.0.0.1
(這邊如果為了迅速 | 懶的改, 在ip 沒有改變的狀況底下可以下載已改好檔案 #wget http://dl.dropbox.com/u/12787647/client-nrpe.cfg
(如果IP有改就改 allowed_hosts= 後面接的IP吧 !! )
(Ezilla Lab 請將代號改成 vda1)
覆蓋且移動原來的設定檔
#mv client-nrpe.cfg /etc/nagios/nrpe.cfg
這個部份就自行考量 ^^)
重新啟動 nrpe 服務( 修改完 /etc/nagios/nrpe.cfg 請記得重新啟動服務)
#rcnrpe restart
再次測試
# /usr/lib/nagios/plugins/check_nrpe -H localhost -c check_sda1
# /usr/lib/nagios/plugins/check_nrpe -H localhost -c check_sda2
另外於 Server端測試 相關的指令
#/usr/lib/nagios/plugins/check_nrpe -H 192.168.3.130 -c check_sda1
#/usr/lib/nagios/plugins/check_nrpe -H 192.168.3.130 -c check_sda2
Part III: 將linux 伺服器(Nagios Client)加入到 Nagios監控範圍
*************************************************************
Lab: 建立範本 for host
新的主機範本 windows-pc
新的群組範本 windows-pcgroup
新的群組範本 linux-servergroup
新的服務範本 generic-pc-service
請於Server上面
nagios 設定檔內可以經由套用範本 use 的方式來加速管理
用來自訂 監控的時間 或是 設定預設的群組
舉例來說 一般的 workstation 不會 24 小時開機, 只會在上班時間開機
所以先建立, windows-pc 的範本,針對一般的 PC, 指定 上班時間監控.
Nagios 範本設定檔 /etc/nagios/objects/templates.cfg
Nagios 時間範本設定檔 /etc/nagios/objects/timeperiods.cfg
修改 Nagios 的範本檔, 將 windows-servers 複製一份改為 windows-pc
並修改 檢查時間為 workhours
#vi /etc/nagios/objects/templates.cfg
建立新的主機範本 windows-pc
# Windows host definition template - This is NOT a real host, just a template!
define host{
name windows-pc ; The name of this host template 範本的名稱
use generic-host ; Inherit default values from the generic-host template
check_period workhours ; 檢查的時間範圍
check_interval 5 ; Actively check the server every 5 minutes
retry_interval 1 ; Schedule host check retries at 1 minute intervals
max_check_attempts 10 ; Check each server 10 times (max)
check_command check-host-alive; Default command to check if servers are "alive"
notification_period workhours ; Send notification out at any time - day or night
notification_interval 30 ; Resend notifications every 30 minutes
notification_options d,r ; Only send notifications for specific host states
contact_groups admins ; Notifications get sent to the admins by default
hostgroups windows-pcgroup ; window-pc 主機預設會歸屬的群組
register 0 ; DONT REGISTER THIS - ITS JUST A TEMPLATE
}
另外定義一個群組 為 windows-pcgroup
讓剛剛建立的主機 範本可以直接加入
# Define host group for Windows PC
define hostgroup{
hostgroup_name windows-pcgroup ; The name of the hostgroup
alias Windows PC Group ; Long name of the group
}
定義一個群組 為 linux-servergroup
讓 linux-server 範本 可以直接加入
# Define host group for Linux Servers
define hostgroup{
hostgroup_name linux-servergroup ; The name of the hostgroup
alias Linux Server Group ; Long name of the group
}
定義一個群組 為 windows-server (原本定義在 windows.cfg)
讓 windows-server 範本 可以直接加入
# Define a hostgroup for Windows machines
# All hosts that use the windows-server template will automatically be a member of this group
define hostgroup{
hostgroup_name windows-servers ; The name of the hostgroup
alias Windows Servers ; Long name of the group
}
修改 linux-server 的範本 讓他自動加入 linux-servergroup
# Linux host definition template - This is NOT a real host, just a template!
define host{
name linux-server ; The name of this host template
use generic-host ; This template inherits other values from the generic-host template
check_period 24x7 ; By default, Linux hosts are checked round the clock
check_interval 5 ; Actively check the host every 5 minutes
retry_interval 1 ; Schedule host check retries at 1 minute intervals
max_check_attempts 10 ; Check each Linux host 10 times (max)
check_command check-host-alive ; Default command to check Linux hosts
notification_period workhours ; Linux admins hate to be woken up, so we only notify during the day
; Note that the notification_period variable is being overridden from
; the value that is inherited from the generic-host template!
notification_interval 120 ; Resend notifications every 2 hours
notification_options d,u,r ; Only send notifications for specific host states
contact_groups admins ; Notifications get sent to the admins by default
hostgroups linux-servergroup ; Host groups that Linux servers should be a member of
register 0 ; DONT REGISTER THIS DEFINITION - ITS NOT A REAL HOST, JUST A TEMPLATE!
}
建立新的服務範本 generic-pc-service 給一般PC使用
因為一般PC 只會在工作時間開機, 可以複製 generic-service 的範本來修改
# Generic PC service definition template - This is NOT a real service, just a template!
define service{
name generic-pc-service ; The 'name' of this service template
active_checks_enabled 1 ; Active service checks are enabled
passive_checks_enabled 1 ; Passive service checks are enabled/accepted
parallelize_check 1 ; Active service checks should be parallelized (disabling this can lead to major performance problems)
obsess_over_service 1 ; We should obsess over this service (if necessary)
check_freshness 0 ; Default is to NOT check service 'freshness'
notifications_enabled 1 ; Service notifications are enabled
event_handler_enabled 1 ; Service event handler is enabled
flap_detection_enabled 1 ; Flap detection is enabled
failure_prediction_enabled 1 ; Failure prediction is enabled
process_perf_data 1 ; Process performance data
retain_status_information 1 ; Retain status information across program restarts
retain_nonstatus_information 1 ; Retain non-status information across program restarts
is_volatile 0 ; The service is not volatile
check_period workhours ; The service can be checked at any time of the day
max_check_attempts 3 ; Re-check the service up to 3 times in order to determine its final (hard) state
normal_check_interval 10 ; Check the service every 10 minutes under normal conditions
retry_check_interval 2 ; Re-check the service every two minutes until a hard state can be determined
contact_groups admins ; Notifications get sent out to everyone in the 'admins' group
notification_options w,u,c,r ; Send notifications about warning, unknown, critical, and recovery events
notification_interval 60 ; Re-notify about service problems every hour
notification_period workhours ; Notifications can be sent out at any time
register 0 ; DONT REGISTER THIS DEFINITION - ITS NOT A REAL SERVICE, JUST A TEMPLATE!
}
workhours 的檢查時間為 早上 9:00 到 下午 5:00
可以 參考 /etc/nagios/objects/timeperiods.cfg
設定內容如下
# 'workhours' timeperiod definition
define timeperiod{
timeperiod_name workhours
alias Normal Work Hours
monday 09:00-17:00
tuesday 09:00-17:00
wednesday 09:00-17:00
thursday 09:00-17:00
friday 09:00-17:00
}
(這邊如果為了迅速 | 懶的改, 在ip 沒有改變的狀況底下可以下載已改好檔案 #wget http://dl.dropbox.com/u/12787647/server-templates.cfg
覆蓋且移動原來的設定檔
# mv server-templates.cfg /etc/nagios/objects/templates.cfg
這個部份就自行考量 ^^)
請於Server上面
複製 windows 的設定檔 來當成 linux server的設定檔
# cp /etc/nagios/objects/windows.cfg /etc/nagios/objects/linux.cfg
修改 /etc/nagios/objects/linux.cfg 內的設定 加上主機名稱 及 修改為Client 的IP
#vi /etc/nagios/objects/linux.cfg
將原來的
define host{
use windows-server ; Inherit default values from a template
host_name winserver ; The name we're giving to this host
alias My Windows Server ; A longer name associated with the host
address 192.168.1.2 ; IP address of the host
}
改為 (定義遠端Linux主機的名稱及IP)
define host{
use linux-server ; 這邊的名稱要參照 template 內的名稱,故不能亂取
host_name suseserver130 ; The name we're giving to this host 主機名稱(簡稱)
alias openSUSE Server2 ; A longer name associated with the host 主機名稱(長)
address 192.168.3.130 ; IP address of the host
}
接下來處理服務的部份, 因為所有要監控的服務都會認主機名稱
使用 :%s/winserver/suseserver130/gc 將 define service{ } 內的
host_name winserver
改為
host_name suseserver130
接下來將群組註解
將原來
define hostgroup{
hostgroup_name windows-servers ; The name of the hostgroup
alias Windows Servers ; Long name of the group
}
改為
#define hostgroup{
#hostgroup_name windows-servers ; The name of the hostgroup
#alias Windows Servers ; Long name of the group
#}
設定要監控的服務
將define service{ } 內的 service_description 及 check_command
修改(由check_nt 改為check_nrpe)
define service{
use generic-service
host_name suseserver130
service_description NSClient++ Version
check_command check_nt!CLIENTVERSION
}
改為(以線上使用者為例)
define service{
use generic-service
host_name suseserver130
service_description Online Users
check_command check_nrpe!check_users
}
define service{
use generic-service
host_name suseserver130
service_description Check sda1
check_command check_nrpe!check_sda1
}
define service{
use generic-service
host_name suseserver130
service_description Check sda2
check_command check_nrpe!check_sda2
}
define service{
use generic-service
host_name suseserver130
service_description Check Load
check_command check_nrpe!check_load
}
define service{
use generic-service
host_name suseserver130
service_description Total_Procs
check_command check_nrpe!check_total_procs
}
define service{
use generic-service
host_name suseserver130
service_description Check SSH
check_command check_nrpe!check_ssh
}
define service{
use generic-service
host_name suseserver130
service_description Check SMTP
check_command check_nrpe!check_smtp
}
請注意主機名稱需對應 define host { } 區段內的 host_name
(這邊如果為了迅速 | 懶的改, 在ip 沒有改變的狀況底下可以下載已改好檔案 #wget http://dl.dropbox.com/u/12787647/server-linux.cfg
(IP 有變就更改 Client 的IP吧)
覆蓋且移動原來的設定檔
# mv server-linux.cfg /etc/nagios/objects/linux.cfg
這個部份就自行考量 ^^)
整理一下對應關係
Server: 建立要監控對象的範本
- /etc/nagios/object/linux.cfg
Client: 設定允許監控伺服器 IP, NRPE 相對應的指令
- /etc/nagios/nrpe.cfg
**設定 NRPE 指令對應**
請於Server上面
修改 /etc/nagios/objects/commands.cfg 加入 check_nrpe 的指令對應
# vi /etc/nagios/objects/commands.cfg
加入
# 'check_nrpe' command definition
define command{
command_name check_nrpe
command_line $USER1$/check_nrpe -H $HOSTADDRESS$ -c $ARG1$
}
(這邊如果為了迅速 | 懶的改, 可以下載已改好檔案
#wget http://dl.dropbox.com/u/12787647/server-commands.cfg
覆蓋且移動原來的設定檔
# mv server-commands.cfg /etc/nagios/objects/commands.cfg
這個部份就自行考量 ^^)
**設定 Nagios 載入 linux.cfg **
請於Server上面
將剛剛的 linux.cfg 複製一份給 linux server 使用
# cp /etc/nagios/objects/linux.cfg /etc/nagios/objects/linux130.cfg
最後修改 /etc/nagios/nagios.cfg 內的設定 讓 linux.cfg 設定載入, 可以監控nagios Clinet
#vi /etc/nagios/nagios.cfg
加入
#Definitions for monitoring the Linux server
cfg_file=/etc/nagios/objects/linux130.cfg
確認設定檔是否無誤
# nagios -v /etc/nagios/nagios.cfg
重新啟動 nagios 使其生效
#rcnagios restart
(註: 重新啟動之後不會馬上偵測, 會過幾分鐘才偵測)
Part IV: Nagios 用戶端-- Windows 伺服器/ Windows PC用戶端建置
1.安裝 NSClient++ 軟體
請於 Window 伺服器 或是用戶端
開啟瀏覽器 連線至 NSClient++ 的專案網頁下載軟體
http://sourceforge.net/projects/nscplus/
依造機器的平台 x86 or x86_64 下載軟體 這邊以0.3.8-Win32 為例
http://downloads.sourceforge.net/project/nscplus/nscplus/NSClient%2B%2B%200.3.8/NSClient%2B%2B-0.3.8-Win32.msi?use_mirror=ncu&ts=1280992189&r=http://sourceforge.net/projects/nscplus/files/
出現安裝精靈
請按 Next
接下來 End-User License Agreement
請勾選 ' I accept the terms in the License Agreement' → Next
接下來Custom Setup
請按 Next
NSClient 會偵測是否有舊的設定檔
由於是新的安裝 請按 Next
這個部份是最重要的部份
Allow hosts: 請輸入 Nagios Server的IP (只允許這台機器連線)
再針對要載入的模組 勾選 → Next
開始安裝
點選 Install
安裝完成後
請勾選 Start service → Finish
Part V: 將Windows 伺服器/PC (Nagios Client)加入到 Nagios監控範圍
請於Server上面
複製 windows.cfg 給 Windows 伺服器或是PC 使用
這邊設定檔的名稱 假定為 windows129.cfg
(這邊個人處理方式目前以 IP命名)
# cp /etc/nagios/objects/windows.cfg /etc/nagios/objects/windows129.cfg
修改相關設定
# vi /etc/nagios/objects/windows129.cfg
Step1:
請將文件內 主機名稱(host_name) winserver 改為Windows 主機名稱
例如 winpc129
- 可以利用 vi 的取代功能 :%s/winserver/winpc129/gc
Step 2:
請將預設 IP 修改為 正確的 IP 位址
將
define host{
use windows-server ; 需參考template不可以自己亂取名稱
host_name winserver ; The name we're giving to this host 主機名稱
alias My Windows Server ; A longer name associated with the host 主機名稱(長)
address 192.168.1.2 ; IP address of the host 用戶端IP位址
}
改為
define host{
use windows-pc ; Inherit default values from a template
host_name winpc129 ; The name we're giving to this host
alias Windows PC 192.168.3.129 ; A longer name associated with the host
address 192.168.3.129 ; IP address of the host
}
另外確認所有的 define service 內的設定 host_name都是新的主機名稱(winpc129)
將服務 套用 generic-pc-service 符合一般PC 只於上班時間運作
define service{
use generic-pc-service
host_name winpc129
service_description NSClient++ Version
check_command check_nt!CLIENTVERSION
}
另外一般的 PC 不會開 網頁伺服器 故註解 W3SVC
#define service{
# use generic-pc-service
# host_name winpc129
# service_description W3SVC
# check_command check_nt!SERVICESTATE!-d SHOWALL -l W3SVC
# }
要注意的是 主機群組只能定義一次,
windowsxxx.cfg 內的主機群組定義
都要註解起來, 才不會發生錯誤!!
故請將設定檔內的
define hostgroup{
hostgroup_name windows-servers ; The name of the hostgroup
alias Windows Servers ; Long name of the group
}
註解起來
#define hostgroup{
# hostgroup_name windows-servers ; The name of the hostgroup
# alias Windows Servers ; Long name of the group
# }
(這邊如果為了迅速 | 懶的改, 在ip 沒有改變的狀況底下可以下載已改好檔案 #wget http://dl.dropbox.com/u/12787647/server-windows.cfg
#wget http://dl.dropbox.com/u/12787647/server-windows129.cfg
(如果有改IP 就請修正 Client 的IP)
覆蓋且移動原來的設定檔
# mv server-windows.cfg /etc/nagios/objects/windows.cfg
# mv server-windows129.cfg /etc/nagios/objects/windows129.cfg
這個部份就自行考量 ^^)
最後修改 /etc/nagios/nagios.cfg 內的設定
讓 windows129.cfg 設定載入, 可以監控nagios Clinet
#vi /etc/nagios/nagios.cfg
加入
cfg_file=/etc/nagios/objects/windows129.cfg
確認設定檔是否無誤
# nagios -v /etc/nagios/nagios.cfg
重新啟動 nagios 使其生效
#rcnagios restart
(註: 重新啟動之後不會馬上偵測, 會過幾分鐘才偵測)
這樣第一份 Windows 機器的設定檔就設定完成
( 確認你的 Windows firewall 可以被server ping 或是 port 12489 沒有擋 )
( for win2008 在管理工具內防火牆管理File And Print Sharing (Echo Request - ICMPv4-IN) )
可以在 Server 上確認
# /usr/lib/nagios/plugins/check_nt -H 192.168.3.129 -p 12489 -v CLIENTVERSION
# /usr/lib/nagios/plugins/check_nt -H 192.168.3.129 -p 12489 -v USEDDISKSPACE -l c
Window Client 也可以重新啟動 nsclient++
如果要加入第二台 Windows 機器設定
可以複製 原來的Windows 設定, 例如
# cp /etc/nagios/objects/windows129.cfg /etc/nagios/objects/windows131.cfg
修改 主機名稱 及 IP 即可
以上 ^__^ 大功告成
相關畫面如下
Optional Lab: 透過 即時通訊 軟體來通知
以上預設的通知方式是透過 e-mail 來傳送通知
如果希望使用更即時的通知方式, 也可以透過 即時通訊軟體來通知管理者
這邊建議使用 Jabber 的方式來通知管理者 ( 也就是透過 Google Talk )
(之前 perl 的方式目前來通知 jabber 有點問題, 我們使用 python-xmpppy)
(參考 http://blogs.gnome.org/woody/2012/02/18/nagios-xmpp-notifications-for-gtalk/ )
但是要使用 Jabber ( Google talk's XMPP ) 的服務要安裝相關套件
這邊我們使用 OneClickInstall 的方式來安裝套件
安裝 python-xmpppy 套件
以下這行指令在同一行
#OneClickInstallCLI http://software.opensuse.org/ymp/devel:languages:python/openSUSE_12.1/python-xmpppy.ymp
驗證是否有安裝
# zypper search xmpp
正在載入套件庫資料...
讀取已安裝的套件...
S | 名稱 | 摘要 | 類型
--+---------------------------+---------------------------------------------------------------------+---------
| libqxmpp-devel | Qxmpp Development Files | 套件
| libqxmpp1 | Qt XMPP Library | 套件
| libqxmpp1-32bit | Qt XMPP Library | 套件
i | perl-Net-XMPP | XMPP Perl Library | 套件
| python-pyxmpp | Python Jabber/XMPP Implementation | 套件
| python-pyxmpp | Python Jabber/XMPP Implementation | src 套件
| python-pyxmpp-debuginfo | Debug information for package python-pyxmpp | 套件
| python-pyxmpp-debugsource | Debug sources for package python-pyxmpp | 套件
| python-sleekxmpp | Python XMPP (Jabber) Library that Implements Everything as a Plugin | 套件
| python-sleekxmpp | Python XMPP (Jabber) Library that Implements Everything as a Plugin | src 套件
i | python-xmpppy | Jabber Library for Python | 套件
| python-xmpppy | Jabber Library for Python | src 套件
i | sendxmpp | A perl-script to send xmpp, similar to what mail does for mail | 套件
將網頁上的 程式儲存為 notify_via_jabber 並修改自己的 google 帳號以及google密碼 ( 以下的google 帳號必須與等等被通知的google 帳號互為 google talk 聯絡人 )
# vi /usr/local/bin/notify-via-jabber
#!/usr/bin/python -tt
import warnings
warnings.simplefilter("ignore")
import xmpp
from xmpp.protocol import Message
from optparse import OptionParser
import ConfigParser
import sys
import os
parser = OptionParser()
opts, args = parser.parse_args()
if len(args) < 1:
print "xmppsend message [to whom, multiple args]"
sys.exit(1)
msg = args[0]
msg = msg.replace('\\n', '\n')
# Connect to the server
c = xmpp.Client('gmail.com')
c.connect( ( 'talk.google.com', 5223 ) )
# Authenticate to the server
jid = xmpp.protocol.JID( 'example@gmail.com' )
c.auth( jid.getNode( ), 'yourgmailpassword' )
if len(args) < 2:
r = c.getRoster()
for user in r.keys():
if user == username:
continue
c.send(Message(user, '%s' % msg))
else:
for user in args[1:]:
c.send(Message(user, '%s' % msg))
懶的 vi 是吧 ^_^
#wget http://dl.dropbox.com/u/12787647/2012-3-31-nagios/notify-via-jabber
但是再如何懶也要進去填個帳號吧
#chmod a+x notify-via-jabber
# mv notify-via-jabber /usr/local/bin/
測試 一下傳送訊息
#/usr/local/bin/notify-via-jabber "testmesg" 被通知的google帳號
接下來修改相關設定
將 notify-by-jabber 以及 host-notify-by-jabber 加入到/etc/nagios/objects/commands.cfg
# vi /etc/nagios/objects/commands.cfg
加入 請複製參考網頁上面的設定
define command{
command_name host-notify-by-jabber
command_line /usr/local/bin/notify-via-jabber "Host '$HOSTALIAS$' is $HOSTSTATE$ - Info : $HOSTOUTPUT$" $CONTACTPAGER$
}
define command{
command_name notify-by-jabber
command_line /usr/local/bin/notify-via-jabber "$NOTIFICATIONTYPE$ $HOSTNAME$ $SERVICEDESC$ $SERVICESTATE$ $SERVICEOUTPUT$ $LONGDATETIME$" $CONTACTPAGER$
}
由上面的指令可以看出 notify_via_jabber 後面傳送的 Google 帳號是由 $CONTACTPAGER$ 來指定
所以我們要新增 聯絡人的 PAGER, 也就是 google 帳號
# vi /etc/nagios/objects/contacts.cfg
請加入 pager 的設定, 就是要傳送的 google 帳號
define contact{
contact_name nagiosadmin ; Short name of user
use generic-contact ; Inherit default values from generic-contact template (defined above)
alias Nagios Admin ; Full name of user
email sakana@study-area.org
pager 要傳送的google帳號
}
故我們接下來修改範本設定檔 /etc/nagios/objects/templetes.cfg
# vi /etc/nagios/objects/templates.cfg
修改 generic-contact 內容, 加入 jabber 的設定
define contact{
name generic-contact ; The name of this contact template
service_notification_period 24x7 ; service notifications can be sent anytime
host_notification_period 24x7 ; host notifications can be sent anytime
service_notification_options w,u,c,r,f,s ; send notifications for all service statesents
host_notification_options d,u,r,f,s ; send notifications for all host states
service_notification_commands notify-service-by-email,notify-by-jabber ; 加入設定
host_notification_commands notify-host-by-email,host-notify-by-jabber ; 加入設定
register 0 ; DONT REGISTER THIS DEFINITION - ITS NOT A REAL CONTACT, JUST A TEMPLATE!
}
確認設定檔是否無誤
# nagios -v /etc/nagios/nagios.cfg
重新啟動 nagios 使其生效
#rcnagios restart
Optional Lab: Nagios Map icon
有關於在status的頁面要使用圖案
可以上 Nagios 的官網去抓 icon
http://exchange.nagios.org/directory/Images-and-Logos
我是去抓 Base Images
頁面如下
http://exchange.nagios.org/directory/Graphics-and-Logos/Images-and-Logos/Base-Images/details
下載下來檔案名稱為 base.zip (假設下載到 /root)
解壓縮在 /usr/share/nagios/images/logos/base
#unzip /root/base.zip
#mv /root/base /usr/share/nagios/images/logos
可以在該主機的設定檔內加入以下區段
define hostextinfo{
host_name da-1
icon_image base/linux40.gif ;icon的圖案
icon_image_alt linux
statusmap_image base/linux40.gd2 ;這個才是statusmap上面的圖案,最好用gd2省資源
}
icon要放在安裝目錄的 images/logos目錄下
openSUSE安裝的目錄路徑就是 /usr/share/nagios/images/logos
所以路徑寫法就會是 base/linux40.gd2
但是上面的寫法
要一個一個主機設定這樣比較麻煩
所以可以使用範本的方式來解決
# vi /etc/nagios/objects/templates.cfg
將 剛剛的範本檔案
# Linux host definition template - This is NOT a real host, just a template!
define host{
name linux-server ; The name of this host template
use generic-host ; This template inherits other values from the generic-host template
check_period 24x7 ; By default, Linux hosts are checked round the clock
check_interval 5 ; Actively check the host every 5 minutes
retry_interval 1 ; Schedule host check retries at 1 minute intervals
max_check_attempts 10 ; Check each Linux host 10 times (max)
check_command check-host-alive ; Default command to check Linux hosts
notification_period workhours ; Linux admins hate to be woken up, so we only notify during the day
; Note that the notification_period variable is being overridden from
; the value that is inherited from the generic-host template!
notification_interval 120 ; Resend notifications every 2 hours
notification_options d,u,r ; Only send notifications for specific host states
contact_groups admins ; Notifications get sent to the admins by default
hostgroups linux-servergroup ; Host groups that Linux servers should be a member of
register 0 ; DONT REGISTER THIS DEFINITION - ITS NOT A REAL HOST, JUST A TEMPLATE!
}
加上相關設定
# Linux host definition template - This is NOT a real host, just a template!
define host{
name linux-server ; The name of this host template
use generic-host ; This template inherits other values from the generic-host template
check_period 24x7 ; By default, Linux hosts are checked round the clock
check_interval 5 ; Actively check the host every 5 minutes
retry_interval 1 ; Schedule host check retries at 1 minute intervals
max_check_attempts 10 ; Check each Linux host 10 times (max)
check_command check-host-alive ; Default command to check Linux hosts
notification_period workhours ; Linux admins hate to be woken up, so we only notify during the day
; Note that the notification_period variable is being overridden from
; the value that is inherited from the generic-host template!
notification_interval 120 ; Resend notifications every 2 hours
notification_options d,u,r ; Only send notifications for specific host states
contact_groups admins ; Notifications get sent to the admins by default
hostgroups linux-servergroup ; Host groups that Linux servers should be a member of
icon_image base/linux40.gif
icon_image_alt linux
statusmap_image base/linux40.gd2 ;這個才是statusmap 上面的圖案, 最好用gd2 省資源
register 0 ; DONT REGISTER THIS DEFINITION - ITS NOT A REAL HOST, JUST A TEMPLATE!
}
這樣就可以讓所有機器都套用
windows 還有其他的機器也可以比照辦理
加完要重新啟動 nagios
#rcnagios restart
~enjoy it