AWS Client VPN with openSUSE leap 15.1 小記
OS: container with openSUSE Leap 15.1
OS: openSUSE Leap 15.1
之前就有看到 AWS Client VPN 的文章, 但是沒有時間來進行 Lab
想法:
- 透過 AWS Client VPN 可以使用桌機或是筆電接入 AWS VPN 的內網, 達成在本機使用 Ansible 進行 AWS 上面的資源調整或是佈署.
- 因為不是所有的resource 都有 public IP, 另外也不一定要想要弄台跳板機, 或是把 playbook 放在上面

使用 container 來建立相關步驟的原因
- 確保有相關 cli 環境, 例如 aws cli / gcloud / az
- 建立過程中如果有本機不需要的套件需要安裝, 不會影響到本機
- 也可以用本機來進行建立過程
==== 在主機上面 ====
啟動 container
> docker run -v ~/.aws:/root/.aws -v ~/.azure:/root/.azure -v ~/.config/gcloud:/root/.config/gcloud -v ~/.ssh:/root/.ssh -it sakana/ansible_opensuse151 /bin/bash
- 這邊也可以考慮掛載一個臨時目錄等等將相關檔案匯出
- -v /home/sakana/下載/test20200321:/root/test20200321
==== 在 container 內 ====
參考官方文件
產生伺服器和用戶端憑證及金鑰
因為容器裡面沒有裝 git 所以就先安裝 git
#zypper install -y git
將 easy-rsa clone 下來
# git clone https://github.com/OpenVPN/easy-rsa.git
進入 easy-rsa 目錄
# cd easy-rsa/easyrsa3
初始化新的 PKI 環境
# ./easyrsa init-pki
init-pki complete; you may now create a CA or requests.
Your newly created PKI dir is: /root/easy-rsa/easyrsa3/pki
建置新的憑證授權機構 (CA)
# ./easyrsa build-ca nopass
Using SSL: openssl OpenSSL 1.1.0i-fips 14 Aug 2018
Generating RSA private key, 2048 bit long modulus
........................................................................................+++++
..............................................+++++
e is 65537 (0x010001)
You are about to be asked to enter information that will be incorporated
into your certificate request.
What you are about to enter is what is called a Distinguished Name or a DN.
There are quite a few fields but you can leave some blank
For some fields there will be a default value,
If you enter '.', the field will be left blank.
-----
Common Name (eg: your user, host, or server name) [Easy-RSA CA]: 可以輸入自訂名稱
CA creation complete and you may now import and sign cert requests.
Your new CA certificate file for publishing is at:
/root/easy-rsa/easyrsa3/pki/ca.crt
產生伺服器憑證和金鑰
# ./easyrsa build-server-full server nopass
Using SSL: openssl OpenSSL 1.1.0i-fips 14 Aug 2018
Generating a 2048 bit RSA private key
.......................................................................+++++
.....+++++
writing new private key to '/root/easy-rsa/easyrsa3/pki/easy-rsa-237.niuWFO/tmp.z1xt2p'
-----
Using configuration from /root/easy-rsa/easyrsa3/pki/easy-rsa-237.niuWFO/tmp.7dpbOC
Check that the request matches the signature
Signature ok
The Subject's Distinguished Name is as follows
commonName :ASN.1 12:'server'
Certificate is to be certified until Jun 21 13:11:46 2022 GMT (825 days)
Write out database with 1 new entries
Data Base Updated
產生用戶端憑證和金鑰
# ./easyrsa build-client-full client1.domain.tld nopass
Using SSL: openssl OpenSSL 1.1.0i-fips 14 Aug 2018
Generating a 2048 bit RSA private key
.........................................................+++++
............................+++++
writing new private key to '/root/easy-rsa/easyrsa3/pki/easy-rsa-164.uQNueZ/tmp.oBHVMB'
-----
Using configuration from /root/easy-rsa/easyrsa3/pki/easy-rsa-164.uQNueZ/tmp.aWJmw3
Check that the request matches the signature
Signature ok
The Subject's Distinguished Name is as follows
commonName :ASN.1 12:'client1.domain.tld'
Certificate is to be certified until Jun 21 13:07:36 2022 GMT (825 days)
Write out database with 1 new entries
Data Base Updated
- 務必儲存用戶端憑證和用戶端私有金鑰,因為您在設定用戶端時需要它們
將伺服器憑證和金鑰及用戶端憑證和金鑰複製到自訂資料夾,然後導覽到自訂資料夾
他的範例是 /custom_folder , 我是用自行掛載的資料夾
# cp pki/ca.crt /root/test20200321/
# cp pki/issued/server.crt /root/test20200321/
# cp pki/private/server.key /root/test20200321/
# cp pki/issued/client1.domain.tld.crt /root/test20200321/
# cp pki/private/client1.domain.tld.key /root/test20200321/
進入自訂資料夾
# cd /root/test20200321/
等等需要把相關的檔案上傳到 ACM 上面, 所以上傳之前先來觀察該 Region 的 ACM 有沒有相關檔案 :) 目前是空的

將伺服器憑證和金鑰上傳到 ACM
# aws acm import-certificate --certificate file://server.crt --private-key file://server.key --certificate-chain file://ca.crt --region us-east-2
{
"CertificateArn": "arn:aws:acm:us-east-2:792117821604:certificate/2014cb32-1c3c-5412-c5d7-3b08ac91354f"
}
- 這邊要注意的是 - 憑證和金鑰要上傳到用戶端 VPN 端點的同一區域, 我這邊以 us-east-2 為例
將用戶端憑證和金鑰上傳到 ACM
# aws acm import-certificate --certificate file://client1.domain.tld.crt --private-key file://client1.domain.tld.key --certificate-chain file://ca.crt --region us-east-2
{
"CertificateArn": "arn:aws:acm:us-east-2:792117821604:certificate/32fc0d1d-6417-3a27-212c-7b25618a0583"
}
在該 Region 的 ACM 上面就會看到剛剛上傳的憑證

建立 用戶端 VPN 端點
接下來建立 AWS Client VPN
登入 AWS 主控台, 點選 Services -- > 點選 VPC 服務
在 VPC 主控台, 點選左方 Client VPN Endpoints

點選 Create Client VPN Endpoint
輸入名稱 / 敘述 / Client IPv4 CIDR

- Client IPv4 CIDR 必須介於 /16 - /22 之間, 就是 Class B ~ 4 個 Class C 大小
選取 Server 憑證
勾選 Use mutual authentication -- > 選取 Client 憑證

- 這邊可以觀察到 AWS Client VPN 有兩種驗證方式, 我們使用的是第二種
- AD 驗證
- 使用 Client 憑證進行交互驗證
Logging 的部分不啟用

在其他選項的部分
選取 VPC ID
DNS 的部分暫時沒有填寫, 因為要跟之後的 split-tunnel 一起進行實驗
Security Group ID 也暫時沒有選
VPN port 選取 1194 ( openVPN 預設的 port )
點選 Create Client VPN Endpoint

建立完成之後, 因為還沒有連接, 所以是 Pending-associate

將 Client VPN 與 VPC subnet 建立關聯
選取剛剛建立的 Client VPN
點選 Associations 分頁 -- > 點選 Associate

選取要關聯的 VPC 以及 Subnet
點選 Associate

經過一段時間觀察, 就會發現 Client VPN state 變成 Available

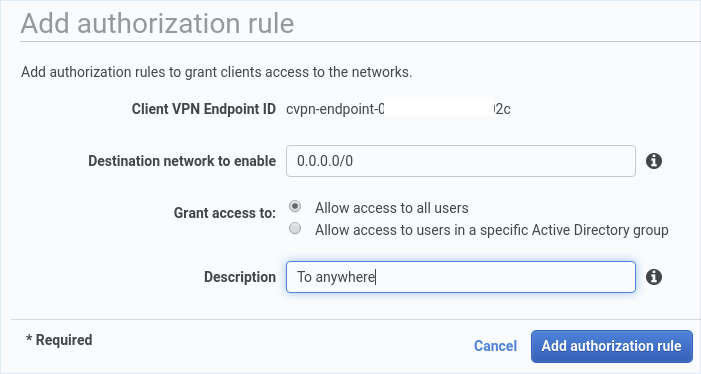
授權用戶端存取網路
選取剛剛建立的 Client VPN
點選 Authorization 分頁 -- > 點選 Authorize Ingress

Destination network to enable: 輸入 0.0.0.0/0 ( 任何 )
輸入 Description
點選 Add authorization rule
新增 Security Group for openVPN 連線
登入 AWS 主控台, 點選 Services -- > 點選 VPC 服務
在 VPC 主控台, 點選左方 Security Groups
點選 Create security group
輸入 名稱 / 敘述 / 選取 VPN
點選 Create

選取剛剛建立 openvpn-udp 的 security group
點選 Inbound Rules 分頁 -- > 點選 Edit rules

點選 Add Rule
選取 Custom UDP Rule
Port Range 輸入 1194
Source 填入 0.0.0.0/0
點選 Save rules

建立完成
接下來我們要讓剛剛建立的 Client VPN 加入這筆 Security Group
點選左方的 Client VPN Endpoints
選取剛剛建立的 Client VPN
點選 Security Groups 分頁 -- > 點選 Apply Security Groups
點選剛剛建立 openvpn-udp 的 security grouip id
點選 Apply Security Groups

- 這邊實驗的關係, 我套用剛剛建立的 openvpn-udp 與 VPN default 規則
下載 用戶端 VPN 端點組態檔案
==== 在主機上面 ====
這邊我們就回到主機上面了, 等等可能要安裝 openVPN 的軟體以及設定
選取剛剛建立的 Client VPN
點選 Download Client Configuration

點選 Download 下載 設定檔

- 剛剛在上面有建議可以將 container 掛載主機的特定目錄, 所以我是將設定檔放在同一個目錄 test20200321
進入特定的目錄, 以我來說, 我是將 ~/下載/test20200321 目錄與剛剛 container 共同掛載
> cd ~/下載/test20200321
觀察相關資訊
> ls
20200321.xml ca.crt client1.domain.tld.crt client1.domain.tld.key downloaded-client-config.ovpn server.crt server.key
- 這邊可以看到剛剛下載的 downloaded-client-config.ovpn 以及剛剛建立的憑證
- 也可以看到 client 的憑證與 key
編輯 downloaded-clietn-config.ovpn
> vi downloaded-client-config.ovpn

- 在 remote 設定的部分, 加上任一主機名稱
- remote test.cvpn-endpoint-002c11553b655b02c.prod.clientvpn.us-east-2.amazonaws.com 1194
- 原因是 Client VPN 的 DNS name 是 *.cvpn-endpoint-002c11553b655b02c.prod.clientvpn.us-east-2.amazonaws.com
- 如果只是 cvpn-endpoint-002c11553b655b02c.prod.clientvpn.us-east-2.amazonaws.com 會解析不到


- 在 </ca> 後面加入 cert 以及 key 兩個區段
- cert 加入 client1.domain.tld.crt 檔案憑證內容
- key 加入 client1.domain.tld.key 檔案 key 內容
在 openSUSE Leap 15.1 的 Network Manager 連線 openVPN
點選桌面右上角的按鈕 -- > 點選 設定值按鈕
點選左邊的網路
點選 VPN 右邊的 + 按鈕

點選 從檔案匯入
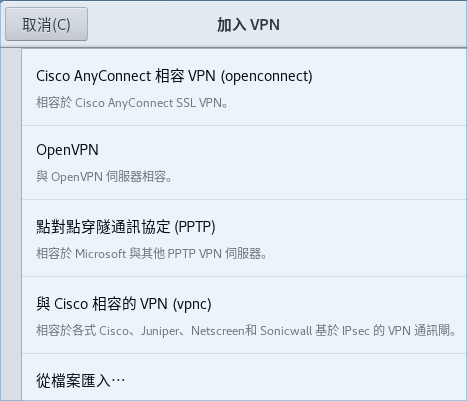
選取剛剛的 downloaded-clietn-config.ovpn -- > 開啟
點選 加入

- 這邊注意一下 閘道是否是 test.cvpn-endpoint-xxxxxxx
輸入管理者密碼來改變網路
由於 openVPN 是走 UDP port 1194, 所以本機的 firewall 也要開啟
#yast2 firewall
點選 左邊的 public Zone
點選 openvpn -- > 點選 Add
點選 Accept

完成 firewall 設定
連接 VPN 之前來觀察一下資訊
# ip route show
default via 192.168.0.1 dev wlan0 proto dhcp metric 600
172.17.0.0/16 dev docker0 proto kernel scope link src 172.17.0.1 linkdown
192.168.0.0/24 dev wlan0 proto kernel scope link src 192.168.0.232 metric 600
ping 我在 AWS 主機 172.31.14.128 -- > 失敗
接下來啟動 VPN
點選開關啟動

# ip route show
default via 10.23.0.1 dev tun0 proto static metric 50
default via 192.168.0.1 dev wlan0 proto dhcp metric 600
3.12.63.134 via 192.168.0.1 dev wlan0 proto static metric 600
10.23.0.0/27 dev tun0 proto kernel scope link src 10.23.0.2 metric 50
172.17.0.0/16 dev docker0 proto kernel scope link src 172.17.0.1 linkdown
192.168.0.0/24 dev wlan0 proto kernel scope link src 192.168.0.232 metric 600
192.168.0.1 dev wlan0 proto static scope link metric 600
ping 我在 AWS 主機 172.31.14.128 -- > 成功
- 因為現在預設路由是走 VPN 出去, 我們並沒有設定 Split tunnel / DNS / 路由
另外 VPN 的設定, 個人會習慣把 自動連線取消勾選

到這邊, 如果只是要連線 AWS 的 內部 Subnet, 應該就達成了
但是如果想要
- 可以連線 AWS Subnet
- 也可以上網呢?
接下來就透過 Split tunnel 來達成
分割通道 ( split tunnel )
- 啟用的時候讓 VPN 可以同時用自己的網路對外, 以及連 AWS VPC
- 如果沒有啟用, 因為都是透過 AWS Client VPN 所以沒辦法上網
還沒有啟用 split tunnel 的時候來觀察 pint www.hinet.net 資訊
# ping www.hinet.net
PING hinet-hp.cdn.hinet.net (61.221.230.163) 56(84) bytes of data.
64 bytes from 61-221-230-163.HINET-IP.hinet.net (61.221.230.163): icmp_seq=1 ttl=50 time=196 ms
64 bytes from 61-221-230-163.HINET-IP.hinet.net (61.221.230.163): icmp_seq=2 ttl=50 time=100 ms
回到 Client VPN 設定
選取剛剛建立的 Client VPN
點選 Actions -- > Modify Client VPN Endpoint

勾選 Enable DNS Server -- > 輸入 DNS Server IP
勾選 Enable split-tunnel
點選 Modify Client VPN Endpoint

接下來建立路由
點選 Route Table 分頁 -- > 點選 Create Route

輸入 Route destination, 這邊我給 0.0.0.0/0
選取 VPC Subnet ID
點選 Create Route

再次啟用 VPN
# ip route show
default via 10.23.0.129 dev tun0 proto static metric 50
default via 192.168.0.1 dev wlan0 proto dhcp metric 600
3.12.63.134 via 192.168.0.1 dev wlan0 proto static metric 600
10.23.0.128/27 dev tun0 proto kernel scope link src 10.23.0.130 metric 50
18.219.170.100 via 192.168.0.1 dev wlan0 proto static metric 600
172.17.0.0/16 dev docker0 proto kernel scope link src 172.17.0.1 linkdown
172.31.0.0/16 via 10.23.0.129 dev tun0 proto static metric 50
192.168.0.0/24 dev wlan0 proto kernel scope link src 192.168.0.232 metric 600
192.168.0.1 dev wlan0 proto static scope link metric 600
- 這邊有觀察到 default route 有不同
ping 我在 AWS 主機 172.31.14.128 -- > 成功
# ping www.hinet.net
PING hinet-hp.cdn.hinet.net (61.221.230.165) 56(84) bytes of data.
64 bytes from 61-221-230-165.HINET-IP.hinet.net (61.221.230.165): icmp_seq=1 ttl=33 time=610 ms
64 bytes from 61-221-230-165.HINET-IP.hinet.net (61.221.230.165): icmp_seq=2 ttl=33 time=628 ms
用 traceroute 觀察
# traceroute www.hinet.net
traceroute to www.hinet.net (61.221.230.165), 30 hops max, 60 byte packets
1 * * *
2 ec2-52-15-0-31.us-east-2.compute.amazonaws.com (52.15.0.31) 486.571 ms 486.564 ms ec2-52-15-0-35.us-east-2.compute.amazonaws.com (52.15.0.35) 486.501 ms
3 100.65.26.160 (100.65.26.160) 486.391 ms 100.65.27.128 (100.65.27.128) 486.386 ms 100.65.27.32 (100.65.27.32) 486.382 ms
4 100.66.12.60 (100.66.12.60) 486.304 ms 100.66.12.180 (100.66.12.180) 486.303 ms 100.66.12.38 (100.66.12.38) 486.214 ms
5 100.66.15.162 (100.66.15.162) 486.330 ms 100.66.14.14 (100.66.14.14) 486.339 ms 100.66.14.134 (100.66.14.134) 486.279 ms
6 100.66.6.229 (100.66.6.229) 486.247 ms 100.66.6.9 (100.66.6.9) 320.587 ms 100.66.7.235 (100.66.7.235) 320.967 ms
- 這邊就可以觀察到是從 AWS 出去的
好吧, 想實驗的東西又完成一件, 離 AWS 又進了一步
~ enjoy it
Reference:
沒有留言:
張貼留言