nginx with openSUSE Leap 15.1 in Azure 小記
OS: openSUSE Leap 15.1 in Azure
Nginx: 1.14.2
之前 web 服務都是使用 Apache 比較多, 但是最近覺得要會 nginx 才能符合之後的需求, 所以開始來練習 nginx :) 今天主要練習
- Nginx 作爲靜態網頁
- Nginx 作為 Proxy Server
Nginx
- 官方網站 http://nginx.org/
使用環境 openSUSE Leap 15.1 in Azure
- 已經登入到 Azure Portal 並建立一台 openSUSE Leap 15.1
- 使用 ssh 連線在 Azure 上面的 openSUSE Leap 15.1
先來使用 zypper 指令 安裝 nginx
# zypper install nginx
Loading repository data...
Reading installed packages...
Resolving package dependencies...
The following 9 NEW packages are going to be installed:
libXpm4 libgd3 libjbig2 libjpeg8 libtiff5 libwebp6 libxslt1 nginx vim-plugin-nginx
The following recommended package was automatically selected:
vim-plugin-nginx
9 new packages to install.
Overall download size: 1.7 MiB. Already cached: 0 B. After the operation, additional 4.8 MiB will be used.
Continue? [y/n/v/...? shows all options] (y): Y
觀察服務狀態
# systemctl status nginx
● nginx.service - The nginx HTTP and reverse proxy server
Loaded: loaded (/usr/lib/systemd/system/nginx.service; disabled; vendor preset: disabled)
Active: inactive (dead)
啟動 nginx 服務
# systemctl start nginx
觀察相關資訊
# systemctl status nginx
● nginx.service - The nginx HTTP and reverse proxy server
Loaded: loaded (/usr/lib/systemd/system/nginx.service; disabled; vendor preset: disabled)
Active: active (running) since Thu 2020-02-20 13:00:00 UTC; 1s ago
確認開機是否會自動啟動
# systemctl is-enabled nginx
disabled
設定開啟自動啟動
# systemctl enable nginx
Created symlink /etc/systemd/system/multi-user.target.wants/nginx.service → /usr/lib/systemd/system/nginx.service.
再次觀察
# systemctl is-enabled nginx
enabled
這樣 nginx 就已啟動然後開機後也會自動啟動
Lab 1: 測試靜態網頁
觀察 listen port
- 早期是用 netstat 指令, 現在是用 ss 指令了
# ss -tupln
Netid State Recv-Q Send-Q Local Address:Port Peer Address:Port
udp UNCONN 0 0 0.0.0.0%eth0:68 0.0.0.0:* users:(("wickedd-dhcp4",pid=685,fd=9))
tcp LISTEN 0 128 0.0.0.0:80 0.0.0.0:* users:(("nginx",pid=120751,fd=6),("nginx",pid=120750,fd=6))
tcp LISTEN 0 128 0.0.0.0:22 0.0.0.0:* users:(("sshd",pid=1189,fd=3))
tcp LISTEN 0 128 [::]:22 [::]:* users:(("sshd",pid=1189,fd=4))
有觀察到 port 80 listen, 但是這個是本機的狀況, 要可以對外連線, 還要在 Azure 上面設定 Security Group 讓 網路流量可以通過
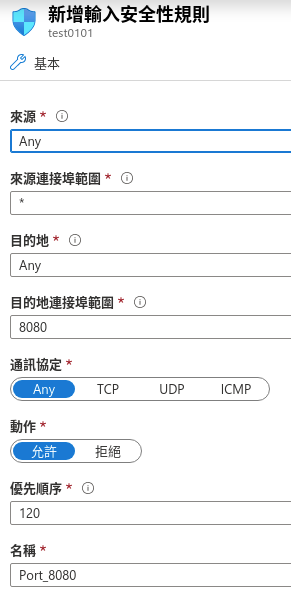
在 Azure 該 VM 的網路設定內, 點選 新增輸入連接埠規則,設定 port 80 可以連線

接下來測試網頁狀況
在瀏覽器開啟 http://YOUR_SERVER_IP

- 這個時候會得到 403 Forbidden,
觀察 error.log
# cat /var/log/nginx/error.log
2020/02/20 13:01:32 [error] 120751#120751: *1 directory index of "/srv/www/htdocs/" is forbidden,
藉由 nginx -t 來觀察設定檔位置以及有沒有問題
# nginx -t
nginx: the configuration file /etc/nginx/nginx.conf syntax is ok
nginx: configuration file /etc/nginx/nginx.conf test is successful
- 從這邊可以得知設定檔在 /etc/nginx/nginx.conf
觀察一下目前的設定檔
# egrep -v '^$|^#|#' /etc/nginx/nginx.conf
worker_processes 1;
events {
worker_connections 1024;
use epoll;
}
http {
include mime.types;
default_type application/octet-stream;
sendfile on;
keepalive_timeout 65;
include conf.d/*.conf;
server {
listen 80;
server_name localhost;
location / {
root /srv/www/htdocs/;
index index.html index.htm;
}
error_page 500 502 503 504 /50x.html;
location = /50x.html {
root /srv/www/htdocs/;
}
}
include vhosts.d/*.conf;
}
整理一下
- 網站的根目錄應該是在 /srv/www/htdocs
- 首頁的檔案應該是 index.html 或是 index.htm
- 觀察 /etc/nginx/conf.d/ 目錄下 - 沒有檔案
- 觀察 /etc/nginx/vhosts.d/ 目錄下 - 沒有檔案
觀察一下資訊
# ls /srv/www/htdocs/
50x.html
該目錄中, 並沒有 index.html 或是 index.htm, 所以就會 Forbidden
嘗試建立 /srv/www/htdocs/index.html
# vim /srv/www/htdocs/index.html
<html> This is lab site </html>
測試是否生效
在瀏覽器開啟 http://YOUR_SERVER_IP
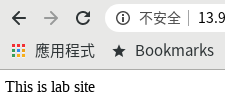
到這邊的話, 基本的靜態網頁測試就應該可以了
Lab 2: 測試 Proxy Server 的用法
為了要有測試的感覺, 先把 docker 服務啟動
# systemctl start docker
觀察服務狀態
# systemctl status docker
● docker.service - Docker Application Container Engine
Loaded: loaded (/usr/lib/systemd/system/docker.service; disabled; vendor pre>
Active: active (running) since Sat 2020-02-22 04:12:17 UTC; 5min ago
執行 container 然後 port 開在 8080
# docker run -d -p 8080:80 russmckendrick/cluster
在 Azure 該 VM 的網路設定內, 設定 port 8080 可以連線
測試是否生效
在瀏覽器開啟 http://YOUR_SERVER_IP:8080
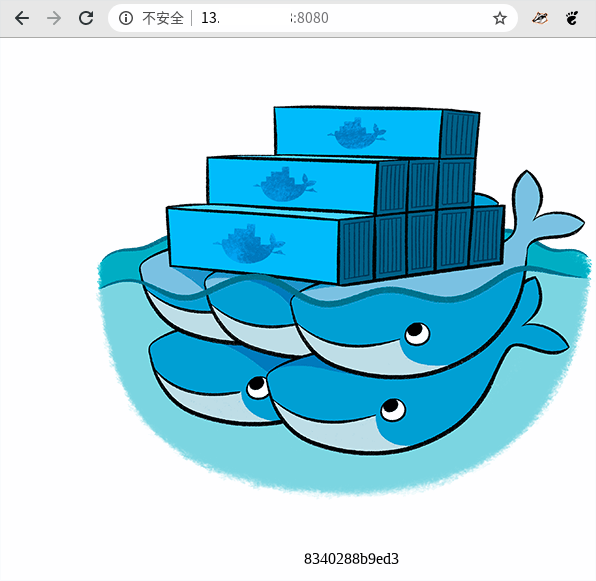
應該會看到網頁以及該 container 的 id
從這邊我們可以觀察到這個服務是正常的
接下來要進行 Proxy Server 的測試
測試想法
- 當使用者連線到某個網域名稱( FQDN ), 就會轉到 本機 port 8080
將剛剛 Azure 上面的安全性規則, 允許 port 8080 刪除
再次嘗試存取剛剛的網站 觀察相關資訊
在瀏覽器開啟 http://YOUR_SERVER_IP:8080
這個時候其實會發現無法存取 ( 因為安全性規則 firewall 已經被刪除)

開始進行實作
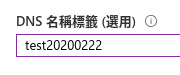
在 Azure 上面替 openSUSE Leap 15.1 設定 DNS 名稱
在 VM 的概觀頁面上面可以看到有 DNS 設定的按鈕
點選 設定
- 這個動作其實是會進入該公用 IP 的組態內
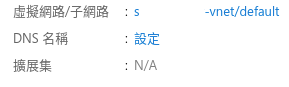
輸入 DNS 名稱
點選儲存
這個時候這個 VM 就會將這個名稱綁定公用 IP
修改 nginx 設定檔
# vim /etc/nginx/nginx.conf
worker_processes 1;
events {
worker_connections 1024;
use epoll;
}
http {
include mime.types;
default_type application/octet-stream;
sendfile on;
keepalive_timeout 65;
include conf.d/*.conf;
server {
server_name test20200222.eastus.cloudapp.azure.com;
location / {
proxy_pass http://127.0.0.1:8080;
}
}
server {
listen 80;
server_name localhost;
location / {
root /srv/www/htdocs/;
index index.html index.htm;
}
error_page 500 502 503 504 /50x.html;
location = /50x.html {
root /srv/www/htdocs/;
}
}
include vhosts.d/*.conf;
}
- 在 http 區段內新增一個 server 區段
- server_name 指定剛剛綁定的 FQDN
- Proxy_pass 指向 port 8080
這邊要善用 nginx -t 來檢查相關設定
進行測試
在瀏覽器開啟 http://test20200222.eastus.cloudapp.azure.com

這個時候會看到剛剛啟動的網頁
Proxy Server 功能測試完畢
整理資訊
- 設定檔 /etc/nginx/nginx.conf
- 相關目錄 /etc/nginx
- Log 目錄 : /var/log/nginx
這樣算是朝向 nginx 的一小步 :)
~ enjoy it
Reference
沒有留言:
張貼留言