20180302
Yast2 with openSUSE Leap 42.3 in Azure 小記
OS: openSUSE Leap 42.3 in Azure
我想 openSUSE / SUSE 與其他 linux 一個很大的不同點就是
他有 yast2 的圖形管理介面

文字管理介面 yast 很方便
但是有時候針對一些要選取的 item 很多的時候, 例如軟體管理, 或是伺服器管理
那真的是圖形介面比較好用.

想到系統是否用圖形介面, 大家會如何判斷呢?
早期在 System V 的時代, 大家應該是用 runlevel 指令吧
# runlevel
N 5
上面的指令會告訴我們目前是使用 runlevel 5 來運作, 所以會判斷可能是有圖形環境的
我也是在 Azure 上面下了 runlevel 指令, 加上下面會談到的認知, 產生錯覺, 以為 Azure 上面的 openSUSE VM 是有圖形環境的.
那目前在 systemd 的環境下如何判斷呢?
可以使用 ls -l 觀察 /etc/systemd/system/default.target
# ls -l /etc/systemd/system/default.target
lrwxrwxrwx 1 root root 40 Jul 21 2017 /etc/systemd/system/default.target -> /usr/lib/systemd/system/graphical.target
以我的桌機來說, 目前 default.target 就指向 graphical.target 也就是圖形介面
然後與原來 system v 對照可以觀察
# ls -l /usr/lib/systemd/system/runlevel*.target
lrwxrwxrwx 1 root root 15 Feb 28 19:44 /usr/lib/systemd/system/runlevel0.target -> poweroff.target
lrwxrwxrwx 1 root root 13 Feb 28 19:44 /usr/lib/systemd/system/runlevel1.target -> rescue.target
lrwxrwxrwx 1 root root 17 Feb 28 19:44 /usr/lib/systemd/system/runlevel2.target -> multi-user.target
lrwxrwxrwx 1 root root 17 Feb 28 19:44 /usr/lib/systemd/system/runlevel3.target -> multi-user.target
lrwxrwxrwx 1 root root 17 Feb 28 19:44 /usr/lib/systemd/system/runlevel4.target -> multi-user.target
lrwxrwxrwx 1 root root 16 Feb 28 19:44 /usr/lib/systemd/system/runlevel5.target -> graphical.target
lrwxrwxrwx 1 root root 13 Feb 28 19:44 /usr/lib/systemd/system/runlevel6.target -> reboot.target
所以我才會下了 runlevel 看到 5 就會以為是有圖形介面基礎的錯覺
但是人生就是很多 But
But in Azure ….. openSUSE Leap 42.3 VM
沒有 /etc/systemd/system/default.target
然後觀察 /etc/systemd/system/default.target.wants/ 指向兩個 service
# ls -l /etc/systemd/system/default.target.wants/
total 0
lrwxrwxrwx 1 root root 47 Jan 14 19:25 YaST2-Firstboot.service -> /usr/lib/systemd/system/YaST2-Firstboot.service
lrwxrwxrwx 1 root root 50 Jan 14 19:25 YaST2-Second-Stage.service -> /usr/lib/systemd/system/YaST2-Second-Stage.service
觀察他們的內容
# cat /usr/lib/systemd/system/YaST2-Firstboot.service
[Unit]
Description=YaST2 Firstboot
After=apparmor.service local-fs.target plymouth-start.service YaST2-Second-Stage.service
Before=getty@tty1.service serial-getty@ttyS0.service serial-getty@ttyS1.service serial-getty@ttyS2.service
Before=display-manager.service
ConditionPathExists=/var/lib/YaST2/reconfig_system
[Service]
Type=oneshot
Environment=SYSTEMCTL_OPTIONS=--ignore-dependencies TERM=linux
ExecStartPre=-/usr/bin/plymouth quit
ExecStartPre=-/usr/bin/plymouth --wait
ExecStart=/usr/lib/YaST2/startup/YaST2.Firstboot
ExecStartPost=/usr/bin/rm -f /var/lib/YaST2/reconfig_system
ExecStartPost=/usr/bin/systemctl restart systemd-vconsole-setup.service
TimeoutSec=0
RemainAfterExit=true
StandardInput=tty
[Install]
WantedBy=default.target
# cat /usr/lib/systemd/system/YaST2-Second-Stage.service | grep -v '^#'
[Unit]
Description=YaST2 Second Stage
After=apparmor.service local-fs.target plymouth-start.service
Before=getty@tty1.service serial-getty@ttyS0.service serial-getty@ttyS1.service serial-getty@ttyS2.service
Before=display-manager.service
ConditionPathExists=/var/lib/YaST2/runme_at_boot
[Service]
Type=oneshot
Environment=SYSTEMCTL_OPTIONS=--ignore-dependencies TERM=linux PX_MODULE_PATH=""
ExecStartPre=-/bin/sh -c 'if [ -x /usr/bin/plymouth ] ; then if [ `/usr/bin/systemctl get-default` = "multi-user.target" ];then /usr/bin/plymouth quit; else /usr/bin/plymouth deactivate --hide-splash; fi; fi'
ExecStart=/usr/lib/YaST2/startup/YaST2.Second-Stage
RemainAfterExit=yes
TimeoutSec=0
ExecStartPost=/bin/sh -c '/usr/bin/printf "\033c" > /dev/tty1'
ExecStartPost=/usr/bin/rm -f /var/lib/YaST2/runme_at_boot
ExecStartPost=/usr/bin/systemctl restart systemd-vconsole-setup.service
StandardInput=tty
[Install]
WantedBy=default.target
沒有啟動 display-manager.service 的念頭 ……..
另外也有可能從這邊發現到 ( 至少我是從這邊發現到的 … )
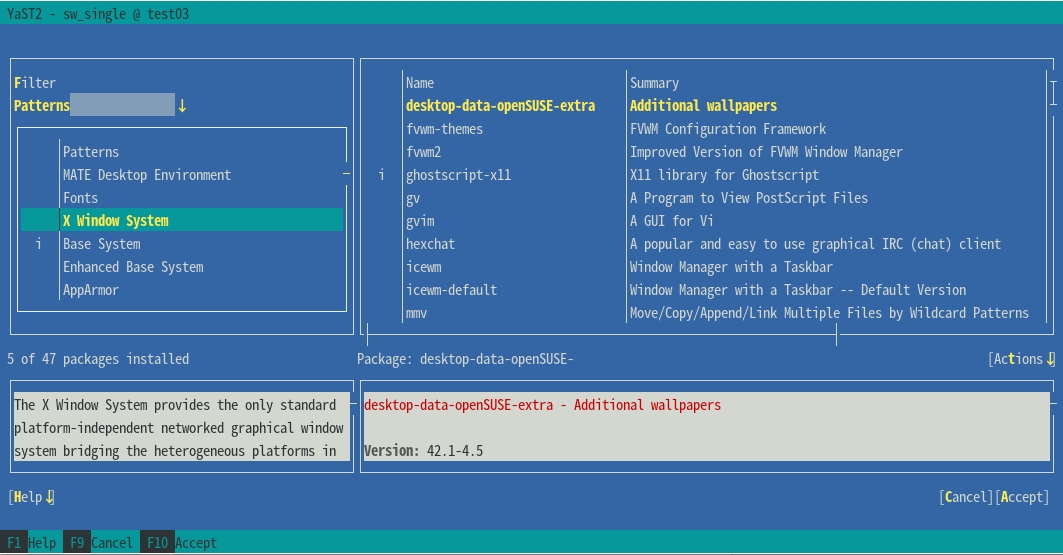
使用 yast2 軟體管理功能( 目前當然只會出現文字介面 )
#yast2 sw_single
切換上面的 Filter 到 Patterns
就會發現 X Window System 根本沒有裝, 怎麼 yast2 ….
接下來就做個實驗吧
選取 GNOME Base System 按 空白鍵 選取安裝
-- > 點選 Accept
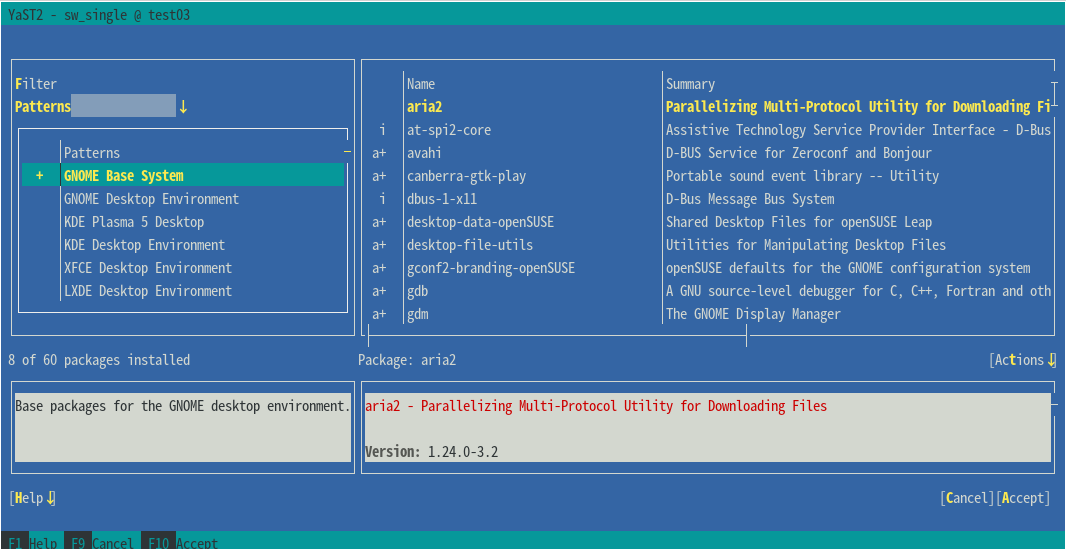
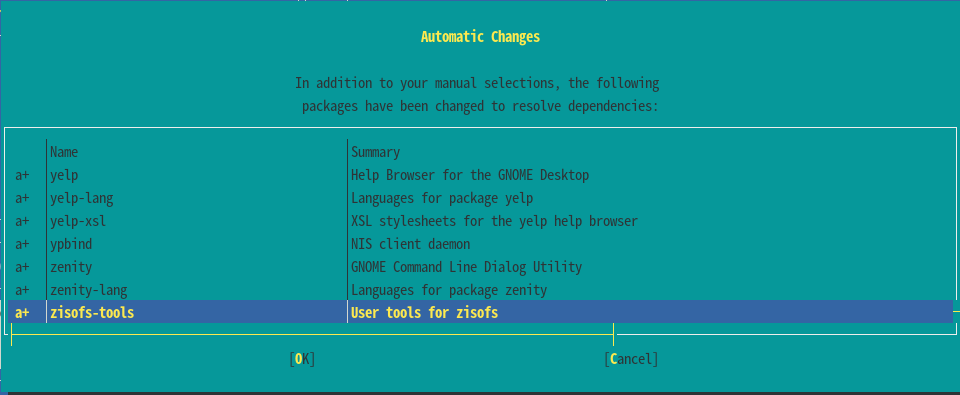
接下來就會告知有一大堆相依性套件要安裝 -- > OK
開始進行安裝( 933 packages?? ), 去喝杯咖啡吧 :)

點選 Finish 完成安裝 ( 總共花了 20分42秒 )

若是不想用這樣互動的方式安裝 ( 應該都不會想的 … )
可以用指令指定 pattern 的方式安裝
想要知道有哪些 pattern 可以選, 可以使用 zypper 指令
# zypper search -t pattern
Retrieving repository 'Python Modules (openSUSE_Leap_42.3)' metadata .....[done]
Building repository 'Python Modules (openSUSE_Leap_42.3)' cache ..........[done]
Retrieving repository 'editors' metadata ..................................................................................................[done]
Building repository 'editors' cache .......................................................................................................[done]
Loading repository data...
Reading installed packages...
S | Name | Summary | Type
---+----------------------+-------------------------------------+--------
| 64bit | 64-Bit Runtime Environment | pattern
i | apparmor | AppArmor | pattern
i+ | base | Base System | pattern
| books | Documentation | pattern
上面就會列出所有的 pattern
所以要跟上面達成一樣的效果, 我們就可以用
# zypper install -t pattern gnome_basis
Loading repository data...
Reading installed packages...
Resolving package dependencies...
The following 18 applications are going to be installed:
Documents "Firefox Web Browser" "GNOME Clocks" "GNOME Color Manager" "GNOME Control Center" "GNOME Package Updater" "GNOME Power Statistics" "GNOME
Software" "LibreOffice Base" "LibreOffice Calc" "LibreOffice Draw" "LibreOffice Impress" "LibreOffice Writer" Nautilus NetworkManager "Print Settings"
Terminal YaST
The following 933 NEW packages are going to be installed:
AppStream Mesa-libGLESv2-2 ModemManager MozillaFirefox MozillaFirefox-branding-openSUSE NetworkManager NetworkManager-branding-openSUSE
安裝 GNOME 桌面基本環境
不管是用 #yast2 sw_single 還是 #zypper install -t pattern gnome_basis 安裝
安裝完成之後, 就可以來測試了
在 client 端:
使用 ssh 指令加上 -Y 來進行連線
- -Y Enables trusted X11 forwarding. Trusted X11 forwardings are not subjected to the X11 SECURITY extension controls.
> ssh -Y -l USER_NAME SERVER_IP
Password:
openSUSE Leap 42.3 x86-64
As "root" use the:
- zypper command for package management
- yast command for configuration management
Have a lot of fun...
/usr/bin/xauth: file /home/sakana/.Xauthority does not exist
這邊其實 ls -a ~ 就會看到 ~/.Xauthority 有被建立起來
使用 sudo su - 切換 root
> sudo su -
[sudo] password for sakana:
切換完成之後, 測試 yast2
# yast2
覺得傷心 ….. 為何還是文字介面 Orz…
此時想換條路走, 那如果用 root 直接連線呢?
畢竟有經過 sudo, 另外 openSUSE / SUSE 其實也不像 ubuntu 會停用 root 密碼
來設定一下 root 密碼
# passwd root
New password:
Retype new password:
passwd: password updated successfully
使用 root 來連線測試看看
> ssh -Y -l root SERVER_IP
Password:
Last failed login: Fri Mar 2 11:15:23 UTC 2018 from 220.39.174.83 on ssh:notty
There were 6 failed login attempts since the last successful login.
openSUSE Leap 42.3 x86-64
As "root" use the:
- zypper command for package management
- yast command for configuration management
Have a lot of fun...
/usr/bin/xauth: file /root/.Xauthority does not exist
再次執行 yast2
# yast2

終於成功了 ( 灑花 )
接下來順手處理一下 遠端桌面連線吧 :)
因為其實有 yast2 就很充足了
在 Azure, 官方建議是用 xrdp
安裝 xrdp 套件
# zypper install xrdp
正在載入套件庫資料...
正在讀取已安裝的套件...
正在解決套件相依性...
將會安裝下列 1 個新的套件:
xrdp
1 要安裝的新套件.
全部下載大小:357.7 KiB。已快取:0 B。 完成操作後,將使用額外的 2.0 MiB。
要繼續嗎? [y/n/...? 顯示所有選項] (y):
觀察 xrdp 服務
# systemctl status xrdp
● xrdp.service - xrdp daemon
Loaded: loaded (/usr/lib/systemd/system/xrdp.service; disabled; vendor preset: disabled)
Active: inactive (dead)
啟動 xrdp
# systemctl start xrdp
觀察 xrdp 服務
# systemctl status xrdp
● xrdp.service - xrdp daemon
Loaded: loaded (/usr/lib/systemd/system/xrdp.service; disabled; vendor preset: disabled)
Active: active (running) since 五 2018-03-02 12:28:23 UTC; 3s ago
Process: 52882 ExecStart=/etc/xrdp/xrdp.sh start (code=exited, status=0/SUCCESS)
Main PID: 52893 (xrdp)
Tasks: 2 (limit: 512)
CGroup: /system.slice/xrdp.service
├─52893 /usr/sbin/xrdp
└─52895 /usr/sbin/xrdp-sesman
設定開機啟動
# systemctl enable xrdp
Created symlink from /etc/systemd/system/multi-user.target.wants/xrdp.service to /usr/lib/systemd/system/xrdp.service.
開啟 Azure 上面的 RDP ( port 3389 ) 防火牆設定 in Network Security Group
在 client 端:
使用 RDP 軟體來進行連線測試, 我是用 xfreerdp
> xfreerdp -u root SERVER_IP
出現登入畫面, 輸入帳號密碼
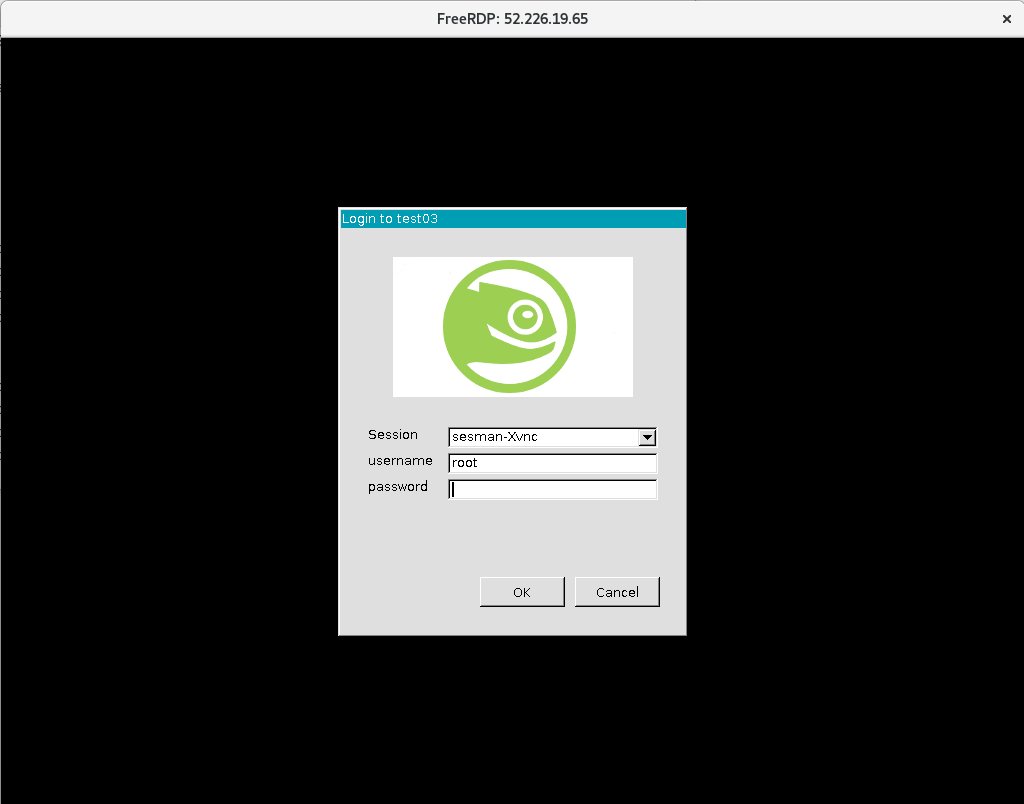
大功告成

終於解了之前心理的一個小問題
~ enjoy it
Reference:
沒有留言:
張貼留言